Burning Firmware
Preface
This section introduces how to burn a firmware from PC to the eMMC in the development Motherboard through a USB Type-C cable.
The firmware can only be burned when the development board in Maskrom mode or Loader mode.
Preparation
ROC-RK3308-CC development board
Firmware file
PC
USB Type-C cable
There are two kinds of firmwares generally:
A single image file update.img has integrated the bootloader, parameters and all partition images into one that for firmware release.
Multiple partition image files, such as kernel.img, rootfs.img, recovery.img and so on , they are generated during the development stage for easy debugging.
Here is the prepared official firmware. Please download and unzip. You can also build the firmware by youself.
PC OS support:
Windows XP (32/64 Bit)
Windows 7 (32/64 Bit)
Windows 8 (32/64 Bit)
Linux (32/64 Bit)
Windows
Burning RK firmware needs one of two tools as follows :
Mass-production tool RKBatchTool for flash the unified firmware(update.img)
Developer tool RKDevelopTool for flash partition firmware
Later, RK released AndroidTool to support burning a unified firmware (update.img) on the basis of RKDevelopTool. So only this tool is needed now.
RK USB driver should be installed before using AndroidTool . If the driver is mounted in advance, this step can be omitted.
Install RK USB driver
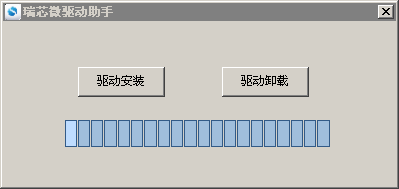
Download RK driver assistant, unzip and run DriverInstall.exe .
In order to make sure that the new driver is available for all devices, please select 驱动卸载 first, and then press 驱动安装.
Connect to the device
Take the following method to boot up at loader mode.
Power off device first, and then:
Taking one end of USB Type-C cable connect to the PC.
Press the
RECOVERYbutton on the device and hold on.Taking another end of USB Type-C cable connect to the device.
After 2 seconds, release the
RECOVERYbutton.
The PC should prompt that a new hardware is discovered and it’s configuring the driver. You should be able to find a new device “Rockusb Device” in the device manager, as shown in the following figure. If there isn’t, please return to the previous step and install the driver and try again.

Burning firmware
Download the AndroidTool, unzip and run AndroidTool.exe from AndroidTool_Release_xx directory (Note, if it’s Windows 7/ 8, please press the right mouse key and select to run as administrator), as shown bellow: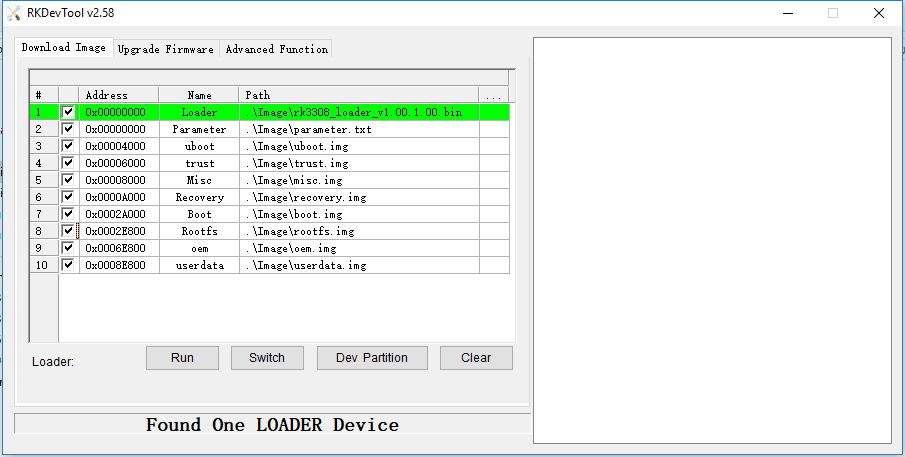
Burning a unified firmware
Steps for burning the unified firmware update.img are as follows:
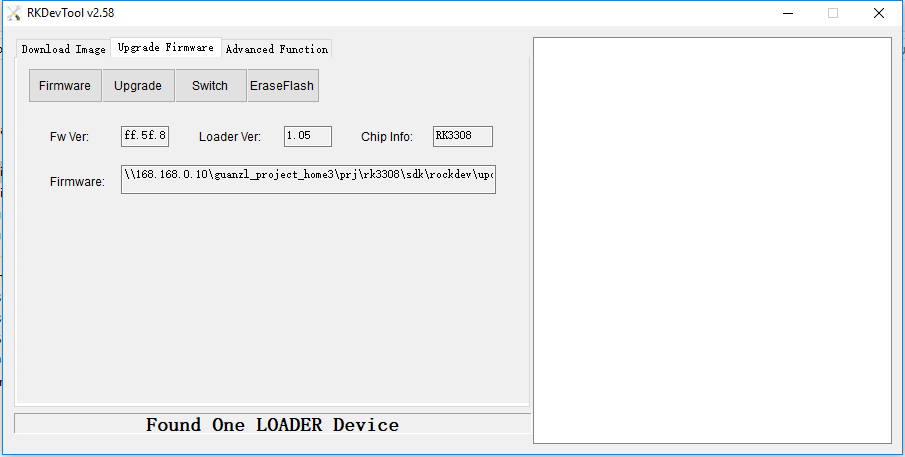
Switch to the
Upgrade Firmwarepage.Click
Firmwarebutton and open the firmware file to be updated. The update tool will display details of firmware information.Click
Upgradeto start upgrade.If the update fails, please try to Click
Erase Flashfirst and trying again.
Note: If the loader version of the firmware is different to the original one, please run Erase Flash first before updating the firmware.
Flash partition images
Steps for flash partition images are as follows:
Switch to
Download Imagepage.Check one or multiple partitions to be flash.
Make sure path of the image file is correct and click the right blank cell to reselect if necessary.
Click
Runbutton to start the update and the device will reboot automatically after the update.
Linux
RK offers a command-line upgrade_tool in Linux to support the flash of unified firmware update.img and partition images.
There is no need to install drivers on Linux system. Refer to Windows Section for Hardware Connection
upgrade_tool
Download Linux_Upgrade_Tool and install according to the following method for easy calls:
unzip Linux_Upgrade_Tool_v1.24.zip
cd Linux_UpgradeTool_v1.24
sudo mv upgrade_tool /usr/local/bin
sudo chown root:root /usr/local/bin/upgrade_tool
Flash unified firmware update.img:
sudo upgrade_tool uf update.img
Flash partition image:
sudo upgrade_tool ul rk3308_loader_v1.17.101.bin
sudo upgrade_tool di -p parameter.txt
sudo upgrade_tool di -u uboot.img
sudo upgrade_tool di -t trust.img
sudo upgrade_tool di -misc misc.img
sudo upgrade_tool di -r recovery.img
sudo upgrade_tool di -b zboot.img
sudo upgrade_tool di -rootfs rootfs.img
sudo upgrade_tool di -oem oem.img
sudo upgrade_tool di -userdata userdata.img
sudo upgrade_tool rd
If the update fails occur, please try low-level formatting and erasing flash:
sudo upgrade_tool lf   # low-level formatting
sudo upgrade_tool ef   # erasing flash
FAQ
How to force booting up at MaskRom mode
If the board cannot boot up at Loader mode, try to force booting up at MaskRom mode. Refer to How to Force Entry into MaskRom Mode for specific steps.