1. Introduction
This Ubuntu manual is applicable to Firefly Ubuntu Desktop & Minimal system. Some introductions related to UI display are only for Desktop system.

The features of Ubuntu Desktop system are as follows:
The desktop environment uses LXDE, Lubuntu+Firefly custom theme, simple and beautiful. (Ubuntu 20.04 uses LXQt)
Xserver uses GPU + RGA for 2D acceleration, runs smoothly, and takes up less CPU resources.
For embedded platforms, streamline system services.
Provide OpenGL and OpenCL support based on Arm Mali GPU.
Provide video hard codec support based on Rockchip VPU + Mpp.
Adapt to QT, Docker, Electron and other development frameworks.
Provide a series of interfaces to operate onboard resource devices.
The system adopts overlayfs file system, supports exporting rootfs, secondary packaging, restoring factory settings and other functionsa.
The features of Ubuntu Minimal system are as follows:
No desktop environment, less resources, after simplifying network management, only 40M memory.
For embedded platforms, streamline system services.
Adapt to QT, Docker, Electron and other development frameworks.
Provide a series of interfaces to operate onboard resource devices.
The system adopts overlayfs file system, supports exporting rootfs, secondary packaging, restoring factory settings and other functions.
2. Display version information
ffgo
The ffgo command provided by Firefly can easily view the firmware information, which is convenient for developers to debug and locate problems.
When users need to feedback information to Firefly, they need to attach the version information displayed by ffgo version.
root@firefly:~# ffgo
Usage:
         ffgo: show this usage
         ffgo update: update ffgo
         ffgo version: get version
         ffgo cmdlist: get support cmd list
         ffgo [cmd]: run cmd in cmd list

root@firefly:~# ffgo update
update success
root@firefly:~#  ffgo version
OS:      Ubuntu 18.04.5 LTS
MODEL:   Firefly RK3566-ROC-PC HDMI(Linux)
FIREFLY: v2.04-1-g618089a
DATE:    20210316-1035
KERNEL:  Linux version 4.19.172 (liaoxt@tchip16) (gcc version 6.3.1 20170404 (Linaro GCC 6.3-2017.05), GNU ld (Linaro_Binutils-2017.05) 2.27.0.20161019) #107 SMP Mon Apr 19 09:01:32
3. Change the device boot and desktop LOGO
Boot up LOGO
The boot logo is stored in the SDK/kernel. After modification, recompile the kernel.
linux-sdk/kernel/logo.bmp
linux-sdk/kernel/logo_kernel.bmp
Note: logo.bmp and logo_kernel.bmp should be the same image.
LOGO on the desktop
The following is the Ubuntu 18.04 LXDE desktop, restart the system after replacing the LOGO:
/usr/share/lubuntu/
├── images
│   └── lubuntu-ff-logo.png             # Small icon in the upper left corner of the desktop
└── wallpapers
    └── firefly-default-wallpaper.png   # desktop wallpaper
The Ubuntu 20.04 desktop system can be replaced directly in the desktop settings.
4. Multi-screen and Rotation
You can config the rotation of screen, and postiton, extension, copy of screens in system preferences.
The settings usually named “Monitor Settings” or “Display”.
If you are using touchscreens, multi-screen or rotation may has problems, here’s the solutions:
Screen rotated but the touch stays
So you need to rotate the touch, too. First use xinput to find the input device.
root@firefly:~# xinput
⎡ Virtual core pointer                          id=2    [master pointer  (3)]
⎜   ↳ Virtual core XTEST pointer                        id=4    [slave  pointer  (2)]
⎜   ↳ PixArt USB Optical Mouse                          id=7    [slave  pointer  (2)]
⎜   ↳ himax-touchscreen                                 id=10   [slave  pointer  (2)]
⎣ Virtual core keyboard                         id=3    [master keyboard (2)]
    ↳ Virtual core XTEST keyboard                       id=5    [slave  keyboard (3)]
    ↳ adc-keys                                          id=6    [slave  keyboard (3)]
    ↳ rk805 pwrkey                                      id=8    [slave  keyboard (3)]
    ↳ fe6e0030.pwm                                      id=9    [slave  keyboard (3)]
    ↳ himax-touchscreen                                 id=11   [slave  keyboard (3)]
In Virtual core pointer we can see the touch device is himax-touchscreen with id 10.
Then change the content of /etc/X11/xorg.conf.d/05-touchscreen.conf like this:
Section "InputClass"
        Identifier "ff_touchscreen"
        MatchProduct "himax-touchscreen"
        Driver "libinput"
        Option "CalibrationMatrix" "1 0 0 0 1 0 0 0 1"
EndSection
Identifier is just a name
MatchProduct need to be the device name we just found
And the key point is Option “CalibrationMatrix”
Normal it should be "1 0 0 0 1 0 0 0 1"
Rotate to left, change to "0 -1 1 1 0 0 0 0 1"
Rotate to right, change to "0 1 0 -1 0 1 0 0 1"
Invert (rotate 180), change to "-1 0 1 0 -1 1 0 0 1"
If you have more than one touchscreen, just add more InputClass to match.
Save the file and reboot to take effect.
Touch one screen but result shows on another screen
That is because input device is not mapping with the right output screen. First use xinput to find input device. Let’s say it is still himax-touchscreen id 10
Then use xrandr to find display device:
root@firefly:~# xrandr
Screen 0: minimum 320 x 200, current 2720 x 1280, maximum 8192 x 8192
HDMI-1 connected primary 1920x1080+0+0 (normal left inverted right x axis y axis) 0mm x 0mm
   1920x1080     60.00*+  59.94
   1920x1080i    60.00    59.94
   ......
   ......
   800x600       60.32
   720x480       60.00    60.00    59.94    59.94    59.94
DSI-1 connected 800x1280+1920+0 (normal left inverted right x axis y axis) 0mm x 0mm
   800x1280      59.98*+
There are two monitors, HDMI-1 and DSI-1, the himax-touchscreen is DSI-1, then start to map, run:
xinput map-to-output 10 DSI-1
10 is the id of himax-touchscreen, map it to DSI-1.
Now see if it works, if everything is fine, create a new file /etc/X11/Xsession.d/90-touchscreen-map, put the mapping cmd in that file to make it persistent.
5. Restore factory settings
Firefly Ubuntu supports restoring factory settings.
Note that this factory setting means that the device is restored to its initial state after the last firmware upgrade
root@firefly:~# recovery
Usage: update <option>

Options are:
        ota | update [path]:
                update firmware, if no path, use default path
                "/userdata/update.img"
                "/sdcard/update.img"
        factory | reset:
                reset to factory
Use recovery reset to restore to factory settings
6. Startup program
Firefly Ubuntu18.04 Desktop can use the following methods to set the boot-up program, but you need to pay attention to the operating permissions and current environment variables:
$ vim /home/firefly/.config/lxsession/Lubuntu/autostart
@/bin/mkdir /home/firefly/ssddd
Each command starts with @, and the above example will create the /home/firefly/ssddd directory
Firefly Ubuntu20.04 Desktop you can open LXQt start menu and click Preferences > LXQt Setings > Session Settings, choose Autostart page in the popped window to add autostart applications
Or you can add application’s .desktop file under /etc/xdg/autostart/
7. Use root to log in to the system interface
autologin-user=root
root@firefly:~# cat /etc/lightdm/lightdm.conf.d/20-autologin.conf
[Seat:*]
user-session=Lubuntu
autologin-user=root
8. On-screen keyboard
The official Ubuntu system comes with an on-screen keyboard, you can click to open it in the menu bar:
9. Sound configuration
Equipment generally has 2 or more audio devices. The most common ones are the audio output of headphones and HDMI. The following is an example of audio settings for users’ reference.
9.1. Specify audio device from the command line
The audio files that come with the system are in the /usr/share/sound/alsa/ directory, please check the sound card device before playing:
root@firefly:~# aplay -l
**** List of PLAYBACK Hardware Devices ****
card 0: rockchiphdmi [rockchip,hdmi], device 0: fe400000.i2s-i2s-hifi i2s-hifi-0 [fe400000.i2s-i2s-hifi i2s-hifi-0]
  Subdevices: 1/1
  Subdevice #0: subdevice #0
card 1: rockchiprk809co [rockchip,rk809-codec], device 0: fe410000.i2s-rk817-hifi rk817-hifi-0 [fe410000.i2s-rk817-hifi rk817-hifi-0]
  Subdevices: 1/1
  Subdevice #0: subdevice #0
Then specify the sound card to play audio, where device 0 of sound card card1 corresponds to the headphone port, and device 0 of card0 corresponds to HDMI. The general audio playback command is aplay -Dhw:0,0 Fornt_Center.wav, but the audio file that comes with the system is mono, so in order to prevent playback failure, you can follow the following command to play:
#Select the headphone port to output audio files
root@firefly:/usr/share/sounds/alsa# aplay -Dplughw:1,0 Front_Center.wav
Playing WAVE'Front_Center.wav': Signed 16 bit Little Endian, Rate 48000 Hz, Mono

#Select HDMI output audio file
root@firefly:/usr/share/sounds/alsa# aplay -Dplughw:0,0 Front_Center.wav
Playing WAVE'Front_Center.wav': Signed 16 bit Little Endian, Rate 48000 Hz, Mono
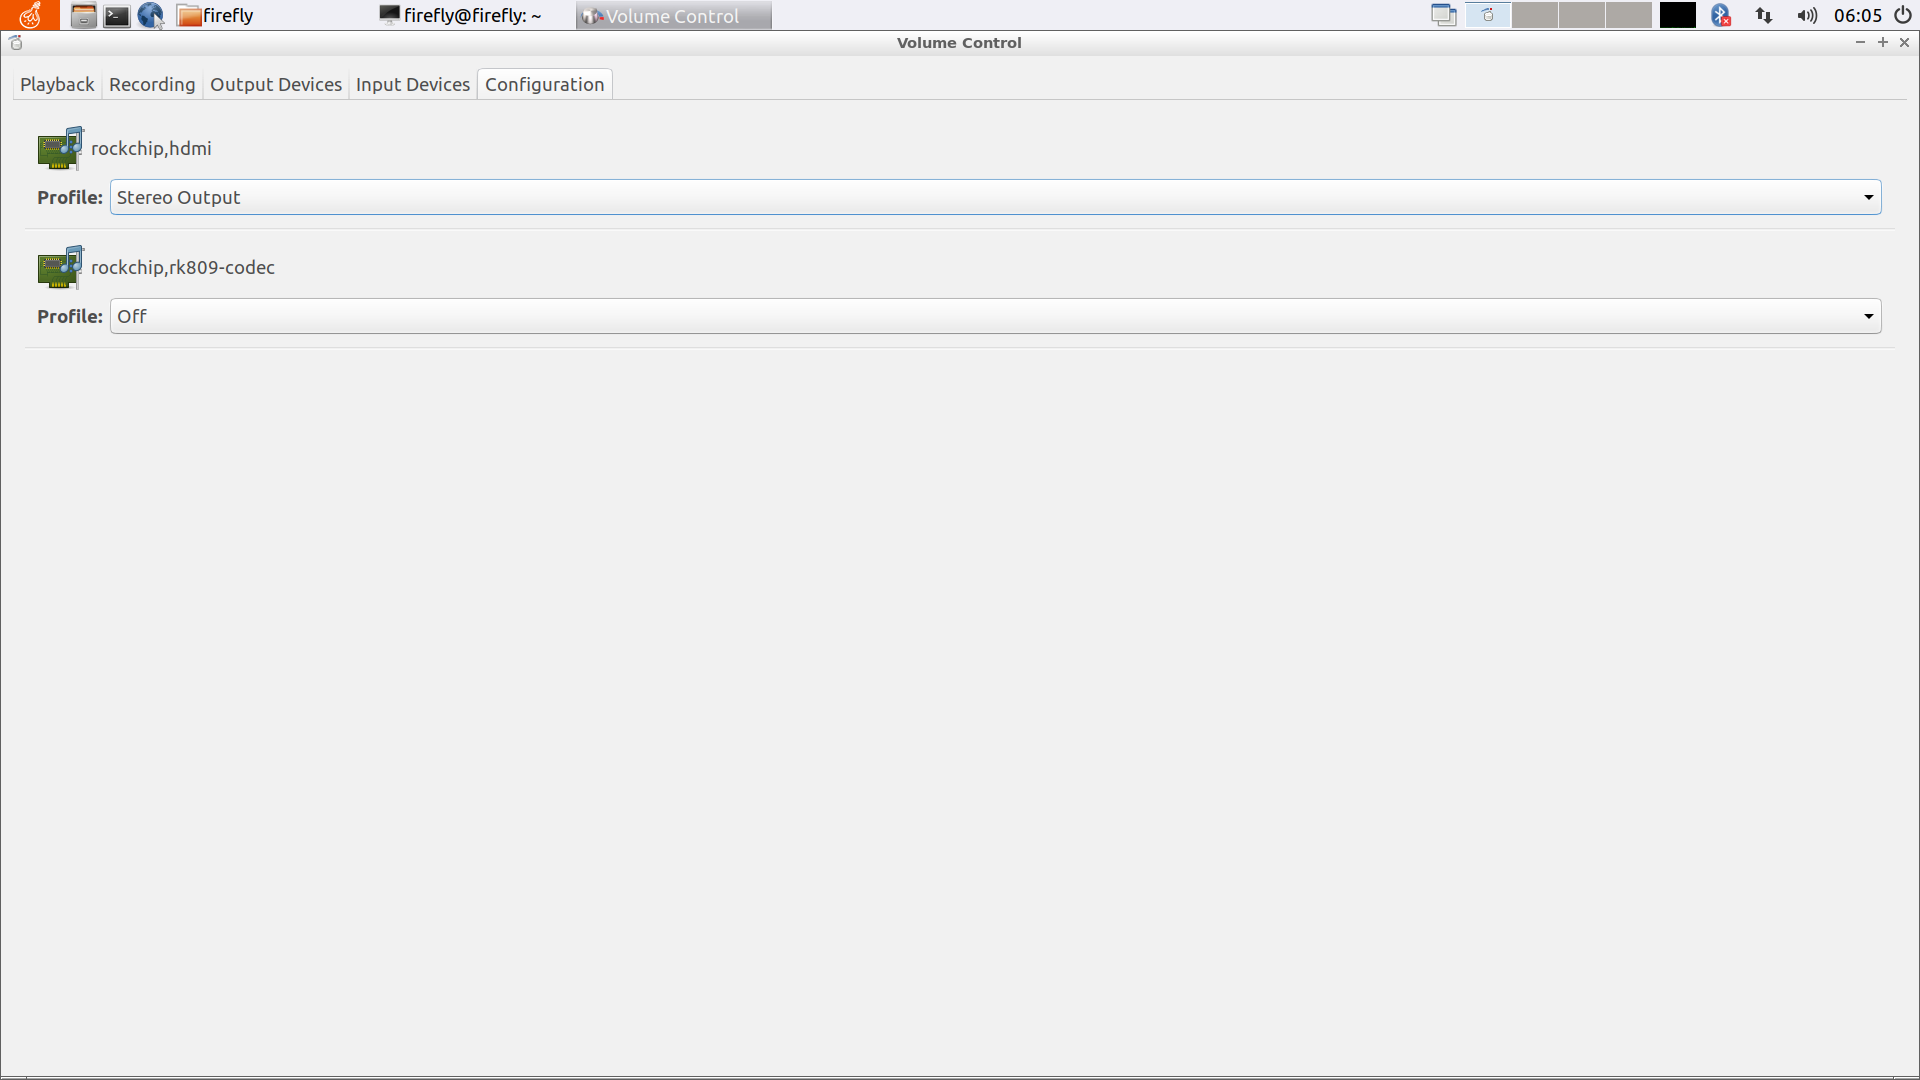
9.2. Select audio device in the graphical interface
In the graphical interface, play the prepared audio file, then click the sound icon to open the Sound Setting, and select the Configuration. You can see two sound card devices, for example, set to HDMI output audio, then set the HDMI sound card device to Output, and set the other sound card to Off. (If the HDMI is silent or low, you can try to increase the volume by pressing the physical button on the HDMI screen)
10. Serial port
There are two types of serial ports on the device, one is a common serial port and the other is a serial port converted from SPI through a conversion chip. The converted serial port has the same function as the ordinary serial port, but it is necessary to note that their device file names are different. The following is the difference between the two:
# Ordinary serial port
root@firefly:~# ls /dev/ttyS*
ttyS0 ttyS1 ttyS2 ttyS3

# SPI to serial port
root@firefly:~# ls /dev/ttysWK*
ttysWK0 ttysWK1 ttysWK2 ttysWK3
10.1. Set the baud rate
Take ttyS4 as an example to view the serial port baud rate command:
root@firefly:~# stty -F /dev/ttyS4
speed 9600 baud; line = 0;
-brkint -imaxbel
Set the baud rate command:
# Set the baud rate to 115200
root@firefly:~# stty -F /dev/ttyS4 ospeed 115200 ispeed 115200 cs8

# Check to confirm whether it has been modified
root@firefly:~# stty -F /dev/ttyS4
speed 115200 baud; line = 0;
-brkint -imaxbel
root@firefly:~#
10.2. Turn off echo
The echo function will affect our test results when doing the loopback test, so you need to turn off the echo in the loopback test or other special circumstances. The following is the command to turn off echo:
# Close back to display
root@firefly:~# stty -F /dev/ttyS4 -echo -echoe -echok

# Check the configuration of all functions and check whether it has been closed. "-" means the function has been closed
root@firefly:~# stty -F /dev/ttyS4 -a | grep echo
isig icanon iexten -echo -echoe -echok -echonl -noflsh -xcase -tostop -echoprt
echoctl echoke -flusho -extproc
10.3. Send and receive raw data
In actual applications, there may be differences between the actual data sent and the data we want to send, such as a carriage return or other special characters. Use stty to set the send and receive to raw mode to ensure that the raw data is sent and received. The following is the setting command:
root@firefly:~# stty -F /dev/ttyS4 raw
10.4. Operating mode
The serial port has two working modes: interrupt mode and DMA mode.
10.4.1. Interrupt mode
The kernel configures the serial port as interrupt mode by default, so no modification is required. The transmission rate in interrupt mode is relatively fast, but it is easy to lose packets or make mistakes when transferring large amounts of data, so please do not use interrupt mode when the amount of data is relatively large.
10.4.2. DMA mode
DMA mode is mainly used when transferring large amounts of data. The kernel will provide a buffer space for the serial port to receive data to minimize the packet loss rate of the serial port transmission.
Note: The default size of the buffer space limit is 8K. If one transfer exceeds the buffer size, packets will be lost, so if you use DMA mode, the sender needs to send in packets.
Device tree file configuration
&uart4 {
        status = "okay";
+       dmas = <&dmac_peri 8>, <&dmac_peri 9>;
+       dma-names = "tx", "rx";
};
The DMA mode cannot increase the transfer rate. On the contrary, the transfer rate will be reduced because of the need for buffering, so do not use the DMA mode if you do not need to transfer a large amount of data.
10.5. Flow Control
Whether it is interrupt mode or DMA mode, data transmission cannot be guaranteed to be foolproof, because when a large amount of data is transmitted for a long time, DDR, CPU frequency conversion or high occupancy rate may cause the upper layer to process the data in time and cause packet loss. At this time, it is necessary to use Flow control. There are two types of flow control, one is software flow control and the other is hardware flow control. Only the use of hardware flow control is introduced below.
10.5.1. Hardware Support
Hardware flow control needs hardware support, and the device’s serial port CTX and RTX pins need to be connected to the remote device.
Note: Not all serial ports of the device support hardware flow control, please confirm from the schematic diagram whether the hardware supports
10.5.2. Device tree file configuration
RK3568/RK3566:
uart3: serial@ff1b0000 {
        compatible = "rockchip,rk3568-uart", "snps,dw-apb-uart";
        reg = <0x0 0xff1b0000 0x0 0x100>;
        clocks = <&cru SCLK_UART3>, <&cru PCLK_UART3>;
        clock-names = "baudclk", "apb_pclk";
        interrupts = <GIC_SPI 101 IRQ_TYPE_LEVEL_HIGH 0>;
        reg-shift = <2>;
        reg-io-width = <4>;
        pinctrl-names = "default";
+       pinctrl-0 = <&uart3_xfer &uart3_cts &uart3_rts>;
        status = "disabled";
};
RK3399:
uart3: serial@ff1b0000 {
        compatible = "rockchip,rk3399-uart", "snps,dw-apb-uart";
        reg = <0x0 0xff1b0000 0x0 0x100>;
        clocks = <&cru SCLK_UART3>, <&cru PCLK_UART3>;
        clock-names = "baudclk", "apb_pclk";
        interrupts = <GIC_SPI 101 IRQ_TYPE_LEVEL_HIGH 0>;
        reg-shift = <2>;
        reg-io-width = <4>;
        pinctrl-names = "default";
+       pinctrl-0 = <&uart3_xfer &uart3_cts &uart3_rts>;
        status = "disabled";
};
RK3288:
uart4: serial@ff1c0000 {
        compatible = "rockchip,rk3288-uart", "snps,dw-apb-uart";
        reg = <0x0 0xff1c0000 0x0 0x100>;
        interrupts = <GIC_SPI 59 IRQ_TYPE_LEVEL_HIGH>;
        reg-shift = <2>;
        reg-io-width = <4>;
        clocks = <&cru SCLK_UART4>, <&cru PCLK_UART4>;
        clock-names = "baudclk", "apb_pclk";
        pinctrl-names = "default";
-       pinctrl-0 = <&uart4_xfer>;
+       pinctrl-0 = <&uart4_xfer &uart4_cts &uart4_rts>;
        status = "disabled";
};
10.5.3. Application layer settings
The upper layer also needs to open the flow control setting. Here is how to open the flow control in stty. If you are using other applications, please turn on the flow control from the application.
# Turn on flow control
root@firefly:~# stty -F /dev/ttyS4 crtscts

# Check whether the flow control is turned on, the "-" sign means that the function has been turned off
root@firefly:~# stty -F /dev/ttyS4 -a | grep crtscts
-parenb -parodd -cmspar cs8 hupcl -cstopb cread clocal crtscts
11. Video hardware codec support
The integrated VPU of RK3568/RK3566/RK3399/RK3288 has excellent video codec capabilities. Mpp is a set of video codec APIs provided by Rockchip for VPU, and is based on mpp. Rockchip provides a set of gstreamer codec plug-ins. Users can do video codec applications based on gstreamer according to their needs, or directly call mpp to achieve hardware codec acceleration.
The system provides a test video file located at /usr/local/test.mp4, the test file is 1080P, 24Fps, H264 encoding, Mp4 format.
There are several ways to verify and develop video codec related applications.
11.1. Gstreamer
Under Ubuntu 16.04, gstreamer has been installed in the
/opt/directory.Under Ubuntu 18.04 and 20.04, gstreamer has been installed in the system.
/usr/local/bin/h264dec.sh Test hardware H264 decoding.
/usr/local/bin/h264enc.sh Test hardware H264 encoding.
Users can refer to these two scripts to configure their own gstreamer application.
11.2. Mpv
The Mpv player provided by the system can directly call the rkmpp decoding plug-in.
11.3. FFmpeg
FFmpeg only supports hardware decoding through Mpp for Rockchip temporarily, and there is no hardware encoding support for the time being.
Firefly Ubuntu has installed FFmpeg, and users can use it directly.
Confirm rkmpp decoder
$ ffmpeg -decoders | grep "rkmpp"

 V..... h264_rkmpp h264 (rkmpp) (codec h264)
 V..... hevc_rkmpp hevc (rkmpp) (codec hevc)
 V..... vp8_rkmpp vp8 (rkmpp) (codec vp8)
 V..... vp9_rkmpp vp9 (rkmpp) (codec vp9)
Test commands
$ ffmpeg -y -c:v h264_rkmpp -i /usr/local/test.mp4 -an output.yuv
Special attention: FFmpeg h264_rkmpp decodes AV_PIX_FMT_DRM_PRIME, which is DRM frame data. If it is based on drm display, you can directly output the frame, otherwise, you need to use hwdownload to convert.
For more information, please refer to FFmpeg official website.
11.4. Mpp
Under Ubunut system, mpp related dev packages have been installed in the system.
For more related information, please refer to the relevant documents under
linux-sdk/docs/Linux/Multimedia
12. OpenGL&Vulkan
The latest version of the Kernel 6.1 SDK supports Panthor & Panfrost + MESA 25.0.7. Support OpenGL and Vulkan. (Currently supports the RK3588,RK3576 platform)
The official firmware still uses Mali DDK by default, which can be switched through scripts.
# The device needs to be connected to the internet
panfrost.sh

reboot
Confirm that the driver switch is successful:
root@firefly:~# dmesg | grep panth
[    7.702542] panthor fb000000.gpu-panthor: [drm] clock rate = 200000000
[    7.726356] panthor fb000000.gpu-panthor: EM: OPP:400000 is inefficient
[    7.726365] panthor fb000000.gpu-panthor: EM: OPP:300000 is inefficient
[    7.726438] panthor fb000000.gpu-panthor: EM: created perf domain
[    7.726673] panthor fb000000.gpu-panthor: [drm] mali-g610 id 0xa867 major 0x0 minor 0x0 status 0x5
[    7.726677] panthor fb000000.gpu-panthor: [drm] Features: L2:0x7120306 Tiler:0x809 Mem:0x301 MMU:0x2830 AS:0xff
[    7.726680] panthor fb000000.gpu-panthor: [drm] shader_present=0x50005 l2_present=0x1 tiler_present=0x1
[    7.742748] panthor fb000000.gpu-panthor: [drm] Firmware protected mode entry not be supported, ignoring
[    7.742813] panthor fb000000.gpu-panthor: [drm] Firmware git sha: 935af7024ac4bfdc31651dccbabd3467e749c51b
[    7.743365] panthor fb000000.gpu-panthor: [drm] CSF FW using interface v1.1.0, Features 0x0 Instrumentation features 0x71
[    7.744405] [drm] Initialized panthor 1.3.0 20230801 for fb000000.gpu-panthor on minor 2
Test OpenGL:
apt install glmark2
root@firefly:~# glmark2
=======================================================
    glmark2 2021.02
=======================================================
    OpenGL Information
    GL_VENDOR:     Mesa
    GL_RENDERER:   Mali-G610 (Panfrost)
    GL_VERSION:    3.1 Mesa 25.0.7-0ubuntu0.24.04.1
=======================================================
[build] use-vbo=false: FPS: 1799 FrameTime: 0.556 ms
Test Vulkan:
apt install vulkan-tools
root@firefly:~# vkcube
Selected GPU 0: Mali-G610, type: 1
13. OpenGL-ES
RK3568/RK3566/RK3399/RK3288 supports OpenGL ES1.1/2.0/3.0/3.1.
Firefly Ubuntu has provided complete OpenGL-ES support.
Test commands
$ sudo test_glmark2_normal.sh
webGL support
In the Chromium browser, type in the address bar: chrome://gpu to view the hardware acceleration support under Chromium.
Note:
EGL is an extension of OpenGL on the arm platform for the x window system, and its function is equivalent to the glx library under x86-64.
Because the Driver modesettings used by Xorg will load libglx.so by default (disabling glx will cause some applications that detect glx environment to fail to start), libglx.so will search for the dri implementation library in the system. However, RK3568/RK3566/RK3399/RK3288 Xorg 2D acceleration is implemented directly based on DRM and does not implement the dri library, so during the startup process, libglx.so will report the following error.
(EE) AIGLX error: dlopen of /usr/lib/aarch64-linux-gnu/dri/rockchip_dri.so failed
This has no effect on the operation of the system and does not need to be processed.
Based on the same reasoning, some applications will report the following errors during the startup process, and there is no need to deal with them, which will not affect the operation of the application.
libGL error: unable to load driver: rockchip_dri.so
libGL error: driver pointer missing
libGL error: failed to load driver: rockchip
In some versions of Ubuntu software previously released by Firefly, the loading of libglx.so is disabled by default. In some cases, the following errors will occur when running certain applications:
GdkGLExt-WARNING **: Window system doesn't support OpenGL.The correction method is as follows:
Delete the following three lines of configuration in
/etc/X11/xorg.conf.d/20-modesetting.conf.Section "Module" Disable "glx" EndSection
14. OpenCL
Firefly Ubuntu has added opencl1.2 support, you can run the built-in clinfo of the system to get platform opencl related parameters.
firefly@firefly:~$ clinfo
Platform #0
 Name: ARM Platform
 Version: OpenCL 1.2 v1.r14p0-01rel0-git(966ed26).f44c85cb3d2ceb87e8be88e7592755c3

 Device #0
   Name: Mali-T860
   Type: GPU
   Version: OpenCL 1.2 v1.r14p0-01rel0-git(966ed26).f44c85cb3d2ceb87e8be88e7592755c3
   Global memory size: 1 GB 935 MB 460 kB
   Local memory size: 32 kB
   Max work group size: 256
   Max work item sizes: (256, 256, 256)
…
15. FFMedia
15.1. Introduce
ffmedia is a video codec framework developed based on Rockchip Mpp/RGA. Supports audio aac codec. ffmedia includes the following units:
VI:
Camera: Support UVC, Mipi CSI
RTSP Client: Supports tcp, udp, and multicast protocols
RTMP Client: Support pull and push stream
File Reader: Support mkv, mp4, flv, ts, ps files and raw stream file reading
Memory Reader: Supports reading data from memory
Alsa Capture: Audio Capture
VP:
MppDec: Video decoding, support H264, H265, MJpeg
MppEnc: Video encoding, support H264, H265, MJpeg
RGA: Image blend, scaling, cropping, format conversion
AacDec: aac audio decoding
AacEnc: aac audio coding
VO:
DRM Display: libdrm-based display module
Renderer Video: Render video with gles, based on libx11 window display, extensible to other Windows display
RTSP Server: Supports tcp and udp push streams
RTMP Server: Support push stream
File Writer: Support mkv, mp4, flv, ts, ps file package and raw stream file saving
Alsa PlayBack: Audio playback
GB28181 Client: Support for video on demand
Source Code:https://github.com/Firefly-rk-linux-utils/ffmedia_release
15.2. Compile & Test
# Get ffmedia repository for arm64 environment
git clone https://github.com/Firefly-rk-linux-utils/ffmedia_release.git

# Get ffmedia repository for armhf environment
git clone https://github.com/Firefly-rk-linux-utils/ffmedia_release.git -b armhf

#See demo/Readme.md in the repository to install the required environment

# Compile
cd ffmedia_release
mkdir build
cd build
cmake ../
make

# Run test demo
## Run the demo to view the help information

$ ./demo
Firefly FFMedia: v2.3.2
INFO: ff_media: usage: Usage: ./demo <Input source> [Options]

Options:
-i, --input                  Input image size
-o, --output                 Output image size, default same as input
-a, --inputfmt               Input image format, default MJPEG
-b, --outputfmt              Output image format, default NV12
-c, --count                  Instance count, default 1
-d, --drmdisplay             Drm display, set display plane, set 0 to auto find plane, default disabled
    --connector              Set drm display connector, default 0 to auto find connector
-x, --x11                    X11 window displays, render the video using opengl. default disabled
-z, --zpos                   Drm display plane zpos, default auto select
-e, --encodetype             Encode encode, set encode type, default disabled
-f, --file                   Enable save source output data to file, set filename, default disabled
-p, --port                   Enable push stream, default rtsp stream, set push port, depend on encode enabled, default disabled
    --push_type              Set push stream type, default rtsp. e.g. --push_type rtmp
    --rtmp_url               Set the rtmp client push address. e.g. --rtmp_url rtmp://xxx
--rtsp_transport             Set the rtsp transport type, default udp.
                               e.g. --rtsp_transport tcp | --rtsp_transport multicast
-m, --enmux                  Enable save encode data to file. Enable package as mp4, mkv, flv, ts, ps or raw stream files, muxer type depends on the filename suffix.
                               default disabled. e.g. -m out.mp4 | -m out.mkv | -m out.yuv
-s, --sync                   Enable synchronization module, default disabled. Enable the default audio.
                               e.g. -s | --sync=video | --sync=abs
--audio                      Enable audio, default disabled.
--aplay                      Enable play audio, default disabled. e.g. --aplay plughw:3,0
--arecord                    Enable record audio, default disabled. e.g. --arecord plughw:3,0
-l, --loop                   Loop reads the media file.
--gb28181_user_id            Enable gb28181 client, default disabled. set user id
--gb28181_server_id          Set the server id of gb28181 client
--gb28181_server_ip          Set the server ip of gb28181 client
--gb28181_server_port        Set the server port of gb28181 client
-r, --rotate                 Image rotation degree, default 0
                               0:   none
                               1:   vertical mirror
                               2:   horizontal mirror
                               90:  90 degree
                               180: 180 degree
                               270: 270 degree

## Demonstration: The input is an rtsp camera with a resolution of 1080p, the decoded image is scaled to 720p and rotated 90 degrees, and the output is displayed on the monitor.
./demo rtsp://admin:firefly123@168.168.2.143 -o 1280x720 -d 0 -r 90

# See demo/Readme.md for more usage examples
16. RGA
Firefly Ubuntu has added RGA support. This article will describe librga.
16.1. Get version information
root@firefly:/usr/lib/aarch64-linux-gnu# strings librga.so |grep rga_api |grep version
16.2. Use process description
Apply for memory space->Enter picture data->Get buffer_handle->Wrap buffer_handle->Operation picture data->Output picture data
16.3. Three ways to apply for memory space
molloc
Function Prototype:void *malloc(size_t size)
Advantage:Simple, convenient and compatible
Disadvantage:slow
dma_buf_alloc
Function Prototype: int dma_buf_alloc(const char *path, size_t size, int *fd, void **va)
Advantage:Memory sharing, shared node at /dev/dma_heap/* ,fast
Disadvantage:Only 4G or less memory can be applied
drm_buf_alloc
Function Prototype:void *drm_buf_alloc(int TexWidth, int TexHeight, int bpp, int *fd, int *handle, size_t *actual_size, int flags=0)
Advantage:Memory sharing, fast
Disadvantage:libdrm libraries need to be installed
16.4. Interface for operating picture data
    //copy image(copy)
    imcopy(rga_buffer_t src,rga_buffer_t dst);
    //resize image(resize)
    imresize(rga_buffer_t src,rga_buffer_t dst);
    //crop image(corp)
    imcrop(rga_buffer_t src,rga_buffer_t dst,im_rect im_src_rect);
    //rotate image(rotate 90/180/270)
    imrotate(rga_buffer_t src,rga_buffer_t dst,RgaRotate rotation);
    //flip image(flip=H/V)
    imflip(rga_buffer_t src,rga_buffer_t dst,IM_USAGE FLIP);
    //translate image(translate)
    imtranslate(rga_buffer_t src,rga_buffer_t dst,int x,int y);
    //blend image(blend)
    imblend(rga_buffer_t src,rga_buffer_t dst);
    //Color space conversion(cvtcolor)
    imcvtcolor(rga_buffer_t src,rga_buffer_t dst,int src_format,int dst_format);
    //fill image(fill=blue/green/red)
    imfill(rga_buffer_t dst,im_rect im_dst_rect, 1);