7. HDMI-IN
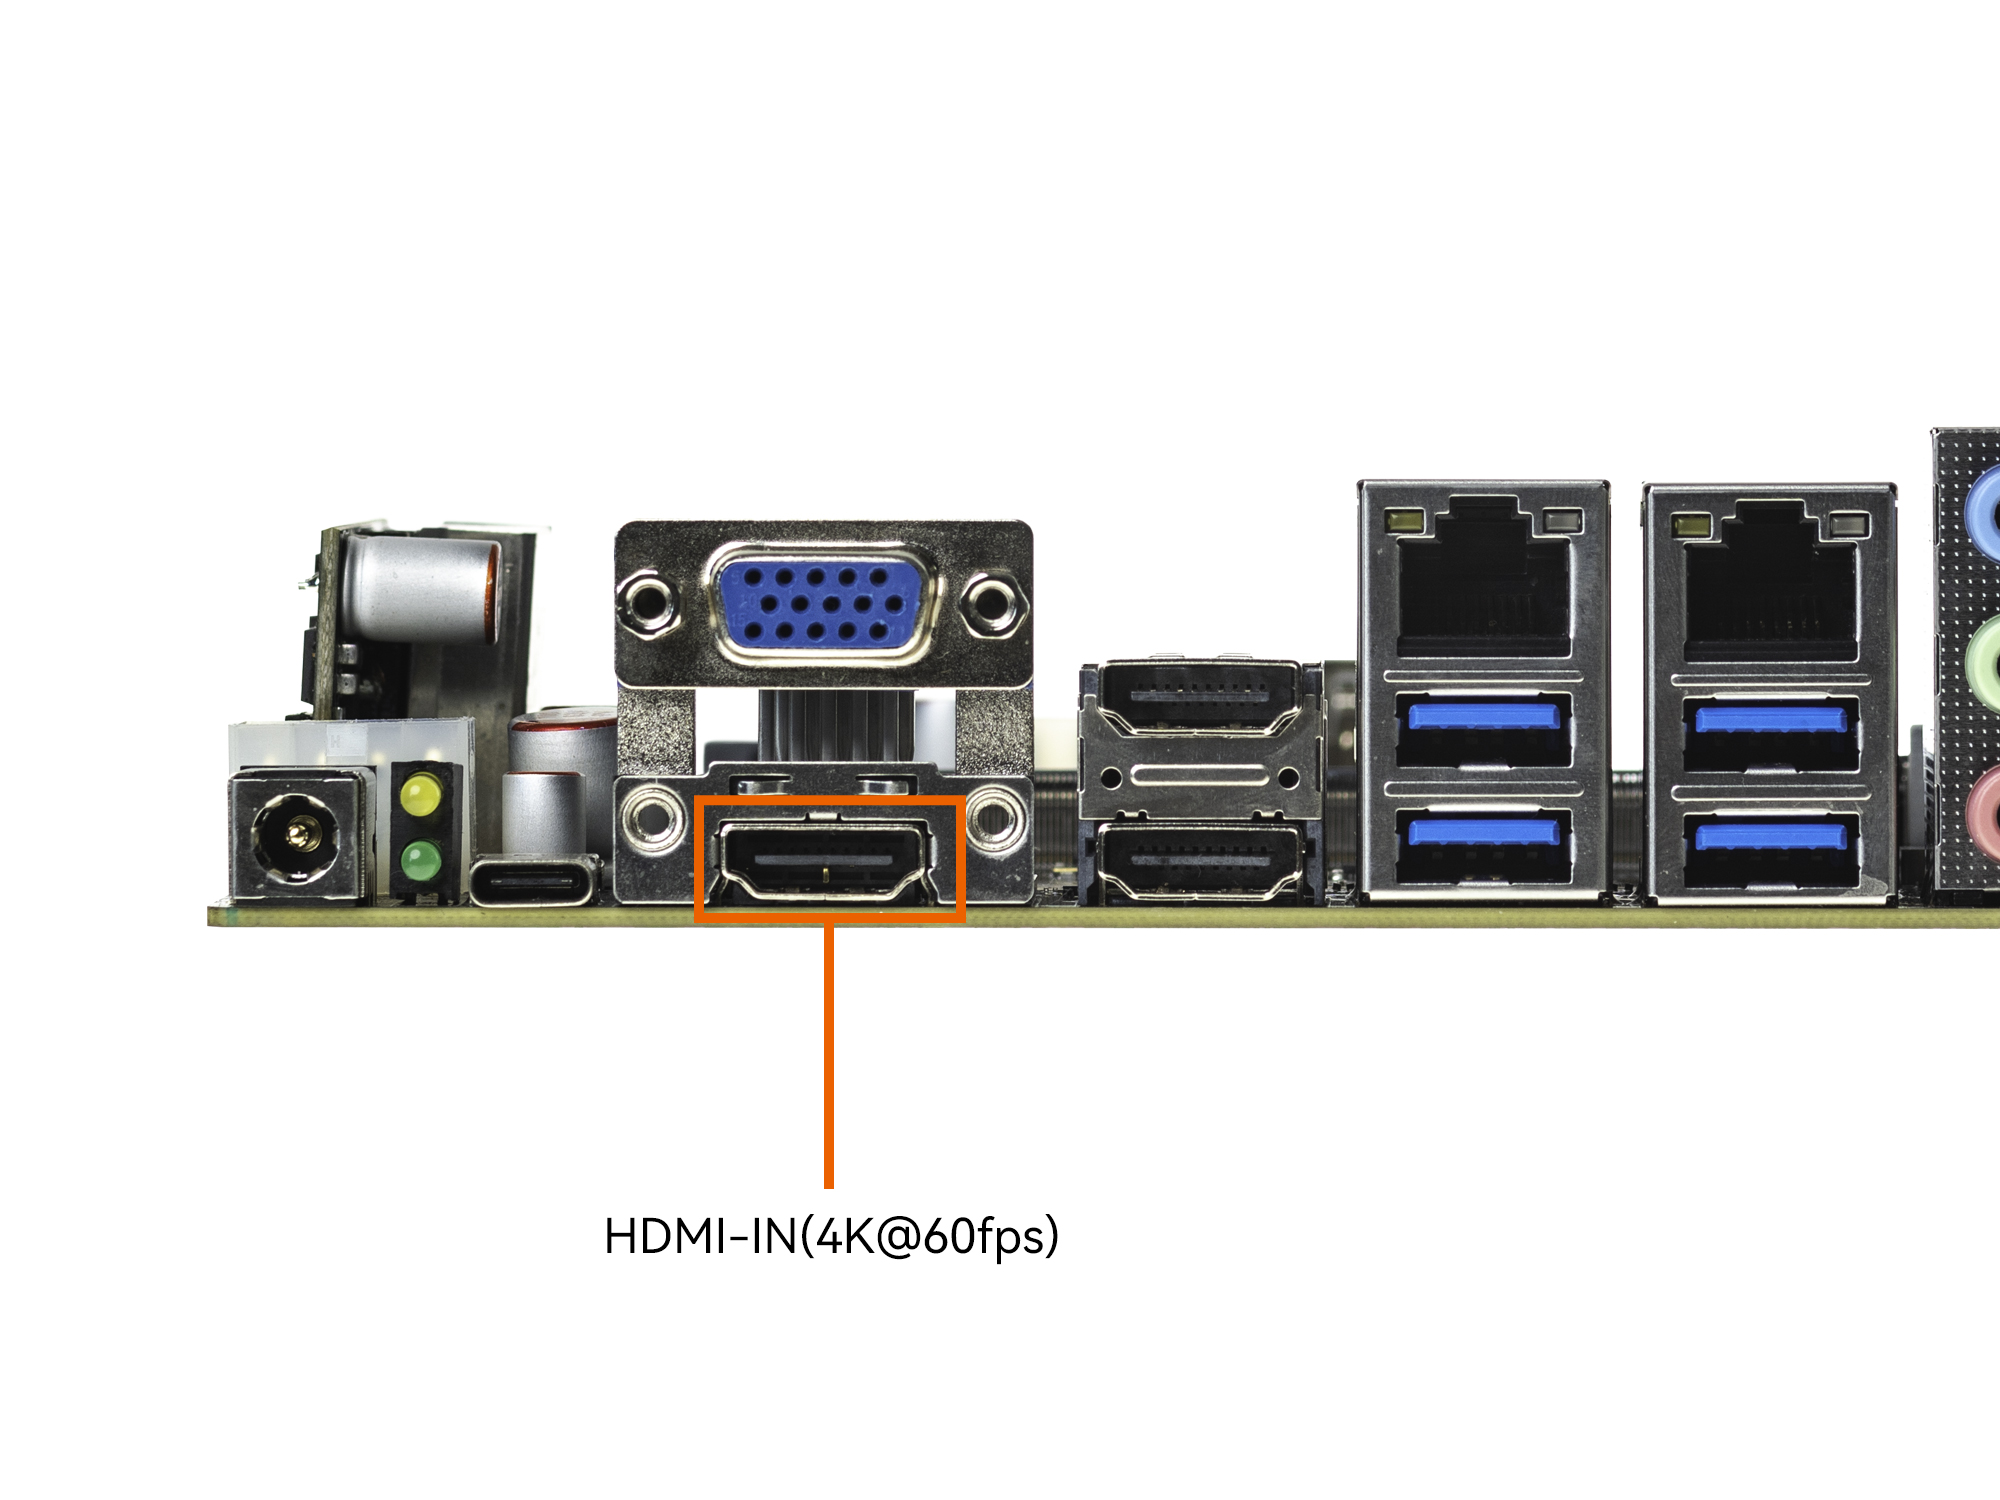
ITX-3588J has an HDMI-IN interface, which supports the standard HDMI2.0 protocol, It supports the following features:
HDMI 1.4b/2.0 RX: Up to 4K@60fps
Support FMT: RGB888/YUV420/YUV422/YUV444 8bit
Pixel clock: Up to 600MHz
HDCP1.4/2.3
CEC hardware engine
E-EDID configuration
S/PDIF 2channel output
I2S 2/4/6/8channel output
The interface diagram is as follows:
Currently, there are APK and command methods to debug HDMI-IN functions.
7.1. Android uses HDMI-IN
By default, the Android system of ITX-3588J have two APKs,one named Live Tv, another named RockchipCamera2,as shown below:
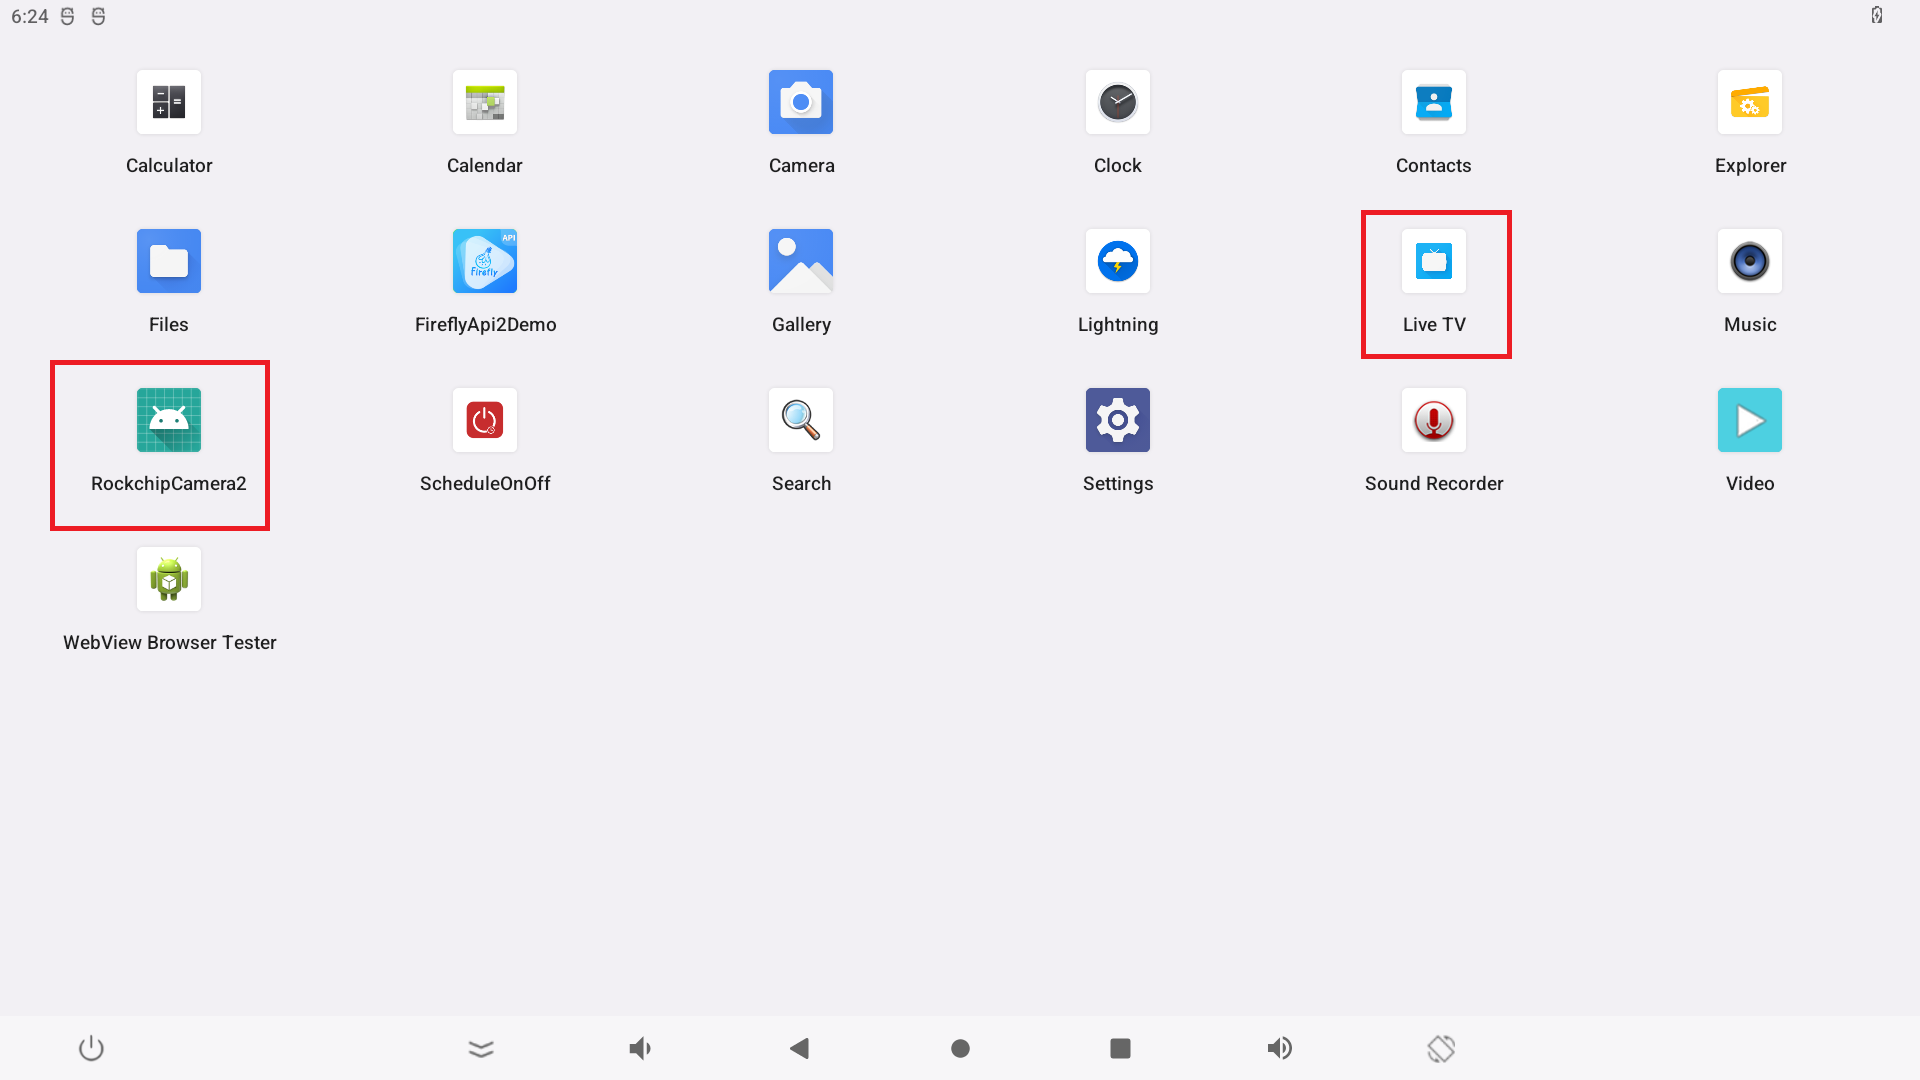
Directly click on the APK to display the video input of HDMI-IN, and the audio input of HDMI-IN will be output from the ITX-3588J headphone, HDMI, Display Port and other interfaces.
Note that on the software layer,Live Tv defaults to the Tv Hal layer and RockchipCamera2 defaults to the USB Camera Hal layer.
By default, RockchipCamera2 supports only NV12, NV16, and RGB3 input formats (so if the input source format is incorrect, the APK will open a black screen). The maximum input resolution supported is 3840x2160@30fps.Live Tv does not have these restrictions.
APK in the SDK corresponding source path:
Live Tv : path/to/sdk/packages/apps/TV/
RockchipCamera2 : path/to/sdk/packages/apps/rkCamera2/
7.2. Linux uses HDMI-IN
The Ubuntu firmware integrates the test_hdmirx.sh test script, just run the script directly, the script path: /usr/local/bin/test_hdmirx.sh.
#!/bin/bash

device_id=$(v4l2-ctl --list-devices | grep -A1 hdmirx | grep -v hdmirx | awk -F ' ' '{print $NF}')

v4l2-ctl -d $device_id --set-dv-bt-timings query

width=$(v4l2-ctl -d $device_id --get-dv-timings | grep "Active width" |awk -F ' ' '{print $NF}')
heigh=$(v4l2-ctl -d $device_id --get-dv-timings | grep "Active heigh" |awk -F ' ' '{print $NF}')

trap 'onCtrlC' INT
function onCtrlC () {
        echo 'Ctrl+C is captured'
        killall gst-launch-1.0
        exit 0
}

export XDG_RUNTIME_DIR=/run/user/1000
gst-launch-1.0 alsasrc device=hw:2,0 ! audioconvert ! audioresample ! queue !  alsasink device="hw:1,0" &
gst-launch-1.0 v4l2src device=$device_id ! queue ! video/x-raw,format=RGB ! capssetter replace = true caps="video/x-raw,format=BGR,width=$width,height=$heigh" ! glimagesink &

echo "[Ctrl + C] exit"
while true
do
        sleep 10
done
7.3. Debug command
7.3.1. Video debug
The HDMI-IN device will be registered as a video device in the kernel, and the generated node is: /dev/video8, you can use the v4l2-ctl command to obtain device information and capture frames.
Get device information
:/ # v4l2-ctl -d /dev/video8  -V -D
Driver Info:
        Driver name      : rk_hdmirx
        Card type        : rk_hdmirx
        Bus info         : fdee0000.hdmirx-controller
        Driver version   : 5.10.66
        Capabilities     : 0x84201000
                Video Capture Multiplanar
                Streaming
                Extended Pix Format
                Device Capabilities
        Device Caps      : 0x04201000
                Video Capture Multiplanar
                Streaming
                Extended Pix Format
Get the resolution information of the external device input
:/ # v4l2-ctl -d /dev/video8  -V
Format Video Capture Multiplanar:
        Width/Height      : 3840/2160
        Pixel Format      : 'NV12'
        Field             : None
        Number of planes  : 1
        Flags             : premultiplied-alpha, 000000fe
        Colorspace        : Unknown (1220e180)
        Transfer Function : Unknown (00000020)
        YCbCr Encoding    : Unknown (000000ff)
        Quantization      : Default
        Plane 0           :
           Bytes per Line : 3840
           Size Image     : 16588800
Grab the frame rate (need to set the resolution and pixel format)
:/ # v4l2-ctl  -d /dev/video8 --set-fmt-video=width=3840,height=2160,pixelformat='NV12' --stream-mmap=4  --stream-skip=10  --stream-poll --

VIDIOC_REQBUFS: ok
VIDIOC_QUERYBUF: ok
VIDIOC_QUERYBUF: ok
VIDIOC_QBUF: ok
VIDIOC_QUERYBUF: ok
VIDIOC_QBUF: ok
VIDIOC_QUERYBUF: ok
VIDIOC_QBUF: ok
VIDIOC_QUERYBUF: ok
VIDIOC_QBUF: ok
VIDIOC_STREAMON: ok
idx: 0 seq:      0 bytesused: 16588800 ts: 617.869692
idx: 1 seq:      1 bytesused: 16588800 ts: 617.888339 delta: 18.647 ms
idx: 2 seq:      2 bytesused: 16588800 ts: 617.904531 delta: 16.192 ms
idx: 3 seq:      3 bytesused: 16588800 ts: 617.921665 delta: 17.134 ms
idx: 0 seq:      4 bytesused: 16588800 ts: 617.937899 delta: 16.234 ms fps: 58.65
idx: 1 seq:      5 bytesused: 16588800 ts: 617.954531 delta: 16.632 ms fps: 58.94
idx: 2 seq:      6 bytesused: 16588800 ts: 617.971662 delta: 17.131 ms fps: 58.84
idx: 3 seq:      7 bytesused: 16588800 ts: 617.987897 delta: 16.235 ms fps: 59.22
idx: 0 seq:      8 bytesused: 16588800 ts: 618.004531 delta: 16.634 ms fps: 59.33
idx: 1 seq:      9 bytesused: 16588800 ts: 618.021230 delta: 16.699 ms fps: 59.39
idx: 2 seq:     10 bytesused: 16588800 ts: 618.037864 delta: 16.634 ms fps: 59.46
idx: 3 seq:     11 bytesused: 16588800 ts: 618.054561 delta: 16.697 ms fps: 59.50
idx: 0 seq:     12 bytesused: 16588800 ts: 618.071196 delta: 16.635 ms fps: 59.55
idx: 1 seq:     13 bytesused: 16588800 ts: 618.088322 delta: 17.126 ms fps: 59.46
idx: 2 seq:     14 bytesused: 16588800 ts: 618.104528 delta: 16.206 ms fps: 59.62
idx: 3 seq:     15 bytesused: 16588800 ts: 618.121653 delta: 17.125 ms fps: 59.53
idx: 0 seq:     16 bytesused: 16588800 ts: 618.137861 delta: 16.208 ms fps: 59.66
idx: 1 seq:     17 bytesused: 16588800 ts: 618.154989 delta: 17.128 ms fps: 59.59
idx: 2 seq:     18 bytesused: 16588800 ts: 618.171227 delta: 16.238 ms fps: 59.69
Save the captured frame as a file, here means to capture a frame and save it in
data/4kp60_nv12.yuv:/ # v4l2-ctl -d /dev/video8 --set-fmt-video=width=3840,height=2160,pixelformat='NV12' --stream-mmap=4 --stream-skip=10 --stream-to=/data/4kp60_nv12.yuv --stream-count=1 --stream-poll <<<<<<<<<<<
View the captured frame file on the PC
Window can use 7yuv tool
Linux can use the ffplay command
ffplay -f rawvideo -video_size 3840x2160 -pixel_format nv12 4kp60_nv12.yuv
7.3.2. Audio debug
Input audio can be recorded with the tinycap command.
View sound card devices
:/ # cat /proc/asound/card*

 0 [rockchipdp0    ]: rockchip_dp0 - rockchip,dp0
                      rockchip,dp0
 1 [rockchipes8388 ]: rockchip-es8388 - rockchip-es8388
                      rockchip-es8388
 2 [rockchiphdmiin ]: rockchip_hdmiin - rockchip,hdmiin
                      rockchip,hdmiin
 3 [rockchiphdmi0  ]: rockchip-hdmi0 - rockchip-hdmi0
                      rockchip-hdmi0
 4 [rockchiphdmi1  ]: rockchip-hdmi1 - rockchip-hdmi1
                      rockchip-hdmi1
As you can see, the sound card number of hdminrx (hdmiin) is 2, you can run the following commands to record and play audio when HDMI-IN has audio input.
Record audio
:/ # tinycap /sdcard/test.wav -D 2 -d 0
Play the recorded audio (specify HDMI0 as the sound card output)
:/ # tinyplay /sdcard/test.wav -D 3 -d 0