If the firmware is larger than 4G SD upgrade card making tutorial:
Because the SD_Firmware_Tool upgrade tool provided by RK, the upgrade partition made is in FAT32 format, so the supported firmware size is up to 4G. Now the FAT32 format partition should be reformatted to EXT4 format. (Note: The previous work is the same as the normal SD upgrade card, but in the end, you need to reformat the partition and put in the files required for the upgrade)
Ready to work
AIO-3399ProC
computer
MicroSD card (ie TF card)
Type-C data cable
USB card reader
Go to SD Firmware Tool Download Page to download SD_Firmware_Tool and unzip it.
Run SD_Firmware_Tool.exe
Download the SD card maker tool: SD_Firmware_Tool
You can modify the config.ini file, set
Selected=1to set the language to Chinese, setSelected=2to set the language to English.Download the unified firmware that needs to be upgraded to the motherboard.
Insert the MicroSD into the USB card reader and then into the USB port of the computer.
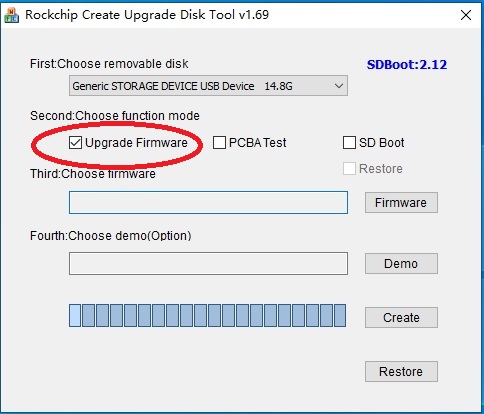
Open SD_Firmware_Tool, check the “Firmware Upgrade” box, select the correct removable disk device and upgrade the firmware.
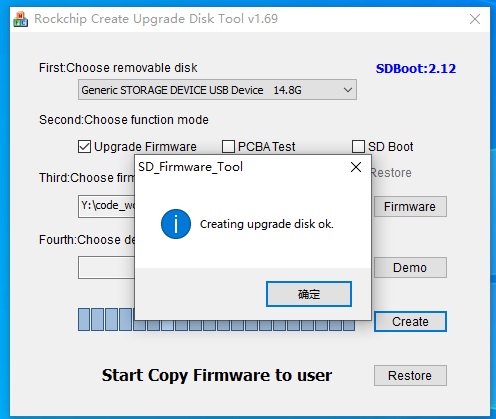
After clicking Start Creation, wait for the creation to finish.
Take out the MicroSD card, insert it into the MicroSD card slot of the motherboard, power on the motherboard, and the motherboard will automatically start to upgrade.
After the upgrade is complete, take out the MicroSD card and the motherboard will automatically restart to complete the entire firmware update process.
Prepare the required files
Because formatting will lose files, now you need to re-prepare the files required for MicroSD card upgrade
rksdfw.tag
sd_boot_config.config
sdupdate.img
mkdir my_tmp/
cd my_tmp/

#make empty rksdfw.tag
touch rksdfw.tag

#Make an upgraded configuration file sd_boot_config.config
echo "#rockchip sdcard boot config file for factory\
loader_update = 0\
display_led = 1\
display_lcd = 1\
pcba_test = 0\
fw_update = 1\
demo_copy = 0" > sd_boot_config.config

# Make firmware to be upgraded sdupdate.img
# Take firmware FIREFLY-RK3399-UBUNTU-18.04_DESKTOP-GPT.img as an example
cp ~/Downloads/FIREFLY-RK3399-UBUNTU-18.04_DESKTOP-GPT.img sdupdate.img

# Check for the existence of the following files
ls rksdfw.tag  sd_boot_config.config  sdupdate.img
Prepare the formatting script flash.sh provided by Firefly
#!/bin/bash

DISK=$1
MNT=$2

sudo umount $DISK
sudo mkfs.ext4 -F $DISK
sudo mount $DISK $MNT
sudo cp rksdfw.tag  sd_boot_config.config  sdupdate.img $MNT
sudo umount $MNT
Upgrade partition production
Notes (must see):
[sdc]1Please be sure to confirm which device node (sdb or sdc or other) the SD card entered is, so as not to damage the local system or cause greater production losses.If it is confirmed that the drive letter is sdc, then the operating device should be
/dev/sdc1rather than others.
# Check that the following files exist
ls rksdfw.tag  sd_boot_config.config  sdupdate.img

# Give flash.sh execute permission
chmod +x flash.sh

sudo ./flash.sh /dev/[sdc]1 /mnt/