Flashing to the eMMC
Foreword
There are two modes for upgrading firmware: RKUSB , Maskrom mode.Please according to your needs to choose the way of flashing
Ready to work
ROC-RK3399-PC-PLUS
Firmware
Host
Type-C cable
eMMC
12-2A Power Adapter
Host operating system support:
Windows XP (32/64)
Windows 7 (32/64)
Windows 8 (32/64)
Linux (32/64)
windows need to install RKUSB driver.
Download Release_DriverAssistant.zip ,extract the archive and run DriverInstall.exe inside.
Boot Mode
RKUSB Mode
RKUSB mode is the normal upgrade mode under normal circumstances,if the loader is damaged .it is necessary to force entry into Maskrom mode.
The device is disconnected from the power supply and all peripherals are disconnected
Type-C data cable is connected to the computer
Press and hold the RECOVERY button, the Type-C0 port is connected to the data cable, and the RECOVERY button is released for more than two seconds.
WARNING: : The ROC-RK3399-PC-PLUS power and firmware upgrades use the Type-C0 interface. When the power is supplied to the computer’s USB interface, the board cannot bring up some peripherals because the current is too small. Therefore, it is best to disconnect all peripherals before upgrading. **
Maskrom Mode
Normally, you don’t need to enter Maskrom mode. You only need to enter this mode if the loader is damageda.
Entering Maskrom mode involves hardware operation, please read carefully.
The device is disconnected from the power supply and all peripherals are disconnected
Type-C data cable is connected to the computer
Connect the eMMC CLK and GND pads with metal tweezers,the Type-C0 port is connected to the data cable, wait about 2 seconds before releasing the metal tweezers.
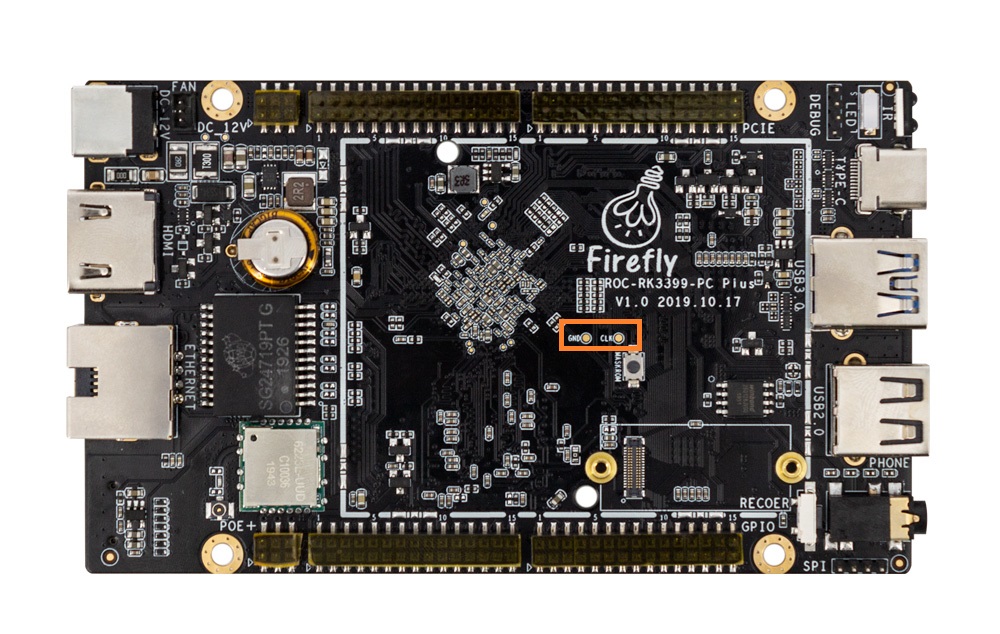
WARNING: :It is best to disconnect all peripherals before upgrading
Windows
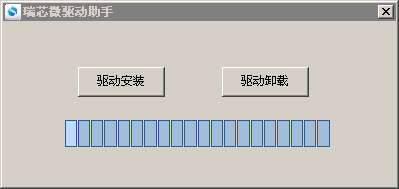
If your device is in RKUSB or Maskrom, you’ll find a Rockusb Device in the device manager.Appears as shown below,if not, you will need to go back to the previous step to reinstall Install Driver.

Prepare the upgrade tool
Download Androidtool_2.58(Must use 2.58 or above for downloading and recording),unzip and extract it. Locate the file named config.ini, and edit it by changing the 4th line from Selected=1 to Selected=2, in order to select English as the default user interface language.
If your device is in RKUSB, the status line will be “Found One LOADER Device”.
If your device is in Maskrom, the status line will be “Found One MASKROM Device”.
Androidtool is a tool developed for flashing Android RK Firmware, but it can also be used to flashing ubuntu
Flashing firmware
Flashing step:
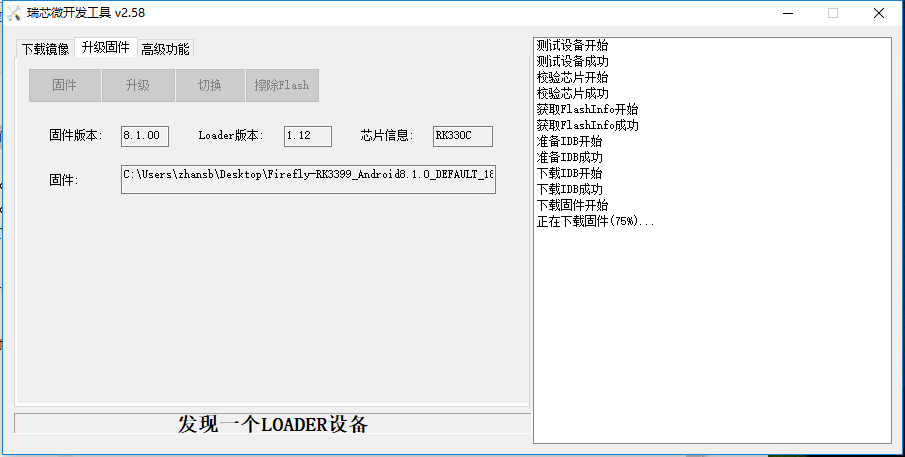
Switch to the “Upgrade Firmware” tab page.
Click the “Firmware” button, which will pop up a file dialog to open the RK Firmware file.
The firmware version, loader version and chip info will be read and displayed.(If the original firmware of the motherboard is Android firmware, and you need to upgrade the ubuntu firmware,Please perform step 4 first.):
Click the “Upgrade” button to flash.
**WARNING:**If the version of the firmware loader is inconsistent with the original firmware loader, please click “Erase Flash” before upgrading the firmware.
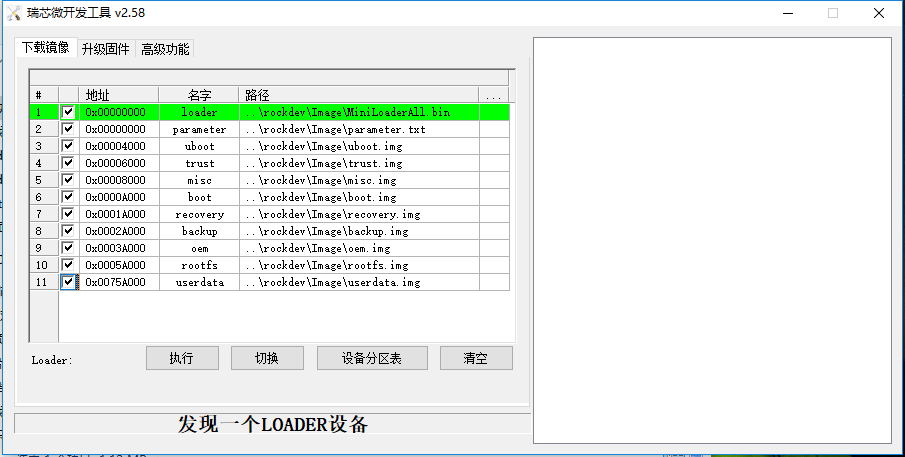
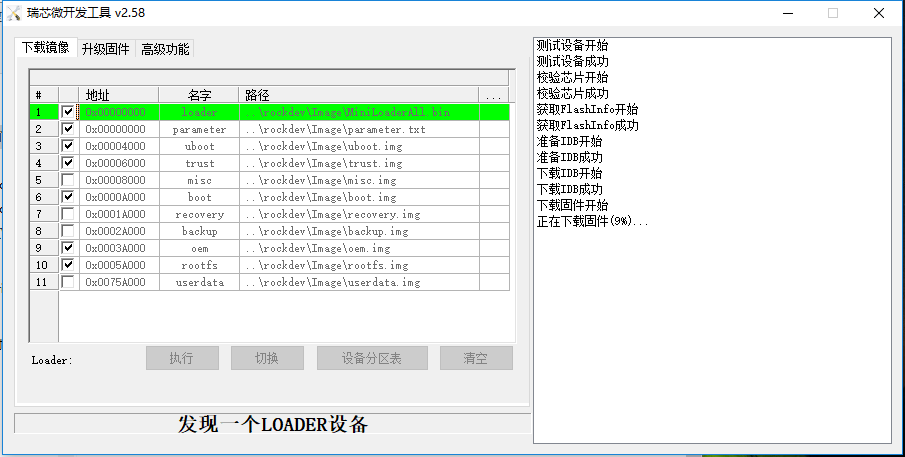
Partiton Image
Flashing partition image step:
Switch to the “Download Image” tab page.
Delete all others unused rows by selecting “Delete Item” from the right-click popup menu.
Add partition image to flash by selection “Add Item” from the right-click popup menu.
Click the right blank cell on the new line, which will pop up a file dialog to open the Partition Image file.
Click the “Run” button to flash.
Linux
Successfully entering the upgrade mode host will detect the new usb device
Tools
upgrade_tool:
git clone -b master https://github.com/FireflyTeam/tools.git
mv tools/linux/Linux_Upgrade_Tool/Linux_Upgrade_Tool/upgrade_tool /usr/local/bin/
Flashing firmware
ubuntu
Entering Maskrom mode or RKUSB mode,flashing RK Firmware(Maskrom only needed if the loder is damaged .)
sudo upgrade_tool uf update.img
sudo upgrade_tool rd     # reboot
WARNNING:The original firmware of the board is Android firmware, please do the following: Entering Maskrom mode or RKUSB mode:
# Erase flash. 	Using ef parameter needs to be selected Loader or update.img
sudo upgrade_tool ef update.img #update.img :ubuntu firmware
# flashing
sudo upgrade_tool uf update.img
android
Entering Maskrom mode or RKUSB mode、flashing RK Firmware(Maskrom only needed if the loder is damaged .)
sudo upgrade_tool uf update.img
sudo upgrade_tool rd     # reboot
Flashing Partition Image
ubuntu
Entering RKUSB mode、flashing RK Firmware(The original firmware of the board is ubuntu RK Firmware)
sudo upgrade_tool ul $LOADER
sudo upgrade_tool di -p $PARAMETER
sudo upgrade_tool di -uboot $UBOOT
sudo upgrade_tool di -trust $TRUST
sudo upgrade_tool di -b $BOOT
sudo upgrade_tool di -r $RECOVERY
sudo upgrade_tool di -m $MISC
sudo upgrade_tool di -oem $OEM
sudo upgrade_tool di -userdata $USERDATA
sudo upgrade_tool di -rootfs $ROOTFS
you can use Linux_SDK scirpt ./rkflash.sh
	./rkflash.sh boot
	./rkflash.sh uboot
	./rkflash.sh loader
	./rkflash.sh parameter
	./rkflash.sh trust
	./rkflash.sh recovery
	./rkflash.sh misc
	./rkflash.sh oem
	./rkflash.sh userdata
	./rkflash.sh rootfs
Android
Entering RKUSB mode、flashing RK Firmware(The original firmware of the board is Android RK Firmware)
	sudo upgrade_tool di -b /path/to/boot.img
	sudo upgrade_tool di -k /path/to/kernel.img
	sudo upgrade_tool di -s /path/to/system.img
	sudo upgrade_tool di -r /path/to/recovery.img
	sudo upgrade_tool di -m /path/to/misc.img
	sudo upgrade_tool di resource /path/to/resource.img
	sudo upgrade_tool di -p parameter
	sudo upgrade_tool ul bootloader.bin