Serial port debugging
Notes
The serial port for debugging and the TF card interface of Firefly-PX3-SE development board share the same signal pins, so you cannot use them at the same time.
Therefore, if you want to use the debug serial port, you need to pull out the TF card, and if you want to use TF card, please do not connect to the debug serial port.
Adapter selecion
There are many USB-to-serial adapters on online stores. According to the chips difference, we can devided them as:
PL2303
CH340
Generally, adapter equipped with CH340 chip has a more stable performance and thus a higher price.
Hardware connection
Serial to USB adapter with four different color cables:
Red: 3.3V power supply, you don’t need to connect it to the development board.
Black: GND, the GND cable of the serial port. Please connect it to the GND pin of the serial port on the development board.
White: TXD, the output cable of the serial port. Please connect it to the TX pin of the serial port on the development board.
Greem: RXD, the input cable of the serial port. Please connect it to the RX pin of the serial port on the development board.
Parameters for connection
Firefly-PX3-SE uses the following serial port parameters:
baud rate: 115200
data bits: 8
stop bit: 1
ddd-even check: None
flow control: None
Serial port debugging on Windows
Install driver
Download the driver and install it:
If you cannot use PL2303 in Win8 normally, please refer to This article and use an older version driver such as version 3.3.5.122 or lower.
Once you connect the adapter to your computer, the system will tell you that a new hardware is added and the system will initialize it. Afte that, you will find the corresponding COM interface in the device manager.

Install software
Generally, we use putty or SecureCRT tool on windows. Putty is an open source tool and we will introduce it here. SecureCRT usage is similar to Putty.
Go to Download putty and we recommend you to download putty.zip, because it contains other useful tools.
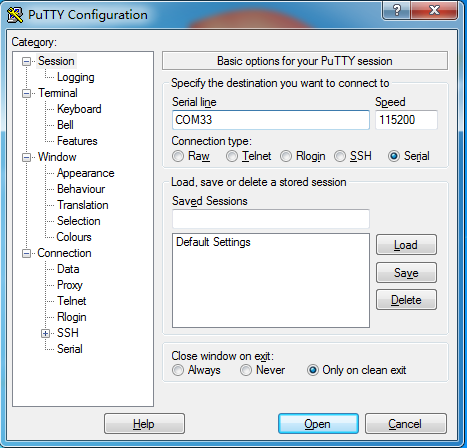
Decompress the package and run PUTTY.exe. Choose the Connection type as Serial, set the Serial line as the newly added COM interface you find in the device manager and set the Speed Baud rate as 115200, and then click Open:

Serial port debugging on Ubuntu
There are many choices on Ubuntu:
picocom
minicom
kermit
It is easy to use picocom. We will introduce this tool in the following part and other softwares are similar to it.
Install
sudo apt-get install picocom
If you have connected the serial port to the computer successfully, please check the serial port devices. For example, if the device name is ttyUSB0, you can use the following command to find it:
$ ls /dev/ttyUSB*
/dev/ttyUSB0
Run
$ picocom -b 115200 /dev/ttyUSB0
picocom v1.7

port is        : /dev/ttyUSB0
flowcontrol    : none
baudrate is    : 115200
parity is      : none
databits are   : 8
escape is      : C-a
local echo is  : no
noinit is      : no
noreset is     : no
nolock is      : no
send_cmd is    : sz -vv
receive_cmd is : rz -vv
imap is        :
omap is        :
emap is        : crcrlf,delbs,

Terminal ready
You will find in the above code that Ctrl-a is a escape charater. If you want to quit the terminal, just press Ctrl-a and Ctrl-q. In addition, there are some other frequently used control commands:
Ctrl-u: increase the Baud rateCtrl-d: lower the Baud rateCtrl-f: Switch among different flow control settings(hardware flow control technology RTS/CTS, software flow control technology XON/XOFF, no flow control)Ctrl-y: Switch among odd-even check (even, odd, none)Ctrl-b: Switch among data bits (5, 6, 7, 8)Ctrl-c: Switch for backing to local-echoCtrl-v: Display the current serial port parameters and status
