3. Technical Case

3.1. PaddlePaddle FastDeploy

3.1.1. Introduce

FastDeploy is an Easy-to-use and High Performance AI model deployment toolkit for Cloud, Mobile and Edge with out-of-the-box and unified experience, end-to-end optimization for over 150+ Text, Vision, Speech and Cross-modal AI models. Including image classification, object detection, image segmentation, face detection, face recognition, keypoint detection, matting, OCR, NLP, TTS and other tasks to meet developers’ industrial deployment needs for multi-scenario, multi-hardware and multi-platform.

Currently FastDeploy initially supports rknpu2, it can run some AI models on RK3588. Other models are still being adapted. For detailed support list and progress please visit github

3.1.2. On RK3588

3.1.2.1. Compilation and Installation

Notice: This manual is based on RK3588 Firefly Ubuntu20.04 v1.0.4a firmware and compiling with python 3.8. Firmware comes with rknpu2 v1.4.0 so here we will skip rknpu2 installation part. If you need C++ compilation or rknpu2 installaion please read Official Document: https://github.com/PaddlePaddle/FastDeploy/blob/develop/docs/cn/build_and_install/rknpu2.md

3.1.2.1.1. Prepare
sudo apt update
sudo apt install -y python3 python3-dev python3-pip gcc python3-opencv python3-numpy

Here we offering a pre-build python whl for fast deploy: Google Drive.

If you decide to use this pre-build package then you can skip the building part (Preparation above is still needed). This pre-build package is based on FastDeploy v1.0.0 (commit id c4bb83ee)

Notice: This project is updated very frequently, the pre-build whl here may be outdated, only for quickly understand and test. For develop and deploy please build from the latest source:

3.1.2.1.2. Building on RK3588
sudo apt update
sudo apt install -y gcc cmake

git clone https://github.com/PaddlePaddle/FastDeploy.git

cd FastDeploy/python

export ENABLE_ORT_BACKEND=ON
export ENABLE_RKNPU2_BACKEND=ON
export ENABLE_VISION=ON
export RKNN2_TARGET_SOC=RK3588
python3 setup.py build
python3 setup.py bdist_wheel

If your RK3588 has insufficient RAM, OOM error may occur, you can add -j N after python3 setup.py build to control jobs.

3.1.2.1.3. Installation on RK3588

You can find whl under FastDeploy/python/dist after building, or use pre-build package above. Use pip3 to install:

pip3 install fastdeploy_python-*-linux_aarch64.whl

3.1.2.2. Inference

Here are 3 tuned demos: Google Drive

Notice: This project is updated very frequently, demos here may be outdated, only for quickly understand and test. For develop and deploy please get latest models from official github mentioned at the beginning of this article.

decompress and run:

  • Picodet object detection

cd demos/vision/detection/paddledetection/rknpu2/python

python3 infer.py --model_file ./picodet_s_416_coco_lcnet/picodet_s_416_coco_lcnet_rk3588.rknn \
                 --config_file ./picodet_s_416_coco_lcnet/infer_cfg.yml \
                 --image 000000014439.jpg
  • Scrfd face detection

cd demos/vision/facedet/scrfd/rknpu2/python

python3 infer.py --model_file ./scrfd_500m_bnkps_shape640x640_rk3588.rknn \
                 --image test_lite_face_detector_3.jpg
  • PaddleSeg portrait segmentaion

cd demos/vision/segmentation/paddleseg/rknpu2/python

python3 infer.py --model_file ./Portrait_PP_HumanSegV2_Lite_256x144_infer/Portrait_PP_HumanSegV2_Lite_256x144_infer_rk3588.rknn \
                 --config_file ./Portrait_PP_HumanSegV2_Lite_256x144_infer/deploy.yaml \
                 --image images/portrait_heng.jpg

3.1.3. On PC

In the previous chapter, only the running environment was deployed on RK3588. Demo was converted and adjusted in advance on the PC. This means that further development such as model transformations, parameter adjustments, etc., will need to be done on the PC, so FastDeploy will also need to be installed on the x86_64 Linux PC.

3.1.3.1. Compilation and Installation

Needs: Ubuntu18 or above, python 3.6 or 3.8

3.1.3.1.1. Install rknn-toolkit2

Use conda or virtualenv to create a virtual environment for installation, for usage of conda or virtualenv please google it.

First go download the rknn_toolkit2 whl: github

sudo apt install -y libxslt1-dev zlib1g zlib1g-dev libglib2.0-0 libsm6 libgl1-mesa-glx libprotobuf-dev gcc g++

# Create virtual env
conda create -n rknn2 python=3.6
conda activate rknn2

# rknn_toolkit2 needs numpy 1.16.6
pip3 install numpy==1.16.6

# Install rknn_toolkit2
pip3 install rknn_toolkit2-1.4.0-*cp36*-linux_x86_64.whl
3.1.3.1.2. Build and Install FastDeploy
pip3 install wheel
sudo apt install -y cmake

git clone https://github.com/PaddlePaddle/FastDeploy.git
cd FastDeploy/python
export ENABLE_ORT_BACKEND=ON
export ENABLE_PADDLE_BACKEND=ON
export ENABLE_OPENVINO_BACKEND=ON
export ENABLE_VISION=ON
export ENABLE_TEXT=ON
# OPENCV_DIRECTORY is optional, it will download pre-build OpenCV if this option is empty
export OPENCV_DIRECTORY=/usr/lib/x86_64-linux-gnu/cmake/opencv4

python setup.py build
python setup.py bdist_wheel

pip3 install dist/fastdeploy_python-*-linux_x86_64.whl
pip3 install paddlepaddle

3.1.3.2. Examples and Tutorial

Many examples are under FastDeploy/examples, and tutorial can be found in README.md in every directory level.

3.2. Android in Container

AIC (Android in Container) means runing Android inside a container on Linux. RK3588 Linux can use docker to run Android and support running multiple Androids at the same time.

Cluster-Server with AIC can increase the amount of Androids, really helpful in cloud-mobile and cloud-gaming.

Here are some firmwares for testing: Download

3.2.1. Usage

Notice:

  1. The host OS is Ubuntu Minimal without desktop, so using debug serial, ssh, adb shell etc. to interact.

  2. Interaction with Android is through network adb and screen mirroring application like scrcpy, not by mouse/keyboard.

  3. Operation AIC requires the following knowledge: basic Linux commands, docker commands, adb commands.

3.2.1.1. Create Containers

Firmwares come with an docker image, only need to create containers. Use script under /root/docker_sh/ to create:

./docker_sh/run_android.sh rk3588:firefly <id> <ipv4_address>

# example
./docker_sh/run_android.sh rk3588:firefly 0 192.168.100.1

id is a number you give to containers for easy management, id will be a part of the container name.

ipv4_address is the ip you give to containers, it needs to be on the same subnet as the host and not in conflict with other devices or containers.

If you need more Androids, just run it again, and remember to change the id and ip.

3.2.1.2. Connect to Containers

In the same local network, use any PC with adb to connect.

# <ip> is the target container's ip
adb connect <ip>

# After connection
# Start scrcpy
scrcpy -s <ip>

We skipped the tutorial of installing adb and scrcpy, please google it if you need.

3.2.1.3. Manage Containers

Use common docker commands to manage containers.

# Check all containers
root@firefly:~# docker ps -a
CONTAINER ID   IMAGE            COMMAND                  CREATED      STATUS                    PORTS     NAMES
cad5a331dea9   rk3588:firefly   "/init androidboot.h…"   6 days ago   Exited (137) 6 days ago             android_1
37f60c3b6b80   rk3588:firefly   "/init androidboot.h…"   6 days ago   Up 13 seconds                       android_0

# Start/Stop containers
docker start/stop <NAMES>

# Connect to Android shell(run exit to return)
docker exec -it <NAMES> sh

# Delete containers
docker rm <NAMES>

If the subnet of host changed, then you need to re-config the macvlan and change containers’ ip.

Modify the parameters according to the actual situation.

docker network rm macvlan
docker network create -d macvlan --subnet=<SUBNET> --gateway=<GATEWAY> -o macvlan_mode=bridge -o parent=<PARENT> macvlan

Google for tutorial of changing docker container ip if you don’t know.

3.2.2. Performance

Run this cmd as root to enable performance mode to get better experience:

# It is normal to get an "Invalid argument", ignore it
root@firefly:~# echo performance | tee $(find /sys/devices -name *governor)
performance
tee: /sys/devices/system/cpu/cpuidle/current_governor: Invalid argument

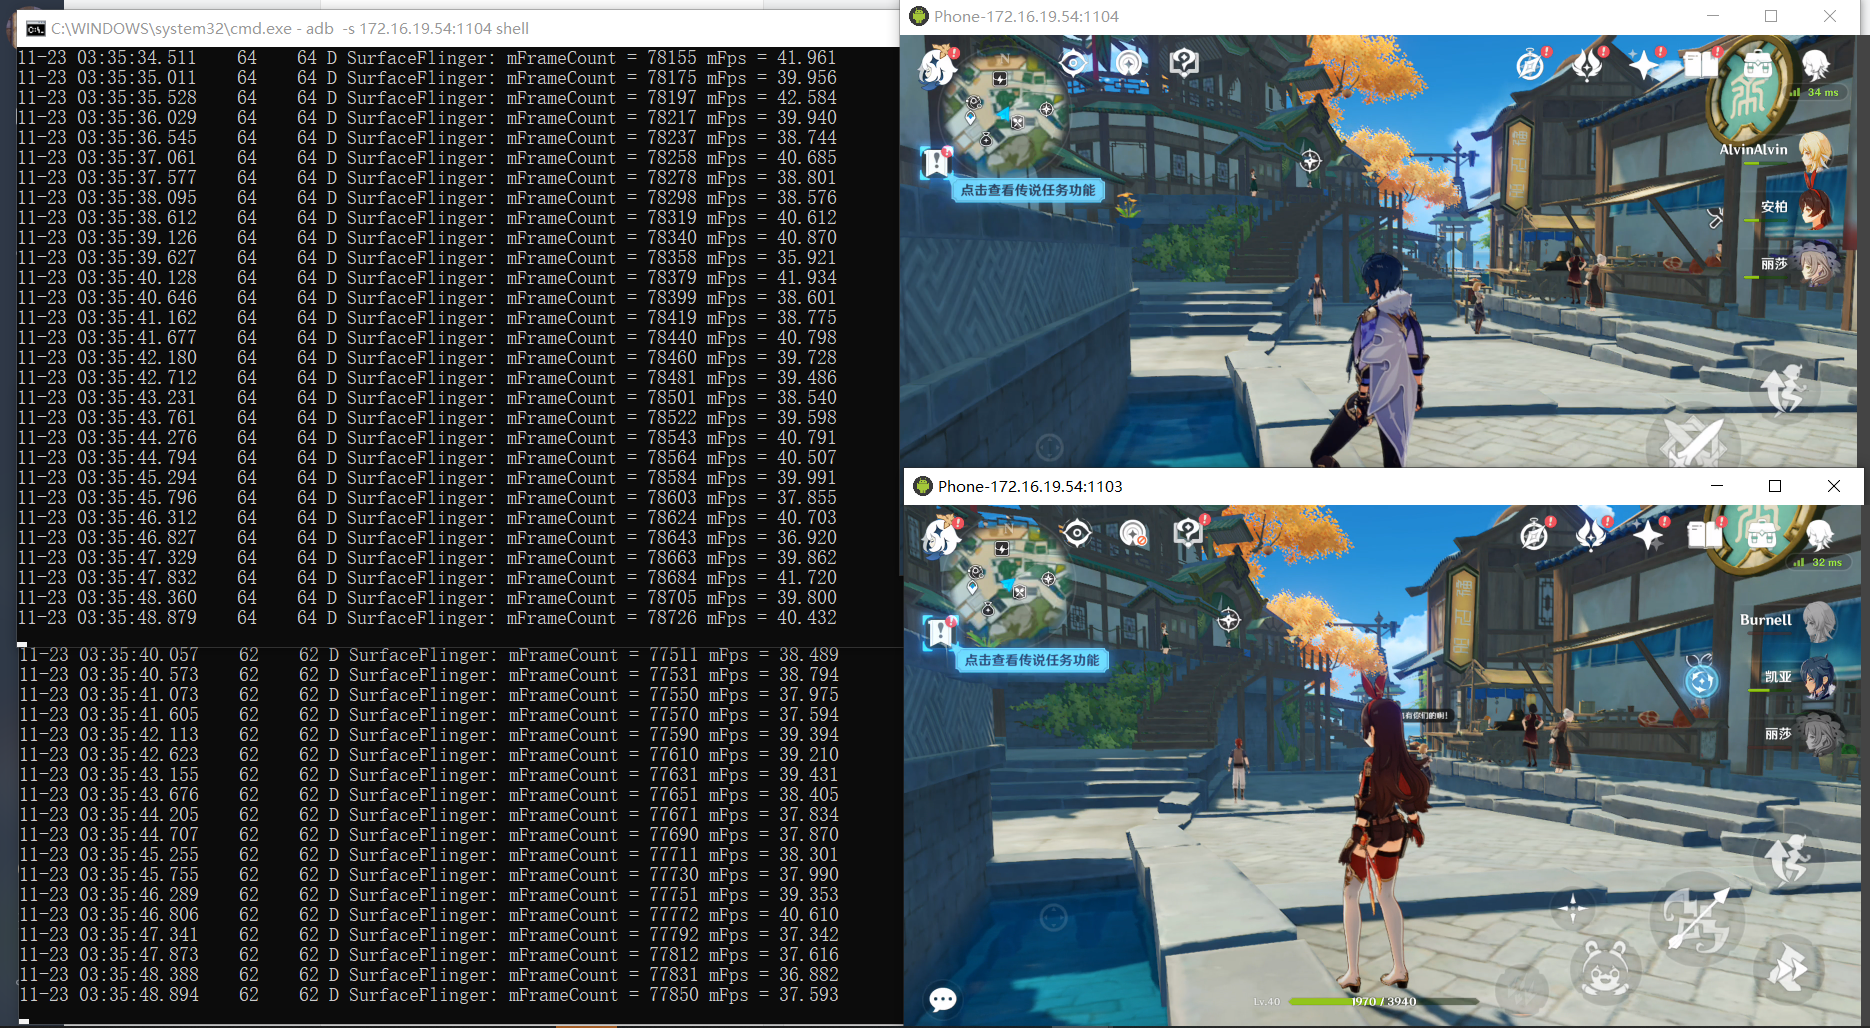
Enter Android terminal or use adb shell to run this cmd can print the game fps:

# Notice: This cmd prints fps only when the game is running
setprop debug.sf.fps 1;logcat -s SurfaceFlinger

One RK3588 using AIC running two Genshin Impact with highest graphic setting at the same time can reach 35+ fps: _images/aic_ys_performance.png

3.3. Rockit AVS

Platform limitations: Currently only verify support under platform 3588 Buildroot system. If you need to use it, please switch the external/rockit repository to the remote rk3588/avs branch.

3.3.1. AVS ADAPTS in Buildroot systems

source code path in SDK/external/rockit/mpi/example/mod, reference Rockit AVS added firefly_mpi_avs_test AVS program, using 6 road input isometric cylindrical projection of compression fusion splicing patterns, Add Mosaic image material, calibration file and program run file input and output path, has been integrated into buildroot.

diff --git a/mpi/example/mod/CMakeLists.txt b/mpi/example/mod/CMakeLists.txt
index 679c0b0..b6891df 100644
--- a/mpi/example/mod/CMakeLists.txt
+++ b/mpi/example/mod/CMakeLists.txt
@@ -76,6 +76,10 @@ set(RK_MPI_TEST_AVIO_SRC
     sys/test_sys_avio.cpp
 )

+set(FIREFLY_MPI_TEST_AVS_SRC
+    firefly_test_mpi_avs.cpp
+)
+
 #--------------------------
 # rk_mpi_ao_test
 #--------------------------
@@ -199,3 +203,15 @@ install(TARGETS rk_mpi_gdc_test RUNTIME DESTINATION "bin")
 add_executable(rk_mpi_avio_test ${RK_MPI_TEST_AVIO_SRC} ${RK_MPI_TEST_COMMON_SRC})
 target_link_libraries(rk_mpi_avio_test ${ROCKIT_DEP_COMMON_LIBS})
 install(TARGETS rk_mpi_avio_test RUNTIME DESTINATION "bin")
+
+#--------------------------
+# firefly_mpi_avs_test
+#--------------------------
+add_executable(firefly_mpi_avs_test ${FIREFLY_MPI_TEST_AVS_SRC} ${RK_MPI_TEST_COMMON_SRC})
+target_link_libraries(firefly_mpi_avs_test ${ROCKIT_DEP_COMMON_LIBS})
+install(TARGETS firefly_mpi_avs_test RUNTIME DESTINATION "bin")
+
+#--------------------------
+# add 6x_rectlinear data
+#--------------------------
+install(DIRECTORY "6x_rectlinear" DESTINATION "data/avs")
diff --git a/mpi/example/mod/firefly_test_mpi_avs.cpp b/mpi/example/mod/firefly_test_mpi_avs.cpp
new file mode 100644
index 0000000..9cfb68c
--- /dev/null
+++ b/mpi/example/mod/firefly_test_mpi_avs.cpp

3.3.2. AVS instructions

1.File path instructions

#Splice material path
/usr/data/avs/6x_rectlinear/input_image/image_data/
#Output path
/usr/data/avs/6x_rectlinear/output_res/
#Calibration file
/usr/data/avs/6x_rectlinear/avs_calib/calib_file.pto

2.Operating instruction

Execute the following command:

root@RK3588:/# chmod 777 /usr/data/avs/6x_rectlinear/firefly_prepare_avs_env.sh
root@RK3588:/# /usr/data/avs/6x_rectlinear/firefly_prepare_avs_env.sh
root@RK3588:/# firefly_mpi_avs_test

When the program runs, the bin format file of the splicing picture is repeatedly output to the specified path, and the default execution is 100 times

output: /usr/data/avs/6x_rectlinear/output_res/chn_out_8192x2700_0_0_nv12.bin

If the program library is missing or abnormally stuck, please copy the specified library file to /usr/lib/

#Copy the specified library file to /usr/lib/
cp /usr/data/avs/6x_rectlinear/lib/libgraphic_lsf /usr/lib/libgraphic_lsf.so
cp /usr/data/avs/6x_rectlinear/lib/libpanoStitchApp /usr/lib/libpanoStitchApp.so

Use YUView tool (Windows tool) to view YUV images in the material path, generate bin format file in the output path after demo runs, and drag the bin file into the YuView-item bar. Set W, H, YUVformat and other options to view the YUV picture (8192x2700-YUV(IL) 4:2:0 8-bit), the preview is as follows:

_images/avs_yuviewtool_preview.png

3.Material production The demo uses the image input format of yuv-nv12, jpg image material can be converted to yuv-nv12 format for testing, which needs to be calibrated by itself. The calibration file is calib_file.pto, which contains the image size, yaw Angle, pitch Angle, roll Angle and other splicing parameter information.

#jpg converted to yuv-nv12
ffmpeg -i camera_0.jpg -s 1520x2560 -pix_fmt nv12 camera_0.yuv

The calibration file is as follows:

root@RK3588:/usr/data/avs/6x_rectlinear/avs_calib# cat calib_file.pto

p w8378 h4189 f2 v360 u0 n"JPEG g0 q95"
m g0 i0

i n"camera_0.jpg" w2560 h1520 f0 y-113.603 r-90.9529 p30.5159 v90.12 a0.03 b-0.12737 c-0.0363 d0 e0 g0 t0

i n"camera_1.jpg" w2560 h1520 f0 y-68.4270 r89.24700 p32.1190 v90.24 a0.03 b-0.12737 c-0.0363 d0 e0 g0 t0

i n"camera_2.jpg" w2560 h1520 f0 y-26.2000 r-90.0960 p32.8350 v90.16 a0.03 b-0.12737 c-0.0363 d0 e0 g0 t0

i n"camera_3.jpg" w2560 h1520 f0 y22.40400 r90.50000 p32.8000 v90.29 a0.03 b-0.12737 c-0.0363 d0 e0 g0 t0

i n"camera_4.jpg" w2560 h1520 f0 y63.53500 r-89.1020 p31.5140 v90.26 a0.03 b-0.12737 c-0.0363 d0 e0 g0 t0

i n"camera_5.jpg" w2560 h1520 f0 y110.5400 r93.83400 p31.6180 v90.53 a0.03 b-0.12737 c-0.0363 d0 e0 g0 t0

3.3.3. Splicing performance test

The GPU is set to 1G and the dumpsys avs command is used to calculate the throughput of picture data to analyze the splicing performance.

#Set the userspace policy fixed frequency gpu, then set different frequencies, and compare the set voltage with the measured voltage
echo userspace > /sys/class/devfreq/ff400000.gpu/governor
#Set the frequency of the fixed frequency
echo 1000000000 > /sys/class/devfreq/ff400000.gpu/userspace/set_freq

In terms of splicing performance, the output resolution can be close to 22M@30fps (8192x2700). The test log is as follows:

-------------------------------------------------------------------------------
END DUMP OF SERVICE avs:
# dumpsys avs
-------------------------------------------------------------------------------
DUMP OF SERVICE avs:
---------------------- avs group attr ----------------------------
grp_id    mode           enable    pipe_num  is_sync   src_rate  dst_rate
0         BLEND          Y         6         N         -1        -1
---------------------- avs lut attr ----------------------------
grp_id    lut_data_acc   lut_data_path
0         HIGH           NONE
---------------------- avs output attr ----------------------------
grp_id    proj_mode                center_x  center_y  fov_x     fov_y
0         EQUIRECTANGULAR          4220      2124      28000     9500

          ori_yaw   ori_pitch ori_roll  yaw       pitch     roll
0         0         0         0         0         0         0

          middel_lut_path     calib_path          mask_path           mesh_alpha_path
0         NONE                /data/avs/6x_rectlinNONE                /data/avs/6x_rectlin
                              ear/avs_calib/calib_                    ear/avs_mesh/
                              file.pto
---------------------- avs channel attr ----------------------------
grp_id    chn_id    enable    width     height    is_compress    dym_range depth     src_rate  dst_rate  
0         0         Y         8192      2700      N              SDR8      3         -1        -1
---------------------- avs group work status ----------------------------
grp_id    cost_time max_cost_time  false_count
0         34        40             0
---------------------- avs pipe work status ----------------------------
grp_id    pipe_id_0 pipe_id_1 pipe_id_2 pipe_id_3 pipe_id_4 pipe_id_5 pipe_id_6 pipe_id_7
0         100       100       100       100       100       100       0         0
          0         0         0         0         0         0         0         0
---------------------- avs pipe queue ----------------------------
grp_id    pipe_id_0 pipe_id_1 pipe_id_2 pipe_id_3 pipe_id_4 pipe_id_5 pipe_id_6 pipe_id_7
  • Related parameter description:

    • pipe_num: Pipe Number

    • proj_mode: EQUIRECTANGULAR

    • cost_time: The current splicing task takes ms. The output frame rate of the splicing task is 1000(ms)/cost_time(ms). When cost_time approaches 33ms, the fps is 30fps

    • max_cost_time: Maximum time spent stitching history(ms)

    • pipe_id_0-pipe_id_7: Corresponds to the number of images received on the input Pipe/The number of discarded images corresponding to the input Pipe