1. FAQS
1.1. Build kernel, show “IO-Domain Checklist” Dialog
kernel new dts file arch/arm64/boot/dts/rockchip/rk3566-roc-pc-DEMO.dtsand when build kernel, will show dialog

Perform the following operations first
cp arch/arm64/boot/dts/rockchip/.rk3566-roc-pc.dtb.dts.tmp.domain arch/arm64/boot/dts/rockchip/.rk3566-roc-pc-DEMO.dtb.dts.tmp.domain
Do not change the IO-Domain. Otherwise, IO may be damaged in the worst case.
1.2. The use of ROC-RK3566-PC SPK and MIC
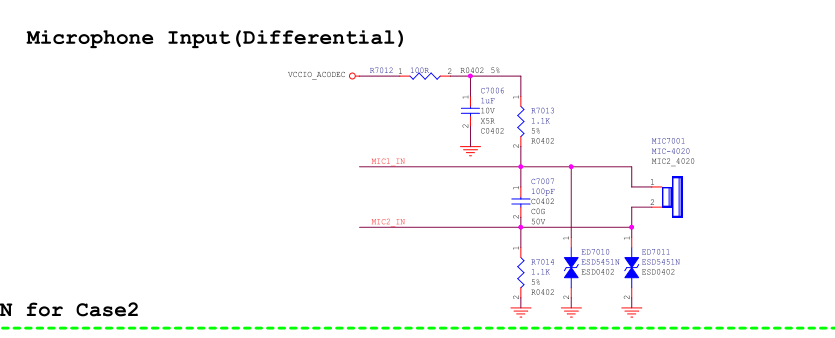
If you need to use ROC-RK3566-PC to debug SPK and MIC functions, you can use the external extended IO port for debugging. The software supports by default. Since the hardware signal is directly led out from codec, SPK only needs to be connected to the speaker, and MIC can be recorded only by adding bias circuit, as shown below

Notice: The hardware version of ROC-RK3566-PC V1.2 2022.01.22, MIC had added bias circuit.
1.3. RK3566 dual display
RK3566 Dual screen Display uses the same internal input Source, that is, VOP is the Same Source, Dual Display, so if MIPI screen is used as the main screen, the HDMI screen of the secondary screen will stretch(pic as below), so if you want to avoid this problem. Both the primary and secondary screens should be in the same direction (horizontal and vertical) with the same resolution.

1.4. Changes in kernel/buildroot configuration doesn’t take effect after compiling
After changing configuration through make menuconfig, compiling with build.sh and burning into device, the changes doesn’t take effect. Then you check the configuration and find out that the previous changes have disappeared.
That’s because the changes are only saved in temporary file .config. While compiling, build.sh will overwrite .config with configuration file.
So changes need to be saved in configuration file:
make ARCH=arm64 savedefconfig
mv defconfig arch/arm64/configs/firefly_linux_defconfig
Then use build.sh to compile.
1.5. Differences between V1.0 and V1.1 devices
1.5.1. V1.0 version
On V1.0 version devices, I2C2_M0 and I2C2_M1 are simultaneously drawn out by hardware, resulting in multiplexing. Therefore, MIPI CSI using I2C2_M1 and RTC and MIPI DSI touch parts using I2C2_M0 cannot be used at the same time. The default firmware for the V1.0 version of the device is enabling I2C2_M0 (it supports RTC and MIPI DSI and turns off MIPI CSI). If you need to enable MIPI CSI, then the SDK needs the following modifications
&i2c2{
	pinctrl-0 = <&i2c2m1_xfer>;
};
This makes the I2C2 use the M1 channel, while the touch part of the MIPI DSI and RTC is temporarily unavailable.
1.5.2. V1.1 and above version
On V1.1 and above version,MIPI CSI using I2C4_M0 and RTC and MIPI DSI touch parts using I2C2_M0.Therefore,there are no conflicts, and do not need to use the previous step to distinguish the use of the configuration.
1.6. HDMI can’t display 4K?
Automatically switching to 4K is temporarily not supported. The default display is 1080P. Support will be updated in the future.After setting the 4K resolution manually, you can use the following command to replug the HDMI cable:
# 4k60 setting:
setprop persist.sys.resolution.main 3840x2160@60
# Update sys.display.timeline every time you set it (add 1 each time) for resolution to take effect
setprop sys.display.timeline 1
1.7. The 3.5mm headphone jack is connected to the national standard headphone abnormal?
At present, ROC-RK3566-PC only supports the American standard type of headphones(CTIA). For the national standard type of headphones(OMTP), the hardware is not compatible, and there will be the phenomenon of dual sound channels in both the left and right channels.
1.8. What should I do if the boot is abnormal and restarts cyclically?
It may be that the power supply current is not enough. Please use a power supply with a voltage of 12V and a current of 2.5A~3A.
1.9. What is the default username and password for Ubuntu?
Username:
fireflyPassword:
fireflySwitch super user
sudo -s
1.10. Write number tool to write SN, MAC address
Note: If the eMMC erase operation is performed on the development board, the previously written data will also be cleared.
1.10.1. Windows way
Install RKDevInfoWriteTool
Select “RPMB” in Settings of RKDevInfoWriteTool
Configure “SN”, “WIFI MAC”, “LAN MAC”, “BT MAC”, etc. in the Settings of RKDevInfoWriteTool as needed
The development board enters loader mode
RKDevInfoWriteTool performs write or read operations
For specific operations, please refer to the PDF document “RKDevInfoWriteTool User Guide” under the RKDevInfoWriteTool installation directory.
1.10.2. Linux way
How to write the number of the development board itself
Buildroot enable
BR2_PACKAGE_VENDOR_STORAGERead and write operations through the vendor_storage command
vendor_storage -w VENDOR_SN_ID -t string -i cad895bedb8ee15f
vendor_storage -r VENDOR_SN_ID -t hex -i /dev/null
LAN MAC
vendor_storage -w VENDOR_LAN_MAC_ID -t string -i AABBCCDDEEFF
vendor_storage -r VENDOR_LAN_MAC_ID -t hex -i /dev/null
Others can be operated according to the prompt of `vendor_storage -h`.
For how to read the application, please refer to the vendor_storage_read function in buildroot/package/rockchip/vendor_storage/vendor_storage.c.
1.11. On Ubuntu system, if there is no sound after plugging in headphones, what should I do?
Menu -> Multimedia -> PulseAudio Volume Control -> Configuration -> Select the sound card that is working and turn off the other sound card.
1.12. How to make the system crawl LOG under Android?
1、Settings (settings) -> About tablet (about tablet) -> Click 7 times Build number (version number)
2、Settings (settings) ->System(system)->Advanced(advanced)-> Developer options (Developer options) -> Android LogSave. After the function is turned on, the log will be generated under the root directory of the system /data/vendor/logs, which includes the system logcat and kernel kmsg.
1.13. Problems encountered in compiling boot.img of Android
The system will boot in recovery mode without using BOOT_IMG to compile kernel, specify a boot.img like BOOT_IMG=../rockdev/Image-rk3566_roc_pc/boot.img when compiling kernel, the boot.img will update in directory SDK/kernel after compilation.
make ARCH=arm64 BOOT_IMG=../rockdev/Image-rk3566_roc_pc/boot.img rk3566-roc-pc.img -j8
If rockdev is not available, please compile the SDK completely first, and refer to Public Compile.
