2. Upgrade the firmware via USB cable
2.1. Introduction
This article describes how to upgrade the firmware file on the host to the flash memory of the development board through the USB cable. When upgrading, you need to choose the appropriate upgrade mode according to the host operating system and firmware type.
2.2. Prepare Tools
ROC-RK3399-PC development board
Firmware
host computer
Type-C data cable
2.3. Prepare Firmware
The firmware can be obtained by compiling the SDK, or you can download the public firmware (unified firmware) from the Resource download.There are two types of firmware files:
A single unified firmware
The unified firmware is a single file packaged and merged by all files such as the partition table, bootloader, uboot, kernel, system and so on. The firmware officially released by Firefly adopts a unified firmware format. Upgrading the unified firmware will update the data and partition table of all partitions on the motherboard, and erase all data on the motherboard.
Multiple partition images
That is, files with independent functions, such as partition table, bootloader, and kernel, are generated during the development phase. The independent partition image can only update the specified partition, while keeping other partition data from being destroyed, it will be very convenient to debug during the development process.
Through the unified firmware unpacking / packing tool, the unified firmware can be unpacked into multiple partition images, or multiple partition images can be merged into a unified firmware.
2.4. Install the Upgrade Tool
2.4.1. Windows Operating System
Install RK USB driver
Download Release_DriverAssistant.zip, extract, and then run the DriverInstall.exe inside . In order for all devices to use the updated driver, first select Driver uninstall(驱动卸载) and then select Driver install(驱动安装).

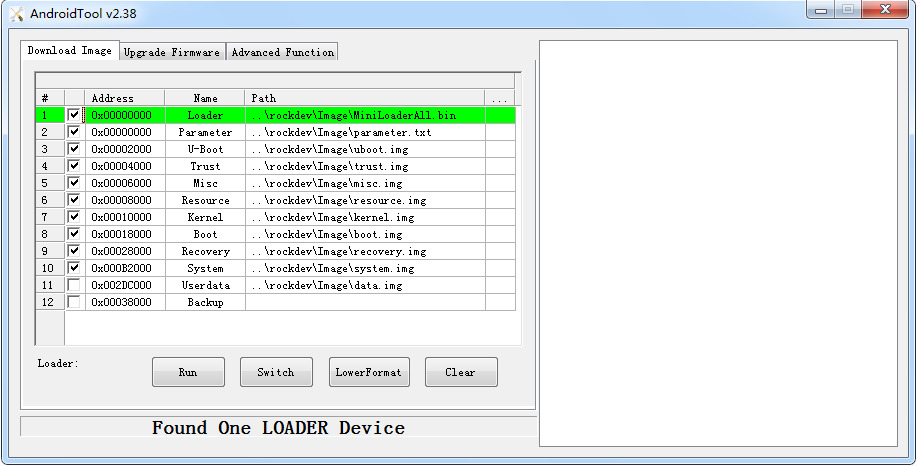
Download and run AndroidTool’s RKDevTool.exe
Note : Different firmware may use different versions of tools, please download the corresponding version according to the Instructions for writing with USB cable (important).
2.4.2. Linux Operating System
There is no need to install device driver under Linux. Please refer to the Windows section to connect the device.
Note : Different firmware may use different versions of tools, please download the corresponding version according to the Instructions for writing with USB cable (important).
Download Linux_Upgrade_Tool, And install it into the system as follows for easy invocation:
unzip Linux_Upgrade_Tool_xxxx.zip
cd Linux_UpgradeTool_xxxx
sudo mv upgrade_tool /usr/local/bin
sudo chown root:root /usr/local/bin/upgrade_tool
sudo chmod a+x /usr/local/bin/upgrade_tool
2.5. Enter Upgrade mode
Usually we upgrade firmware in two modes, namely Loader mode and MaskRom mode. Before we can write the firmware, we need to connect the device and put the board into upgradable mode.
2.5.1. Loader mode
2.5.1.1. Hardware way into Loader mode
Connect the device and press the RECOVERY button to enter the Loader mode. The steps are as follows:
Disconnect the power adapter first
Type-C data cable connect the device and the host.

Press and hold the RECOVERY button on the device.

plug in
After about two seconds, release the RECOVERY button.
2.5.1.2. Software way into Loader mode
After Type-C data cable is connected, run the following command on the serial debugging terminal or adb shell to the board:
reboot loader
2.5.1.3. Check the Loader mode
How to determine whether the board is in Loader mode, we can check through the tool
Windows Operating System
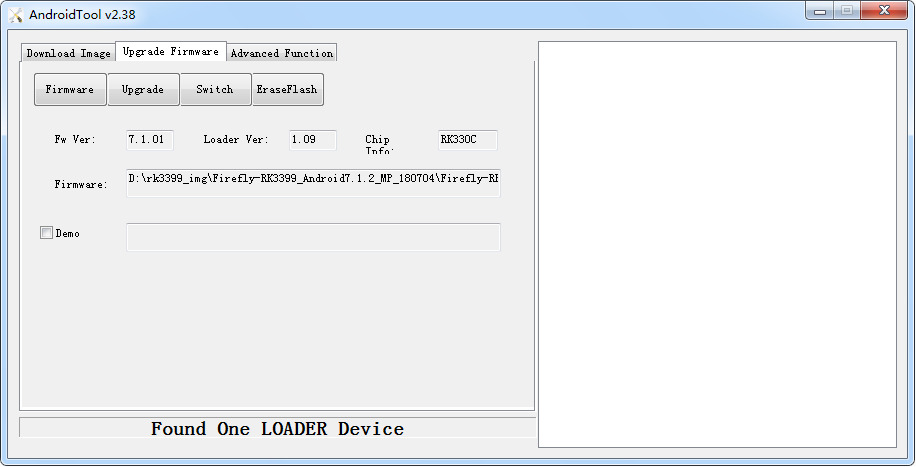
The AndroidTool displays the prompt Found One LOADER Device at the bottom

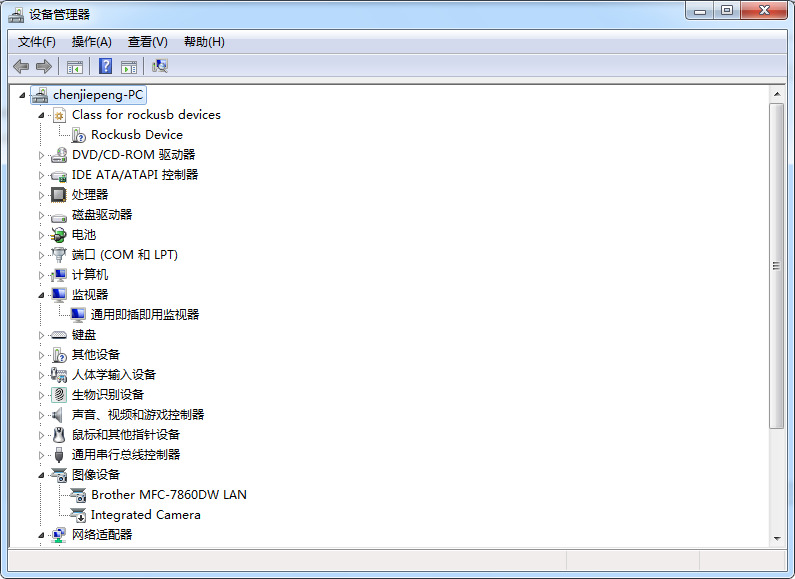
if the “Enter Loader mode” operation is performed, and the LOADER prompted by the upgrade tool is not displayed, check whether the Windows host computer you to discover new hardware and configure the driver. Open the Device manager and a new device Rockusb Device will appear, as shown below. If not, you can go back to the previous step to reinstall the driver.
Linux Operating System
After running upgrade_tool, you can see a Loader prompt in the connected device
firefly@T-chip:~/severdir/down_firmware$ sudo upgrade_tool
List of rockusb connected
DevNo=1 Vid=0x2207,Pid=0x330c,LocationID=106    Loader
Found 1 rockusb,Select input DevNo,Rescan press <R>,Quit press <Q>:q
2.5.2. MaskRom mode
To enter MaskRom mode, please refer to MaskRom mode.
2.6. Upgrade the firmware
2.6.1. Windows Operating System
2.6.1.1. Upgrade unified firmware - update.img
The steps to update the unified firmware update.img are as follows:
1.Switch to the Upgrade Firmware page.
2.Press the Firmware button to open the firmware file to be upgraded. The upgrade tool displays detailed firmware information.
3.Press the Upgrade button to start the upgrade.
4.If the upgrade fails, you can try to erase the Flash by pressing the EraseFlash button first, and then upgrade.Be sure to erase the upgrade according to Instructions for writing with USB cable (important)
2.6.1.2. Upgrade Partition image
Each firmware partition may be different, please note the following some points:
When upgrading
ubuntu(MBR)andAndroid7.1firmware withAndroidtool_2.38, the default configuration can be used.When upgrading
ubuntu(GPT)withAndroidtool_2.58, the default configuration can be used. Please first perform the following actions to upgradeAndroid8.1firmware:
Switch toDownload Imagepage; Right click on the table and selectimport configuration; Select therk3399-Android81.cfg.When upgrading
Android9.0andAndroid10.0firmware withAndroidtool_2.71, the default configuration can be used.
The steps to upgrade the partition image are as follows:
Switch to the
Download Imagepage.Check the partition to be burned, and select multiple.
Make sure the Path to the image file is correct. The path to the image file can be re-selected by clicking on the blank cell in the column to the right of
Path.Click
Runbutton to start the upgrade, and the device will restart automatically after the upgrade.

2.6.2. Linux Operating System
2.6.2.1. Upgrade unified firmware - update.img
sudo upgrade_tool uf update.img
If the upgrade fails, try erasing before upgrading. Be sure to erase and upgrade according to Instructions for writing with USB cable (important).
# erase flash : Using the ef parameter requires the loader file or the corresponding update.img to be specified.
# update.img :The ubuntu firmware you need to upgrade.
sudo upgrade_tool ef update.img
# upgrade again
sudo upgrade_tool uf update.img
2.6.2.2. Upgrade Partition image
Android7.1, Android8.1 use the following methods:
sudo upgrade_tool di -b boot.img
sudo upgrade_tool di -k kernel.img
sudo upgrade_tool di -s system.img
sudo upgrade_tool di -r recovery.img
sudo upgrade_tool di -m misc.img
sudo upgrade_tool di -re resource.img
sudo upgrade_tool di -p paramater
sudo upgrade_tool ul bootloader.bin
Android9.0、Android10.0 use the following way:
sudo upgrade_tool di -b boot.img
sudo upgrade_tool di -dtbo dtbo.img
sudo upgrade_tool di -misc misc.img
sudo upgrade_tool di -parameter parameter.txt
sudo upgrade_tool di -r recovery.img
sudo upgrade_tool di -super super.img
sudo upgrade_tool di -trust trust.img
sudo upgrade_tool di -uboot uboot.img
sudo upgrade_tool di -vbmeta vbmeta.img
Ubuntu (GPT) uses the following methods:
sudo upgrade_tool ul $LOADER
sudo upgrade_tool di -p $PARAMETER
sudo upgrade_tool di -uboot $UBOOT
sudo upgrade_tool di -trust $TRUST
sudo upgrade_tool di -boot $BOOT
sudo upgrade_tool di -recovery $RECOVERY
sudo upgrade_tool di -misc $MISC
sudo upgrade_tool di -oem $OEM
sudo upgrade_tool di -userdata $USERDATA
sudo upgrade_tool di -rootfs $ROOTFS
If the upgrade fails due to flash problems, you can try low-level formatting and erase nand flash:
sudo upgrade_tool lf update.img # low-level formatting
sudo upgrade_tool ef update.img # erase
2.7. FAQs
2.7.1. 1. How to forcibly enter MaskRom mode
A1 : If the board does not enter Loader mode, you can try to force your way into MaskRom mode. See operation method “How to enter MaskRom mode”.
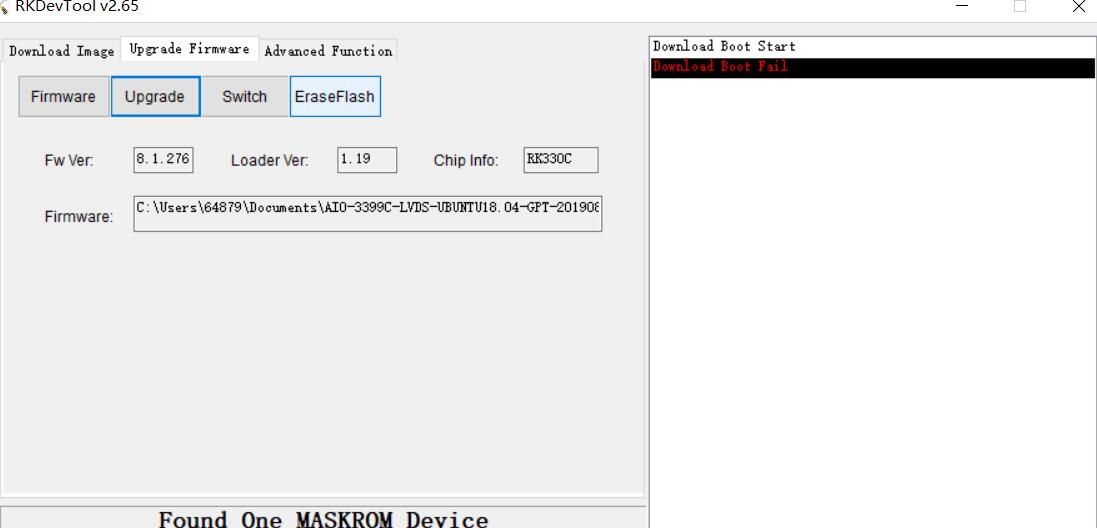
2.7.2. 2. Analysis of programming failure
If Download Boot Fail occurs during the programming process, or an error occurs during the programming process, as shown in the figure below, it is usually caused by the poor connection of the USB cable, the inferior cable, or the insufficient drive capability of the USB port of the computer. Troubleshoot the computer USB port.
