2. Firmware Upgrade
2.1. Boot mode description
2.1.1. Preface
AIO-PX30-JD4 has a flexible startup mode. Generally, the AIO-PX30-JD4 development board does not brick unless the hardware is damaged.
If the accident appeared in the process of upgrading, bootloader damage, leading to unable to upgrade again, while still can enter MaskRom mode to repair.
2.1.2. Loading way
AIO-PX30-JD4 has 32KB BootRom and 16KB internal SRAM and supports loading the system from the following devices:
eMMC interface
SDMMC interface
Serial NAND flash or NOR flash
AIO-PX30-JD4 also supports downloading system code from USB OTG interface.
2.1.3. Boot order
The order of startup:
Main control power on initialization.
BootRom code runs on SRAM and verifies the bootloader in the storage device.
Verify pass, load and run bootloader boot code.
Bootloader boot code is responsible for initializing DDR memory, loading the complete bootloader code into DDR memory and running it.
Bootloader loads the Linux kernel on the storage device and gives the execution power to the Linux kernel.
2.1.4. Boot mode
AIO-PX30-JD4 has three startup modes:
Normal mode
Loader mode
MaskRom mode
2.1.4.1. Normal mode
Normal mode is the Normal startup process. Each component loads in turn and enters the system normally.
2.1.4.2. Loader mode
In Loader mode, bootloader will enter the upgrade state and wait for the host command for firmware upgrade. To enter the Loader mode, must let the bootloader detected in startup RECOVERY key press, and USB connection status. The method to put the device into upgrade mode is as follows:
Disconnect the power adapter:
Connect device and host with Type A to Type C data cable.
Press the RECOVERY button on the device and hold it.
Plug in.
About two seconds later, release the RECOVERY key.
2.1.4.3. MaskRom mode
MaskRom mode is used for system repair when bootloader is damaged.
Generally, it is not necessary to enter MaskRom mode. BootRom code will enter MaskRom mode only if bootloader validation fails (IDR block cannot be read, or bootloader is damaged). At this point, BootRom code waits for the host to transfer the bootloader code through the USB interface and load and run it.
force into MaskRom mode, please refer to the chapter of MaskRom.
2.2. Upgrade firmware
2.2.1. Introduction
This article describes how to upgrade the firmware file on the host to the flash memory of the development board through the Type A to Type C date cabl. When upgrading, you need to choose the appropriate upgrade mode according to the host operating system and firmware type.
2.2.2. Preparatory work
AIO-PX30-JD4 development board
Firmware
Host computer
Type A to Type C date cable
There are two types of firmware files:
A single unified firmware
update.imgthat packs the boot loader, parameters, and all partition images together for firmware publishing.Multiple partition images, such as
kernel.img,rootfs.img,recovery.img, etc. are generated in the development stage.You can find the compiled unified AIO-PX30-JD4 firmware here, download it and unpack it. You can also refer to the instructions for compiling firmware to compile by yourself.
Host operating system support:
Windows XP(32/64 bits)
Windows 7 (32/64 bits)
Windows 8 (32/64 bits)
Linux (32/64 bits)
2.2.3. Windows
2.2.3.1. Install RK USB drive
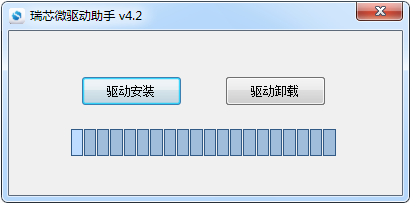
Download Release_DriverAssistant.zip, extract, and then run the DriverInstall.exe inside .
In order for all devices to use the updated driver, first select 驱动卸载(Driver uninstall) and then select 驱动安装(Driver install).
2.2.4. Connect device
You can put the device into upgrade mode as follows:
Disconnect the power adapter first:
Type-C data cable connects one end to the host and the other end to the development board.
Press the
RECOVERYbutton on the device and hold.Connect to the power supply.
About two seconds later, release the
RECOVERYbutton.
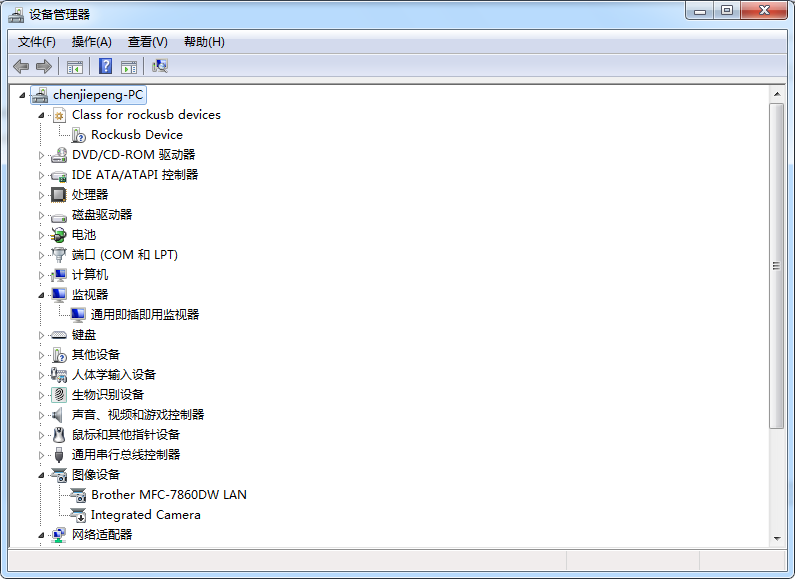
The host should prompt for new hardware and configure the driver. Open Device manager and you will see the new Device Rockusb Device appear as shown below. If not, you need to go back to the previous step and reinstall the driver.
2.2.5. Upgrade firmware
Download AndroidTool. AndroidTool defaults to display in Chinese. We need to change it to English. Open config.ini with an text editor (like notepad). The starting lines are:
#选择工具语言:Selected=1(Chinese);Selected=2(English)
[Language]
Kinds=2
Selected=1
LangPath=Language\
Change Selected=1 to Selected=2, and save. From now on, AndroidTool will display in English.Now, run AndroidTool.exe: (Note: If using Windows 7/8, you’ll need to right click it, select to run it as Administrator)

2.2.5.1. Upgrade unified firmware - update.img
The steps to update the unified firmware update.img are as follows:
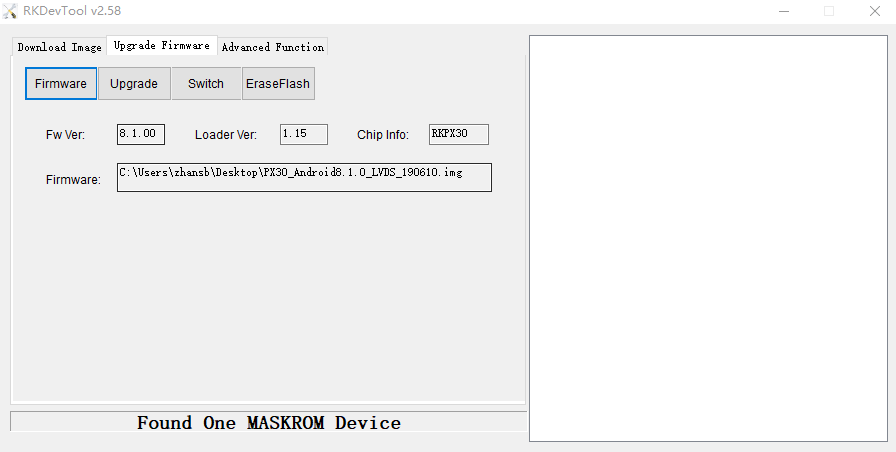
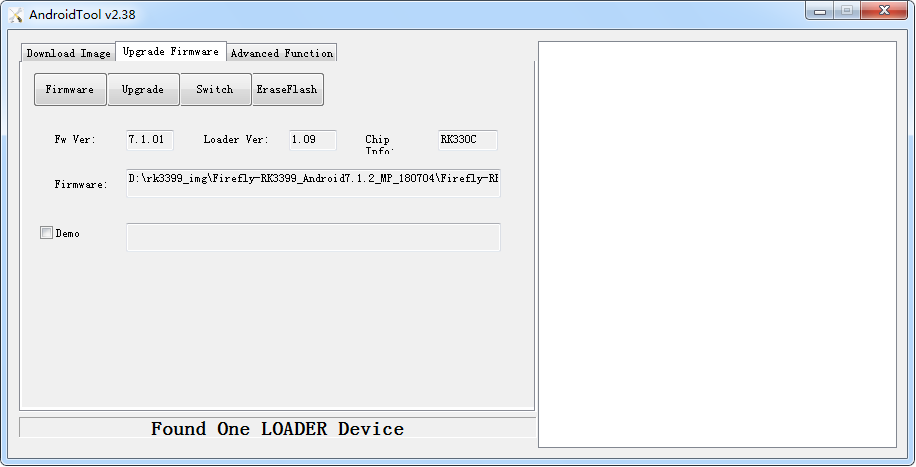
Switch to the “upgrade firmware” page.
Press the “firmware” button to open the firmware file to be upgraded. The upgrade tool displays detailed firmware information.
Press the “upgrade” button to start the upgrade.
If the upgrade fails, you can try to erase the Flash by pressing the
erase Flashbutton first, and then upgrade. Be sure to erase and upgrade according to Upgrade instructions.
Note: if the firmware laoder you wrote is inconsistent with the original one, please execute wipe Flash before upgrading the firmware.
2.2.5.2. Upgrade Partition image
Each firmware partition may be different, please note the following point:
The default configuration can be used when upgrading Android8.1 with Androidtool_2.58.
The steps to upgrade the partition image are as follows: 1. Switch to the “download image” page. 2. Check the partition to be burned, and select multiple. 3. Make sure the path of the image file is correct. If necessary, click the blank table cell on the right side of the path to select it again. 4. Click “Run” button to start the upgrade, and the device will restart automatically after the upgrade.
2.3. Linux
There is no need to install device driver under Linux. Please refer to the Windows section to connect the device.
2.3.1. Upgrade_tool
Download Linux_Upgrade_Tool, And install it into the system as follows for easy invocation:
unzip Linux_Upgrade_Tool_xxxx.zip
cd Linux_UpgradeTool_xxxx
sudo mv upgrade_tool /usr/local/bin
sudo chown root:root /usr/local/bin/upgrade_tool
sudo chmod a+x /usr/local/bin/upgrade_tool
2.3.2. Upgrade unified firmware - update.img:
sudo upgrade_tool uf update.img
Try to erase first before upgrade if upgrade failed.
# erase flash : Using the ef parameter requires the loader file or the corresponding update.img to be specified.
# update.img :The ubuntu firmware you need to upgrade.
sudo upgrade_tool ef update.img
# upgrade again
sudo upgrade_tool uf update.img
2.3.3. Upgrade Partition image
Ubuntu(MBR)、Android7.1、Android8.1:使用以下方式: Using the following methods:
sudo upgrade_tool di -b /path/to/boot.img
sudo upgrade_tool di -k /path/to/kernel.img
sudo upgrade_tool di -s /path/to/system.img
sudo upgrade_tool di -r /path/to/recovery.img
sudo upgrade_tool di -m /path/to/misc.img
sudo upgrade_tool di resource /path/to/resource.img
sudo upgrade_tool di -p paramater   # upgrade parameter
sudo upgrade_tool ul bootloader.bin # upgrade bootloader
Ubuntu(GPT): Using the following methods:
sudo upgrade_tool ul $LOADER
sudo upgrade_tool di -p $PARAMETER
sudo upgrade_tool di -uboot $UBOOT
sudo upgrade_tool di -trust $TRUST
sudo upgrade_tool di -b $BOOT
sudo upgrade_tool di -r $RECOVERY
sudo upgrade_tool di -m $MISC
sudo upgrade_tool di -oem $OEM
sudo upgrade_tool di -userdata $USERDATA
sudo upgrade_tool di -rootfs $ROOTFS
If the upgrade fails due to flash problems, you can try low-level formatting and erase nand flash:
sudo upgrade_tool lf update.img	# low-level formatting
sudo upgrade_tool ef update.img	# erase
2.3.4. MaskRom mode
See startup mode for an introduction “boot mode”
MaskRom pattern is the last line of defense equipment burn out. Forced entry MaskRom involved hardware operation, have certain risk, so only in the equipment into the Loader mode, can try MaskRom mode.
Please read and operate carefully!
The operation steps are as follows:
Disconnect all power supplies.
Unplug the SD card.
Connect the equipment and host machine with Type-C data cable.
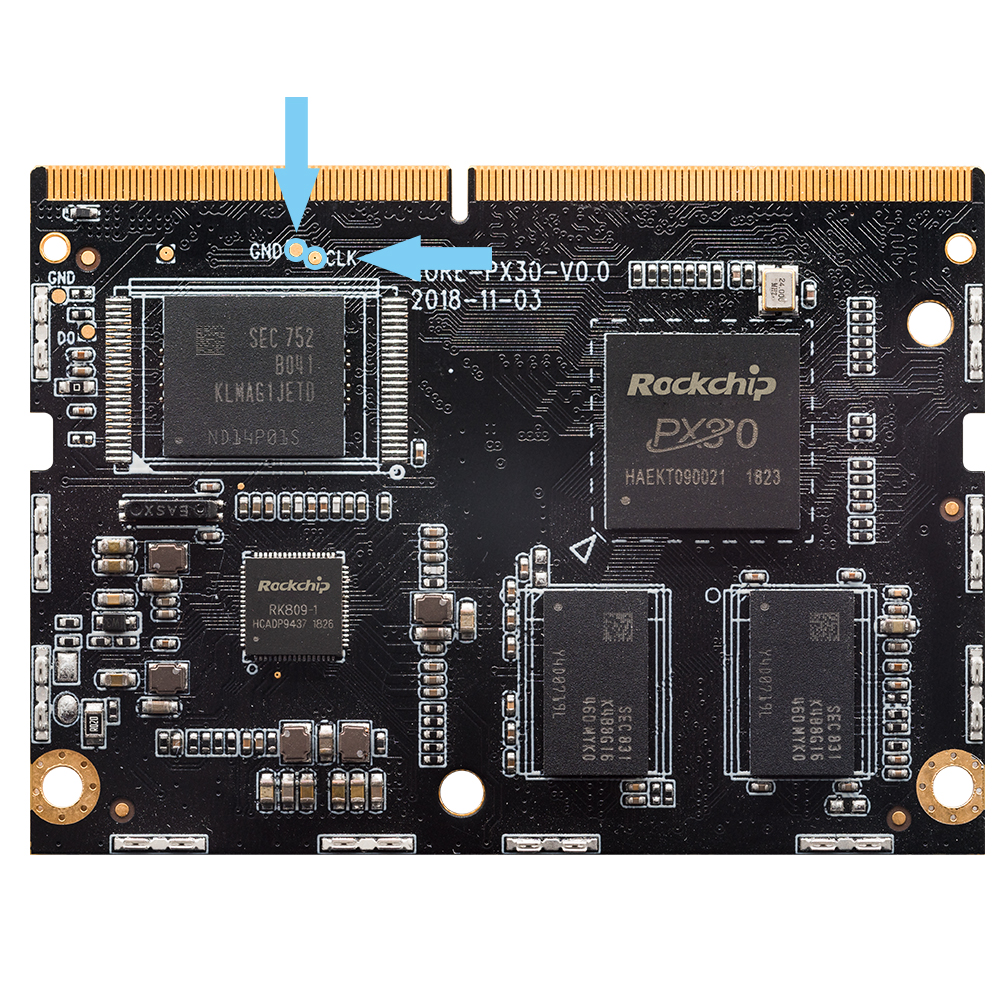
Use metal tweezers to connect the two test points on the core board as shown in the figure below and hold.
Plug the device into the power supply.
Wait a moment, then loosen the tweezers.
At this point, the device should go into MaskRom mode.