2. CAN
2.1. Introduction
Controller area network (can) is a kind of serial communication network which can effectively support distributed control or real-time control. Can bus is a bus protocol widely used in automobile, which is designed as the communication of microcontroller in automobile environment.
2.2. Hardware Connection
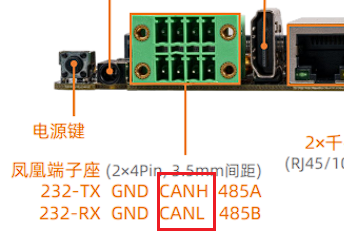
Connection between two CAN devices, only need CAN_H to CAN_H, CAN_L to CAN_L.

2.3. DTS Configuration
Common
kernel-5.10/arch/arm64/boot/dts/rockchip/rk3588s.dtsi
        can0: can@fea50000 {
                compatible = "rockchip,can-2.0";
                reg = <0x0 0xfea50000 0x0 0x1000>;
                interrupts = <GIC_SPI 341 IRQ_TYPE_LEVEL_HIGH>;
                clocks = <&cru CLK_CAN0>, <&cru PCLK_CAN0>;
                clock-names = "baudclk", "apb_pclk";
                resets = <&cru SRST_CAN0>, <&cru SRST_P_CAN0>;
                reset-names = "can", "can-apb";
                pinctrl-names = "default";
                pinctrl-0 = <&can0m0_pins>;
                tx-fifo-depth = <1>;
                rx-fifo-depth = <6>;
                status = "disabled";
        };

        can1: can@fea60000 {
                compatible = "rockchip,can-2.0";
                reg = <0x0 0xfea60000 0x0 0x1000>;
                interrupts = <GIC_SPI 342 IRQ_TYPE_LEVEL_HIGH>;
                clocks = <&cru CLK_CAN1>, <&cru PCLK_CAN1>;
                clock-names = "baudclk", "apb_pclk";
                resets = <&cru SRST_CAN1>, <&cru SRST_P_CAN1>;
                reset-names = "can", "can-apb";
                pinctrl-names = "default";
                pinctrl-0 = <&can1m0_pins>;
                tx-fifo-depth = <1>;
                rx-fifo-depth = <6>;
                status = "disabled";
        };

        can2: can@fea70000 {
                compatible = "rockchip,can-2.0";
                reg = <0x0 0xfea70000 0x0 0x1000>;
                interrupts = <GIC_SPI 343 IRQ_TYPE_LEVEL_HIGH>;
                clocks = <&cru CLK_CAN2>, <&cru PCLK_CAN2>;
                clock-names = "baudclk", "apb_pclk";
                resets = <&cru SRST_CAN2>, <&cru SRST_P_CAN2>;
                reset-names = "can", "can-apb";
                pinctrl-names = "default";
                pinctrl-0 = <&can2m0_pins>;
                tx-fifo-depth = <1>;
                rx-fifo-depth = <6>;
                status = "disabled";
        };
Because there is only one CAN device created by the system according to the dts , and the first device created is CAN0.
2.4. Communication
2.4.1. CAN communication test
Use the “candump” and “cansend” tools directly to send and receive messages, push tool into /system/bin/ . Tools “candump/cansend” are included with the SDK and download from Officail link or github.
#Close the can0 device at the transceiver
ip link set can0 down
#Set the bit rate to 250Kbps at the transceiver
ip link set can0 type can bitrate 250000
#Show can0 details
ip -details link show can0
#Open the can0 device at the transceiver
ip link set can0 up
#Perform candump on the receiving end, blocking waiting for messages
candump can0
#Execute cansend at the sending end to send the message
cansend can0 123#1122334455667788
2.5. More Command
1、 ip link set canX down 		//turn off CAN device
2、 ip link set canX up   		//turn on CAN device
3、 ip -details link show canX 		//show CAN device details
4、 candump canX  			//Receive data from CAN bus
5、 ifconfig canX down 			//shutdown CAn device
6、 ip link set canX up type can bitrate 250000 //Set CAN Baudrate
7、 conconfig canX bitrate + (Baudrate)
8、 canconfig canX start 		//start CAN device
9、 canconfig canX ctrlmode loopback on //loopback test
10、canconfig canX restart 		//restart CAN device
11、canconfig canX stop 		//stop CAN device
12、canecho canX 			//check CAN device status查看can设备总线状态;
13、cansend canX --identifier=ID+data 	//send data
14、candump canX --filter=ID:mask 	//Use the filter to receive ID matching data
