4. Quick Use
This chapter describes how to use the official baseboard of CORE-1126-JD4/CORE-1109-JD4, and does not include specific application development.
4.1. Power Supply Instructions
Since the CAM-C1126S2U device has a built-in high-power IR fill light, the CAM-C1126S2U must be connected to the rear USB 3.0 interface of the host motherboard. If the USB 2.0 or USB 3.0 interface on the front of the host chassis is used, the device may not be powered enough. In addition, the USB interface of the laptop may also be insufficiently powered. In this case of insufficient power supply current, the device may restart or disconnect from the host computer.
Power supply solutions for different application scenarios:
If it is a Facial_Gate application scenario, and data communication with the host computer is not required via USB, a higher power supply can be used to power the device. For example, a 5V 2A or 5V 3A power adapter can be used to power the device.
If data communication with the host computer is required via USB, use a usb hub that can be connected to an external power supply to power the CAM-C1126S2U device.
4.2. Application Scenario Introduction
The ArcSoft face recognition algorithm suite demo sample software is divided into two categories:
Facial_Gate (face recognition gate) application scenario. The working principle of this application scenario is that
CAM-C1126CS2U/CAM-C1109S2Uobtains video frame data from the camera, performs AI face recognition algorithm inference locally, and compares the inference result with the face image reserved in the local database. Then the recognition result is presented on the MIPI screen.AI_UVC (AI UVC camera) application scenario. The working principle of this application scenario is to use
CAM-C1126CS2U/CAM-C1109S2Uas a UVC camera, and simulate the USB interface into a network card device through the USB RNDIS protocol, so that the host computer andCAM-C1126CS2U/CAM-C1109S2Ucan communicate using network protocols, such as socket communication.CAM-C1126CS2U/CAM-C1109S2Uobtains video frame data from the camera, performs AI face recognition algorithm inference locally, and transmits the inference results to the host computer through the USB network card. The host computer processes the inference results and presents the recognition results through the screen display. This application scenario does not require access to the MIPI screen.
Important Note:
The Facial_Gate and AI UVC software provided by ArcSoft are both demonstration demos, without source code and ArcSoft’s corresponding technical support. It is used to demonstrate ArcSoft’s face recognition algorithm. It cannot be used for commercial purposes. Since it is a demonstration example demo software, there may be some bugs. If you encounter some bugs in the process of using the demo, such as the ArcAICamera host computer may have the problem of failed to insert the face database. Please try to re-burn the firmware and re-operate to verify. It is best not to make any operation errors in the middle to prevent triggering the demonstration example software bug.
ArcSoft provides the underlying API technical support for the face recognition algorithm.
The factory firmware of the CAM-C1126S2U device is
AI_UVCfirmware.If you encounter problems during use, please try to update the firmware first. For example: the problem of
RNDISnetwork card not being recognized or theyellow exclamation markappearing in some Windows systems has been fixed. If the device has this problem, you can try to update the firmware first.
4.3. Facial_Gate Firmware
For the first use, you need to connect to the host computer for deployment and debugging, please refer to method 1. After the host computer is deployed, you can use method 2 to use the device. Facial_Gate application scenario requires access to a MIPI screen.
Method 1: Host computer deployment and debugging steps:
The device is connected to a MIPI screen. For the connection method of the MIPI screen, please refer to: 《Display Usage》.
Connect the device to the
USB 3.0interface on the host computer motherboard, and use the TYPE-C cable to power it on.If the host computer searches for the ADB device, it means that the device has been powered on normally.
After booting up, the Windows host will recognize a USB network card. Set the static IP address properties of the network card as follows:
IP address:
172.16.110.5Subnet mask:
255.255.255.0Gateway:
172.16.110.1Preferred DNS:
8.8.8.8
Open the browser address bar and enter
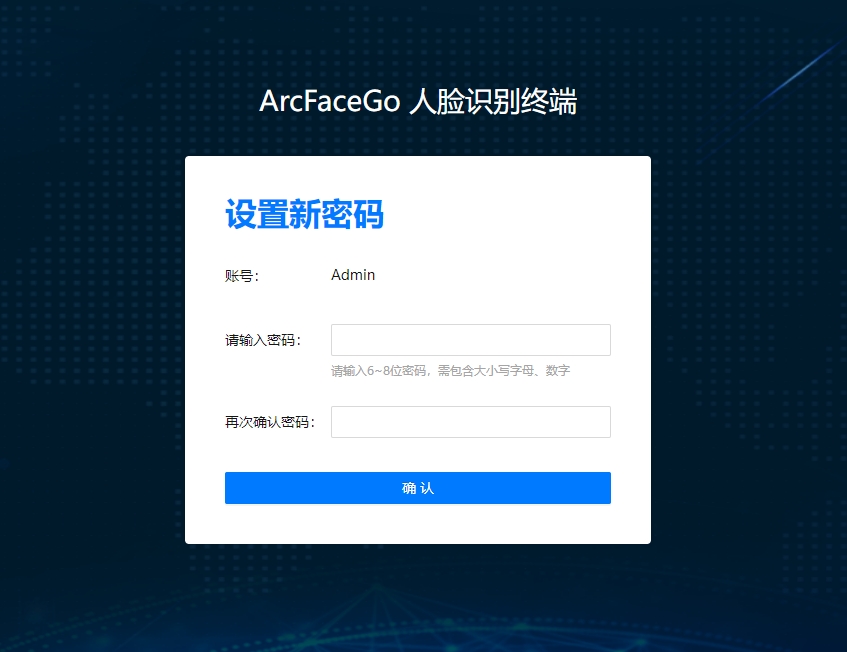
172.16.110.2to enter the Web backend management platform. PS: If the driver network card device is not normal, you can use third-party driver installation tools such as Driver Genius to install or update the driver.You need to set a login password when using the Web backend management platform for the first time:
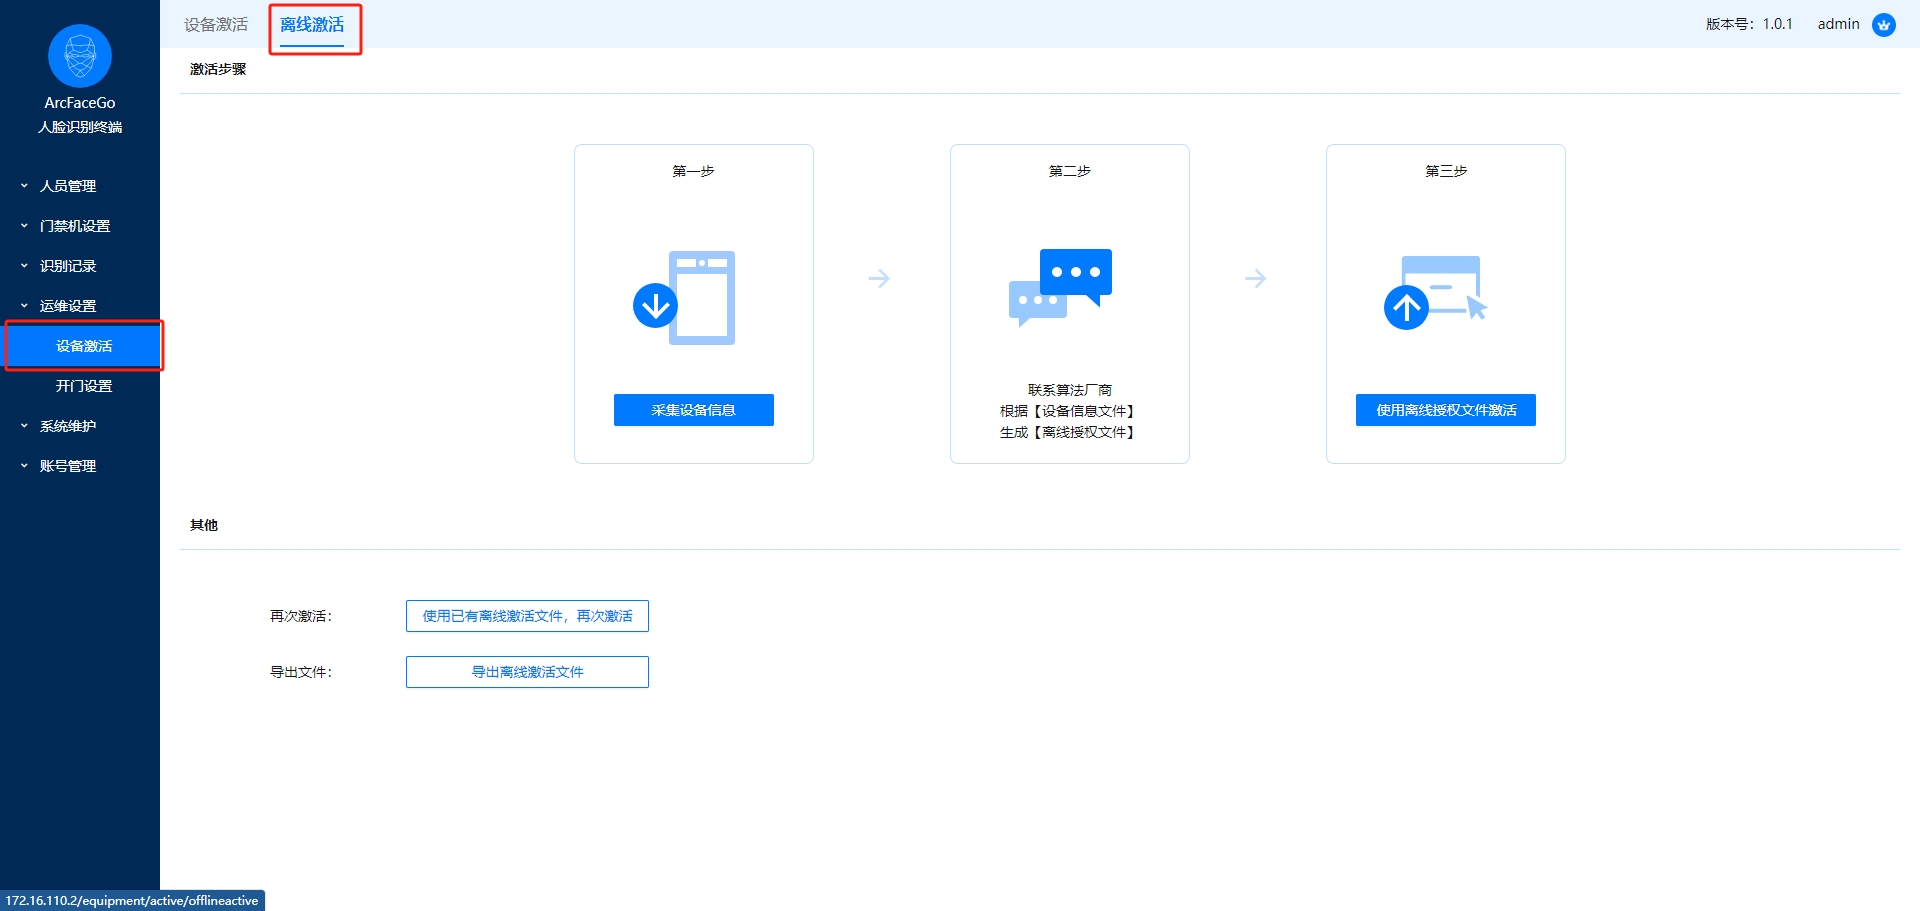
After logging in, select Device Activation. Please contact the business department to purchase the activation code.
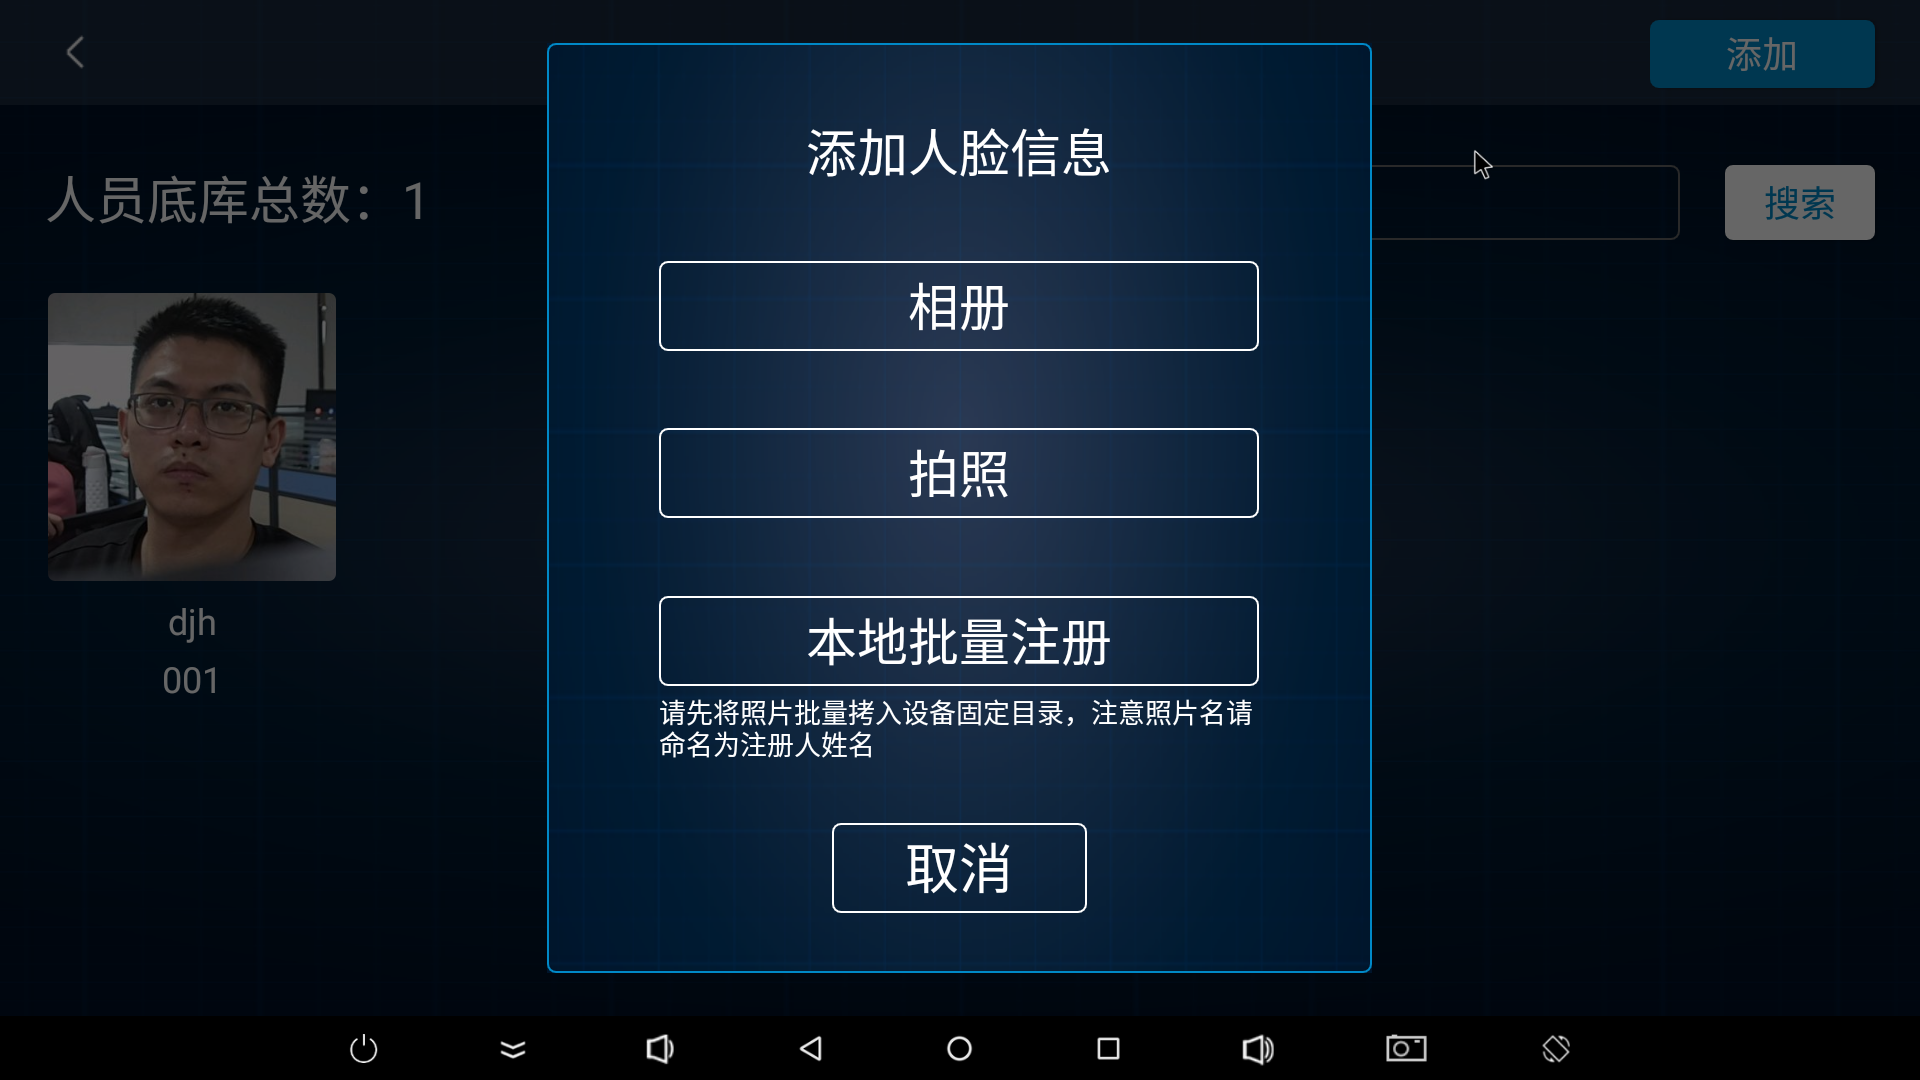
After activating the device, click [Personnel Management–>Personnel Registration] on the Web backend management platform to perform face registration. Perform face registration.
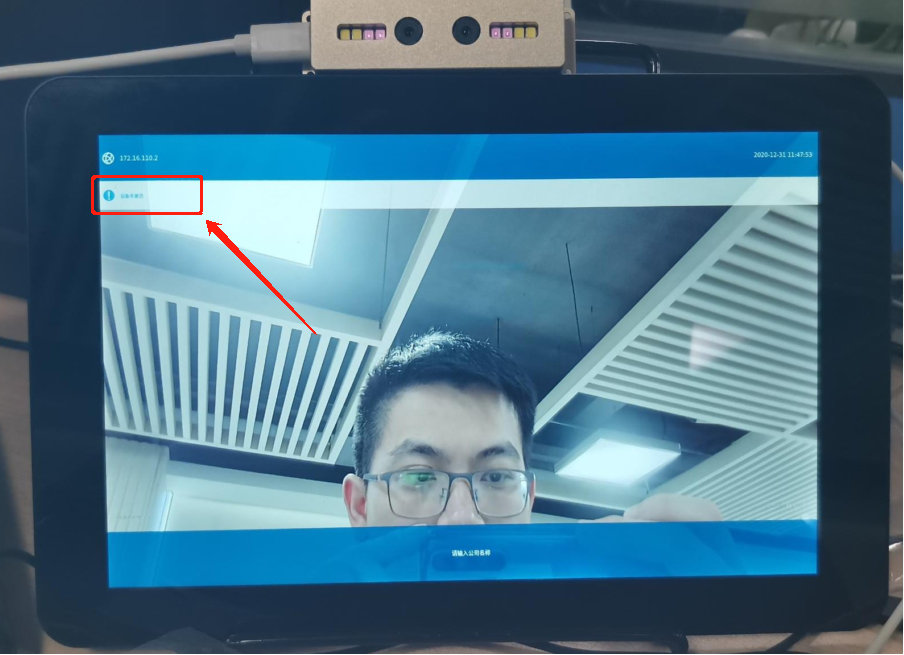
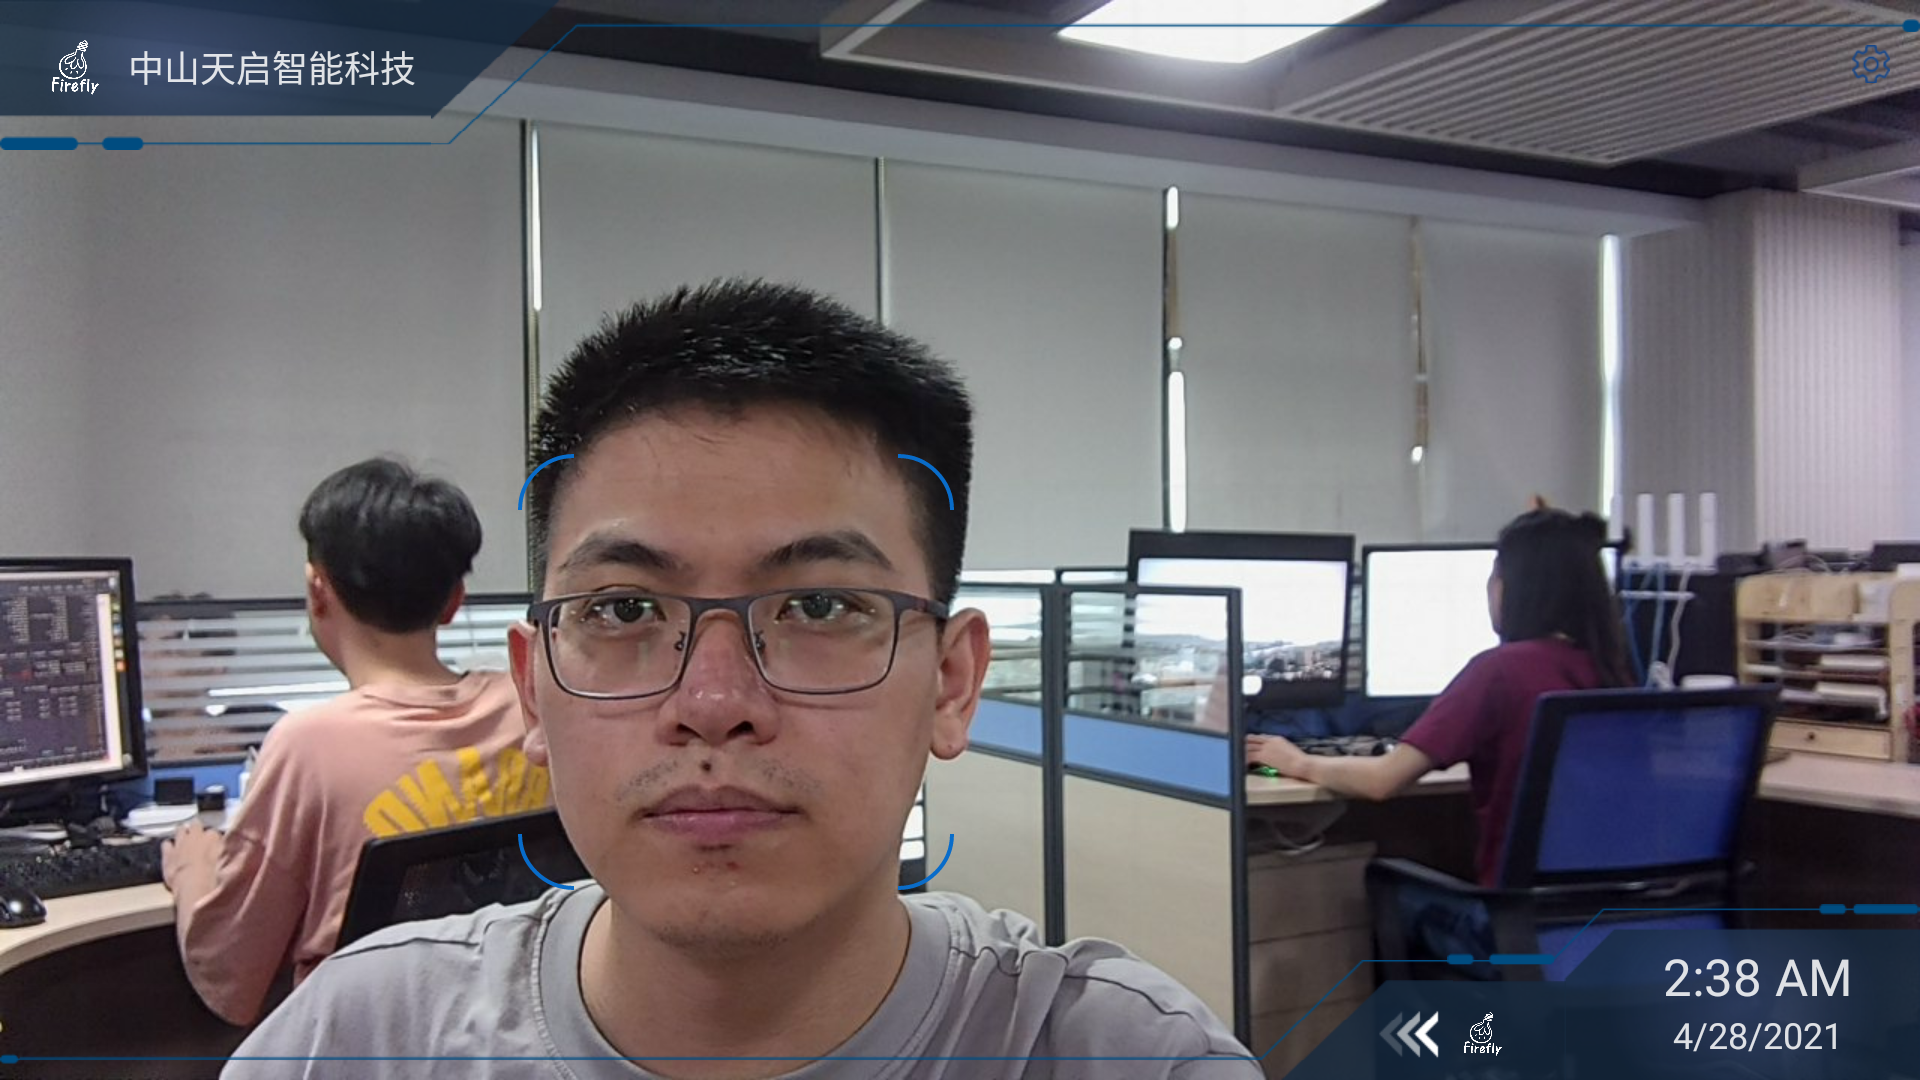
After completing face registration, face the camera and you can see the face recognition result output on the MIPI screen.
Method 2: Steps for use without connecting to the host computer:
Connect the device to the MIPI screen. For the connection method of the MIPI screen, please refer to: 《Display Usage》.
Connect TYPE-C to a 5V/2A power supply alone.
Face the camera and you can see the face recognition result output on the MIPI screen.
Note:
When the device is connected to a MIPI screen, you will first see the Firefly startup logo. After a while, the interface will enter the preset gate application. If the gate application is not authorized, it will display “Unauthorized” or “Authorization failed” and cannot perform face recognition.
4.4. AI_UVC Firmware
AI_UVC requires different host computer APP tools to be installed depending on the platform used. ArcSoft provides Windows host computer APP tools and Android host computer APP tools, but does not provide Linux host computer APP tools.
ArcAICameraSetup.exe, Android APK and instructions can be downloaded from this repository:
https://gitlab.com/firefly-linux/external/arcuvc_app.git
4.4.1. Windows
Official test uses Windows 10 system. Test steps are as follows:
Click to download Windows host computer tool: ArcAICameraSetup .
CAM-C1126S2U connects to the rear
USB 3.0interface of the chassis that comes out of the Windows host motherboard.After normal startup, the infrared fill light will light up.
After normal startup, the Windows host will recognize a USB RNDIS network card. The Windows host sets the static IP address properties of the network card as follows:
IP address:
172.16.110.5Subnet mask:
255.255.255.0Gateway:
172.16.110.1Preferred DNS:
8.8.8.8
After the settings are completed, you can communicate with the CAM-C1126S2U device. PS: If the driver network card device is not normal, you can use a third-party driver installation tool such as Driver Genius to install or update the driver.
Install the Windows host tool
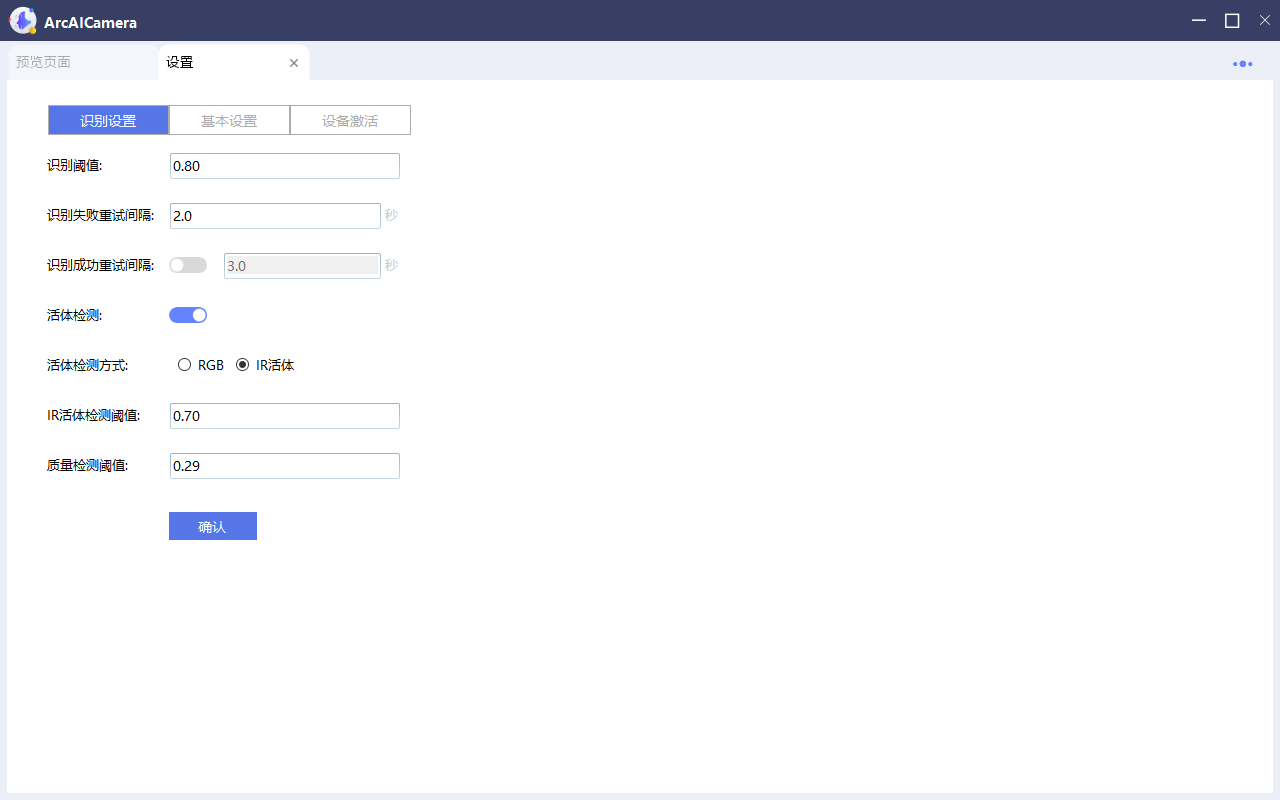
ArcAICameraSetup.exeand open it. After authorization according to the prompts, you can use the built-in AI_UVC application. PS: Please contact the business to purchase the authorization code.In the settings interface, click the button in the upper right corner to enter the face registration:
Successful recognition, after successful registration, you can return to the preview page to view the effect:

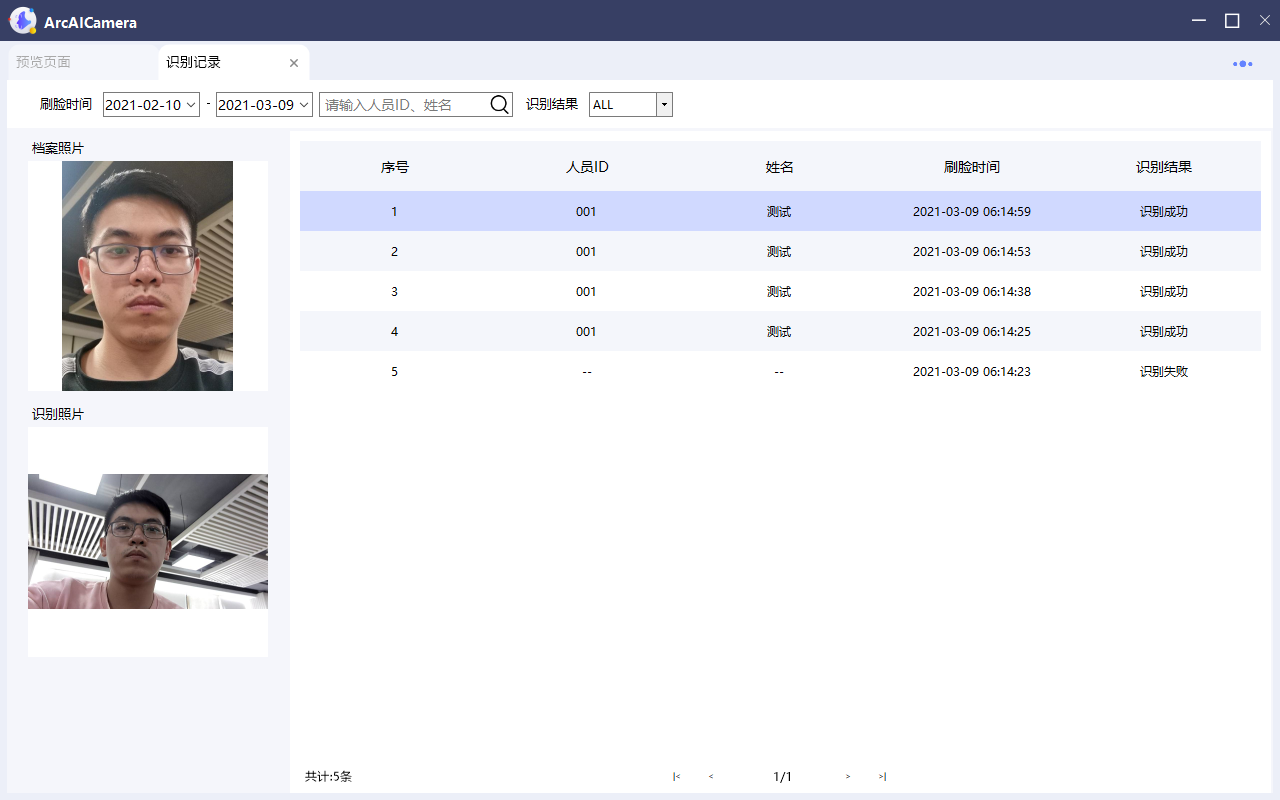
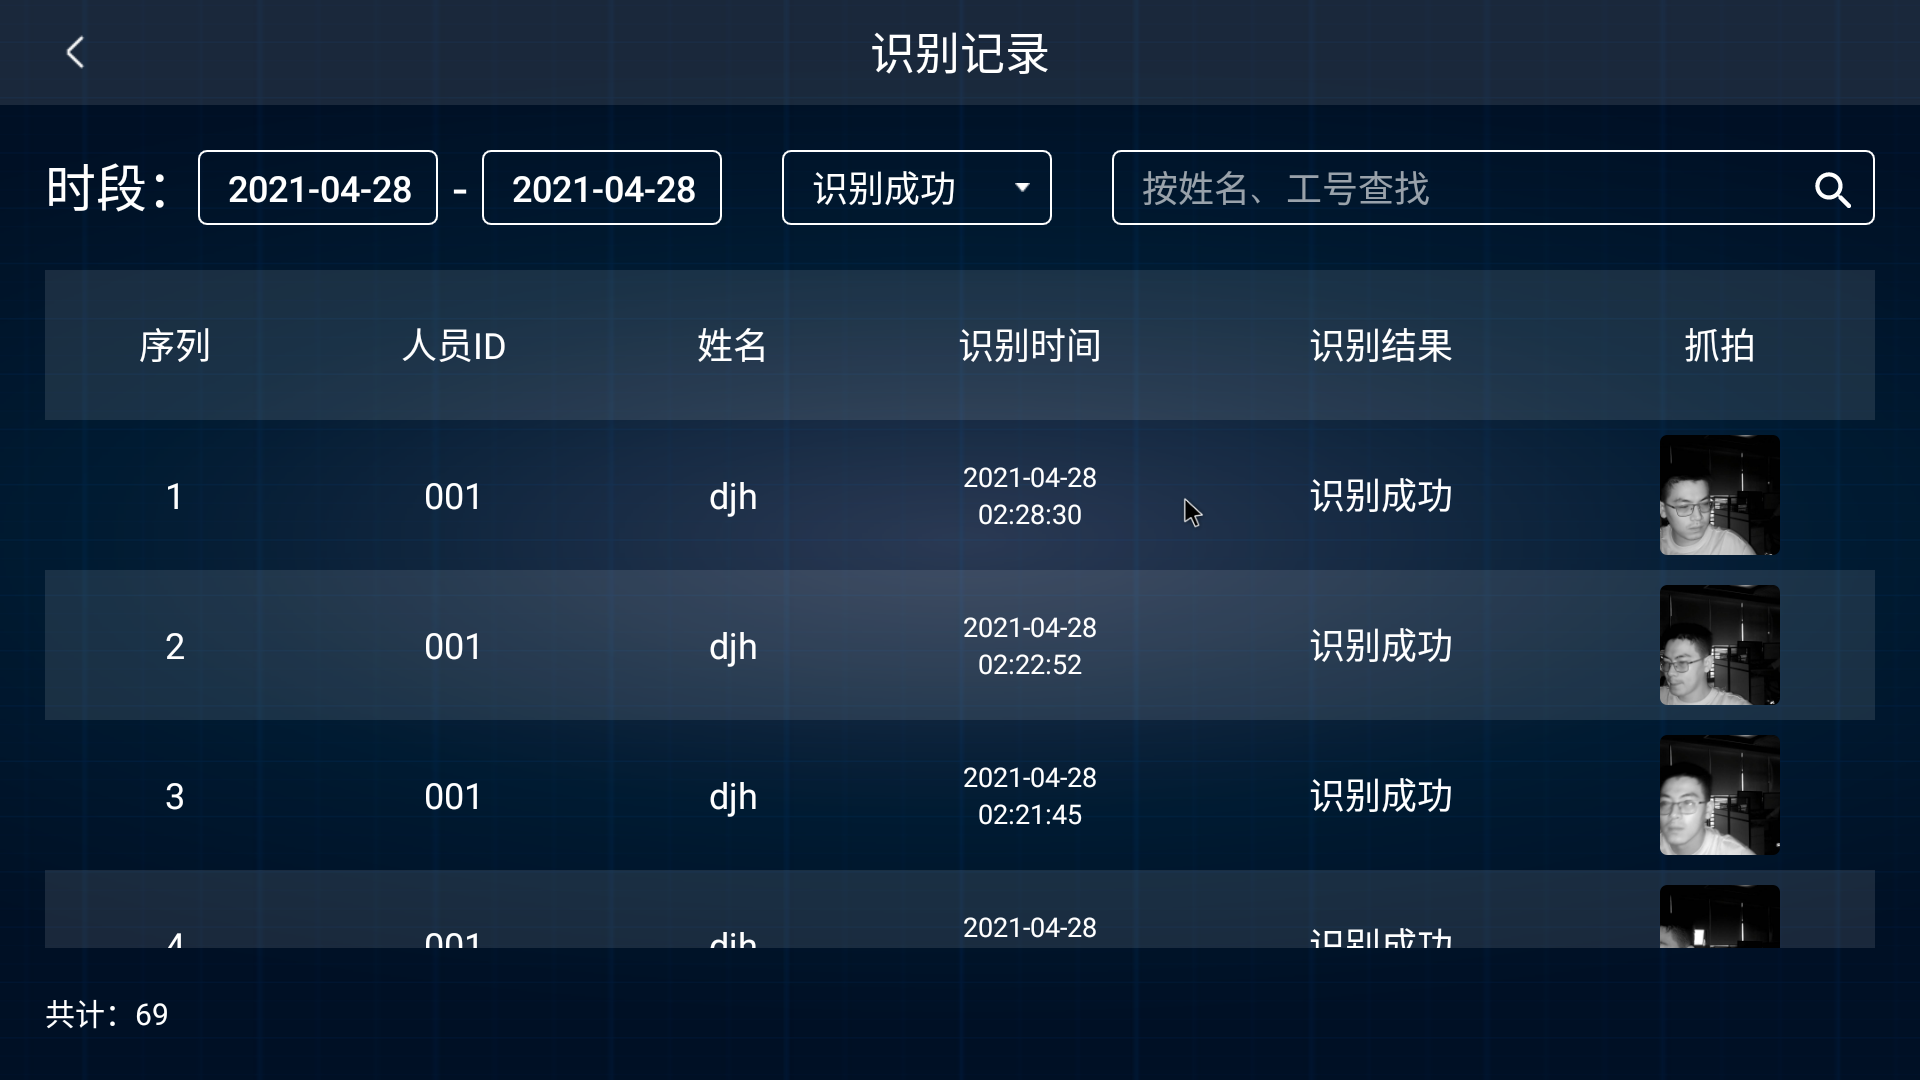
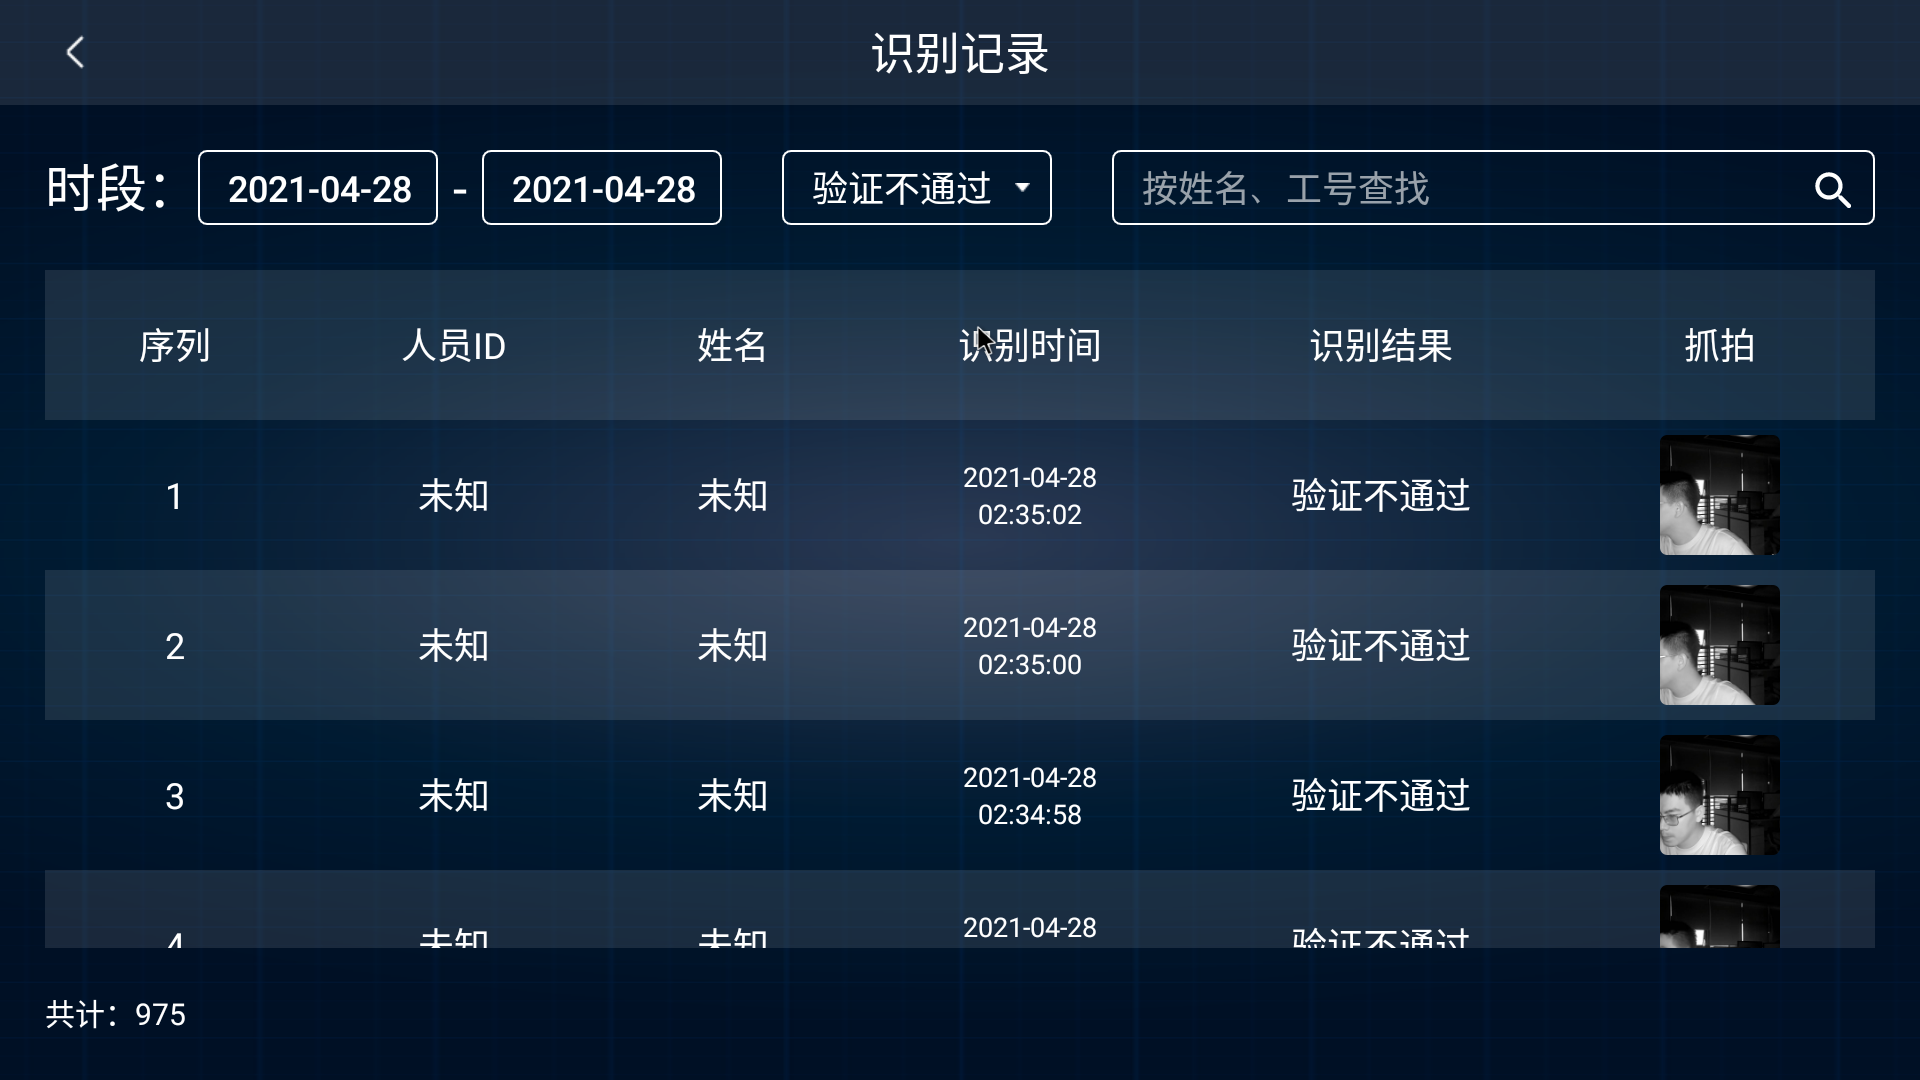
Recognition record, after the face is recognized, it will be recorded in the background:
4.4.2. Android
Official test uses RK3399 Andorid 7.1. Test steps are as follows:
Click to download Android host computer APP tool: Android APK.
Connect to the
USB 3.0interface of the Android device.After normal startup, the infrared fill light will light up.
Download and install
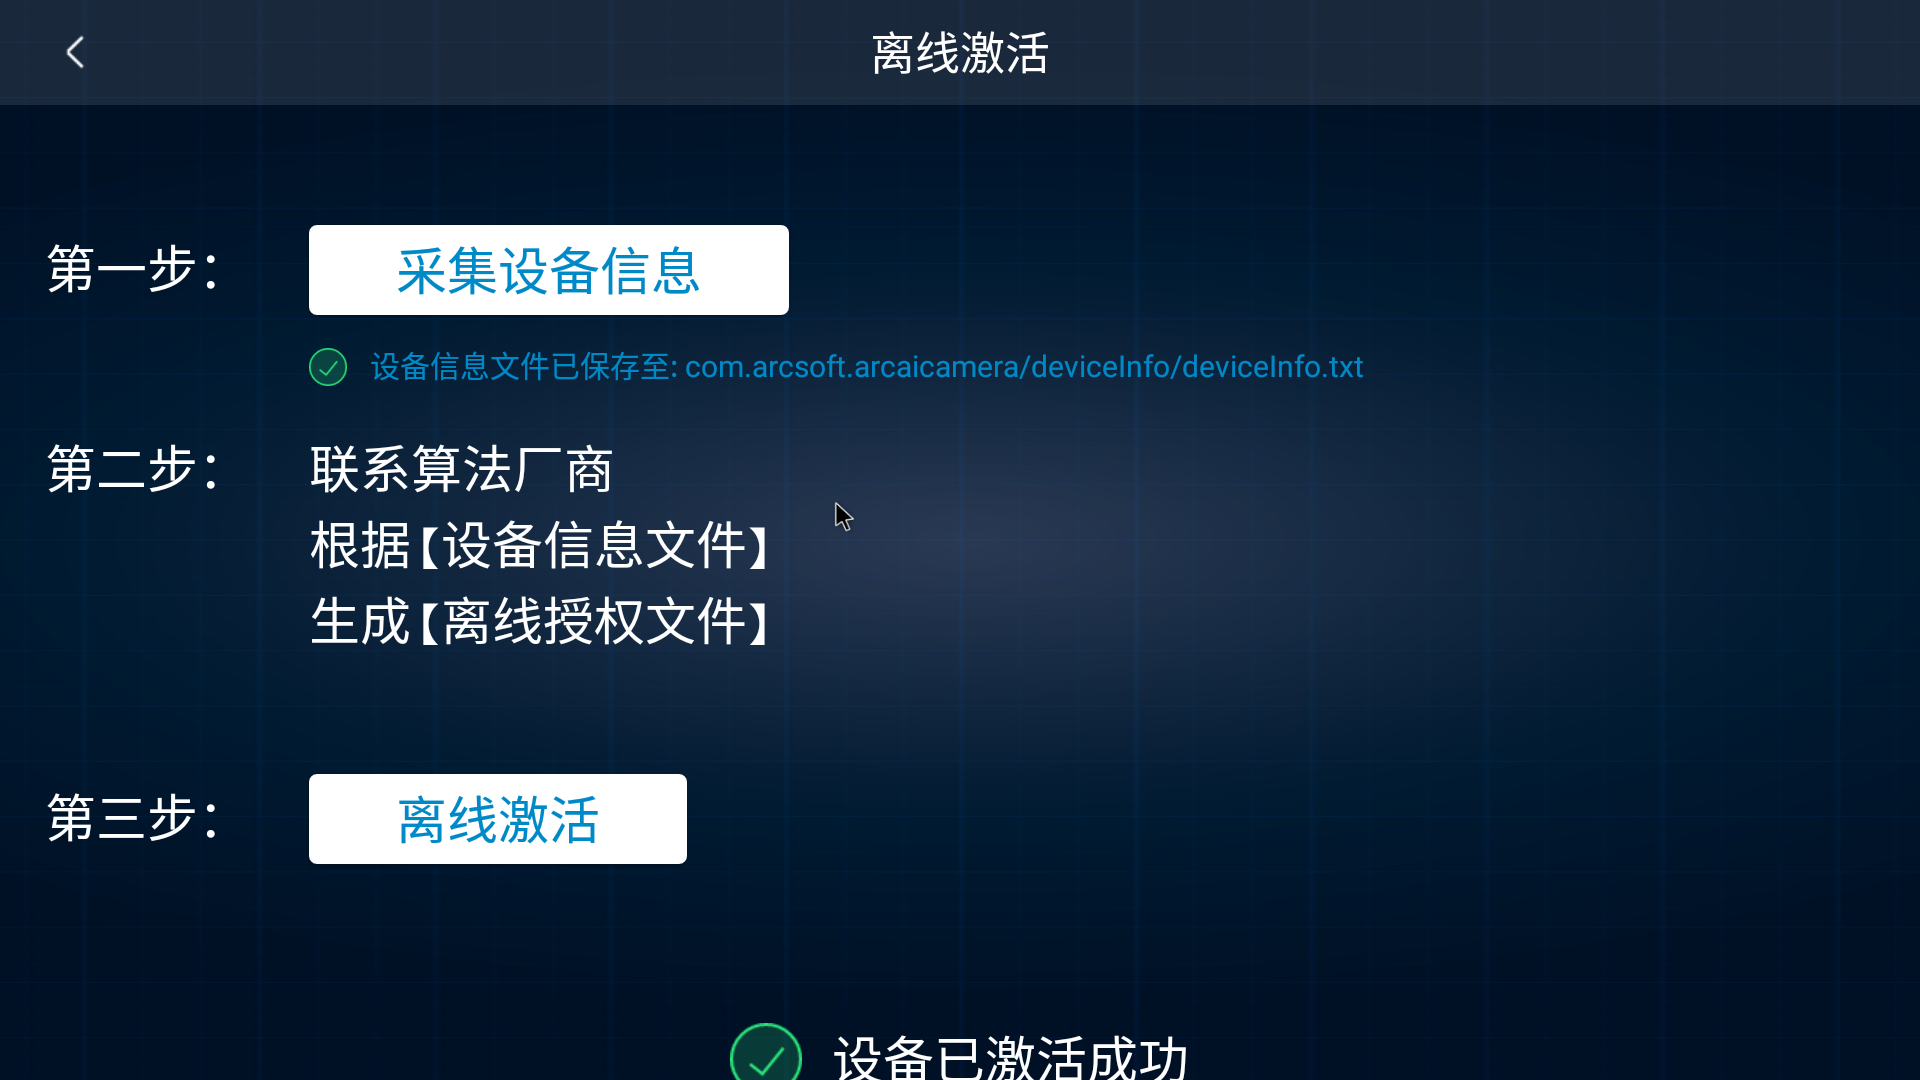
ArcSoft_AICamera_xxx.apkand open the application. After authorization according to the prompts, you can use the built-in AI_UVC application. PS: Please contact the business to purchase the authorization code.Authorization, obtain device information and contact us to generate offline authorization files based on device information:
Preview, after successful authorization, return to the preview screen to see that the face recognition function has been activated:
Settings, click the gear in the upper right corner of the preview interface to enter the settings interface, the default administrator password is
123456: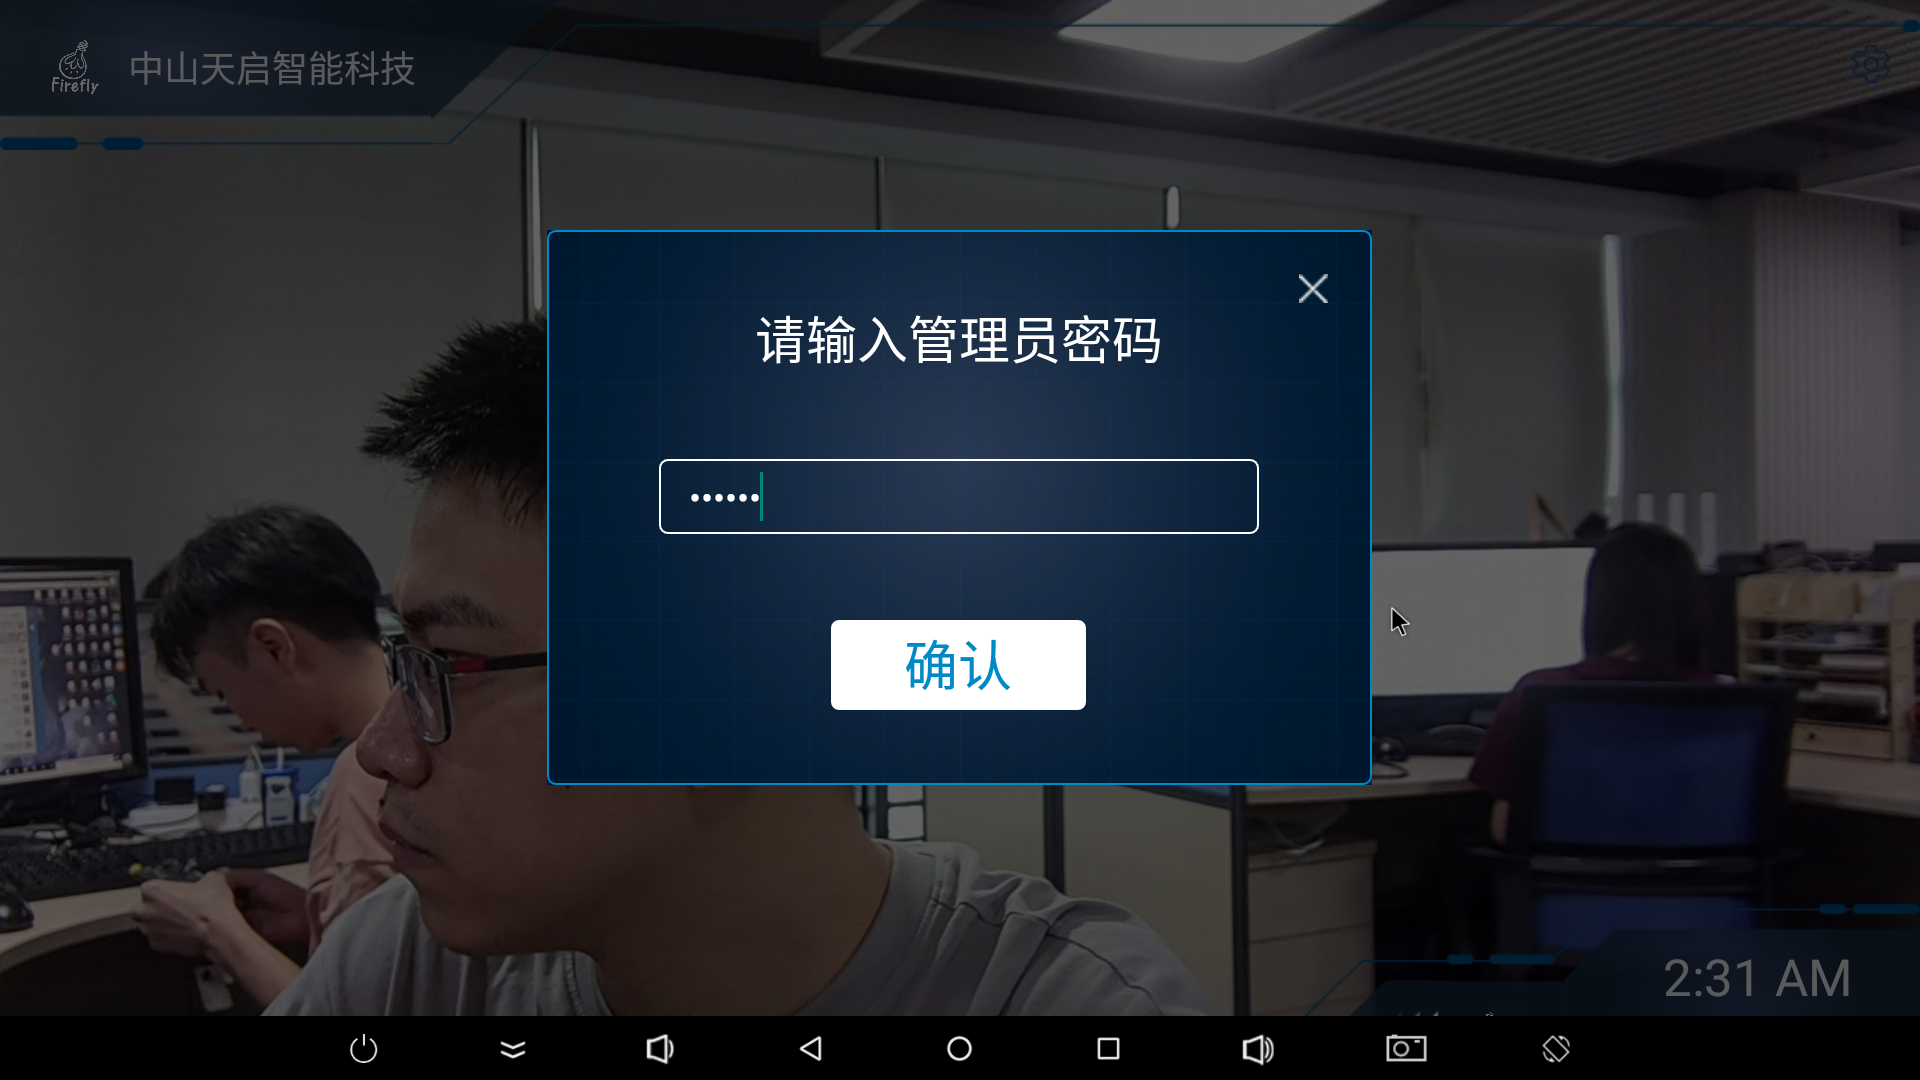
Change your company’s
logoandcompany name: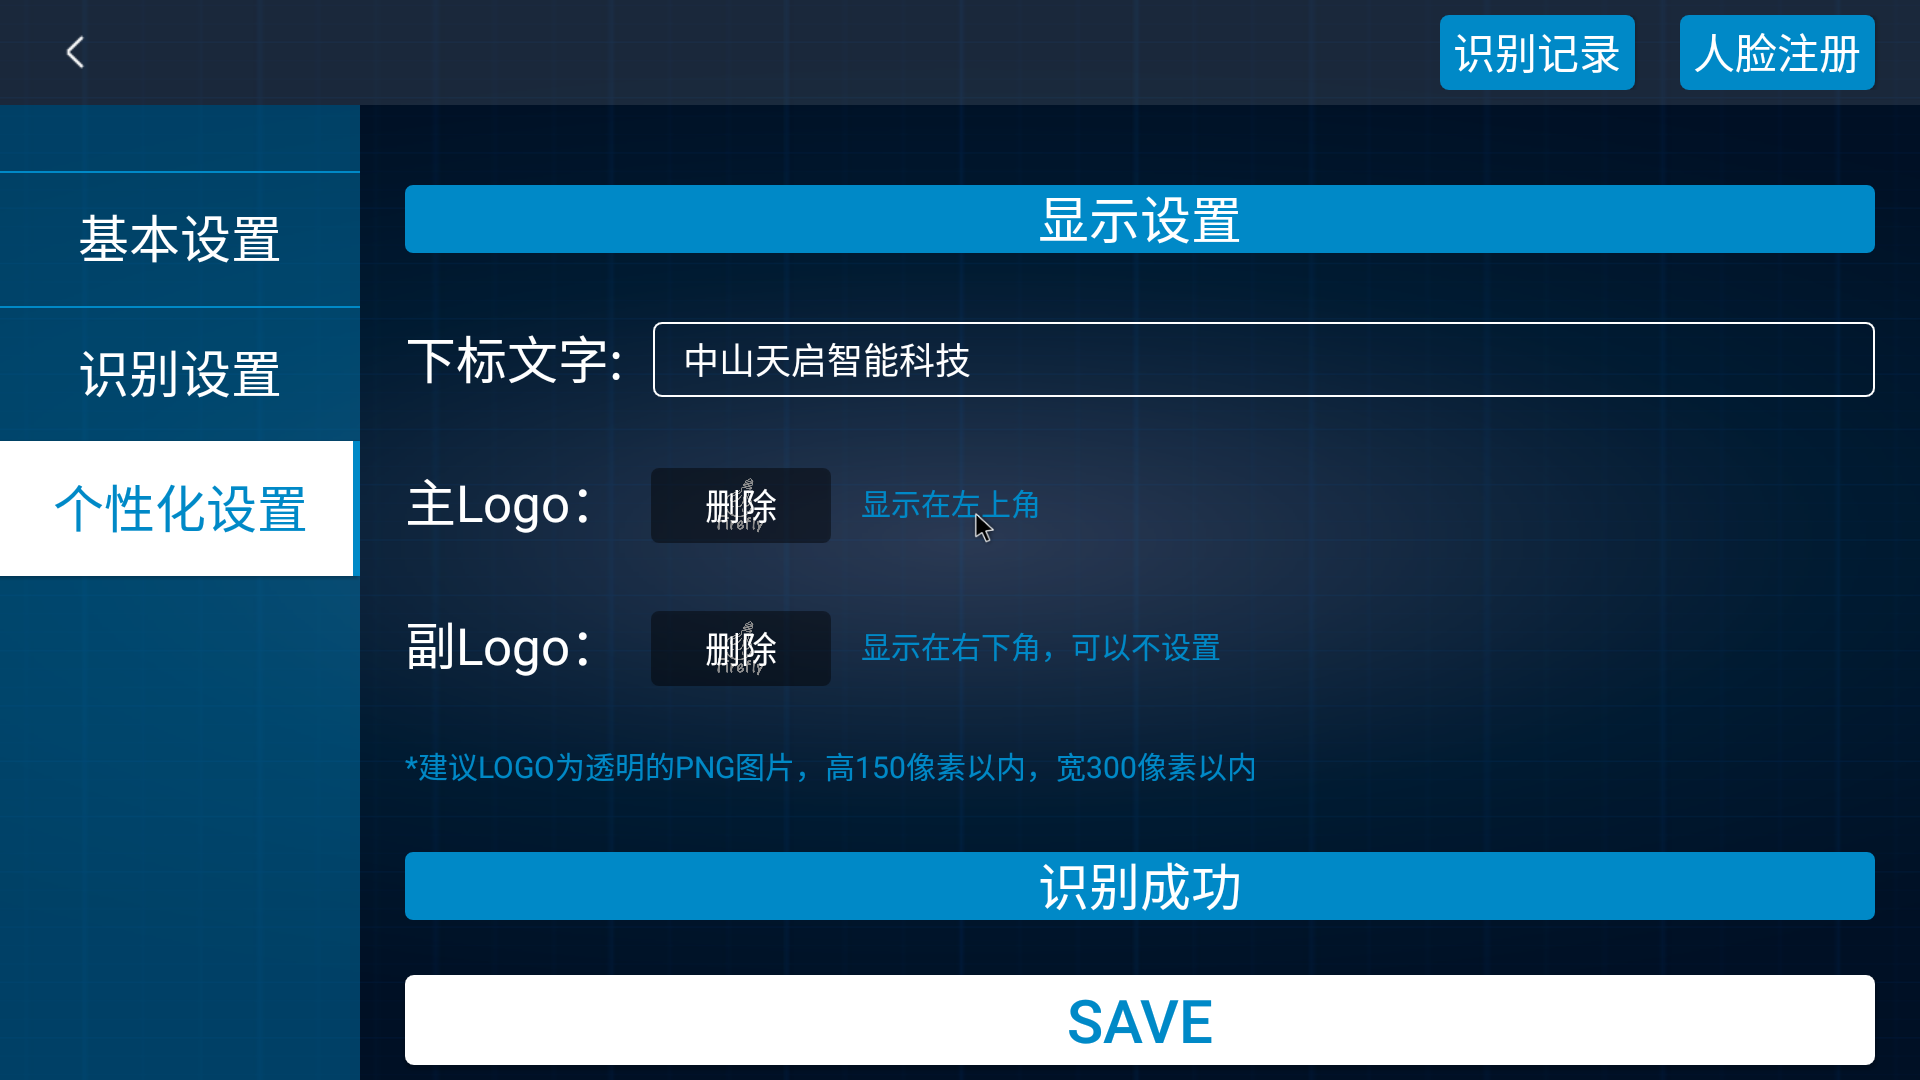
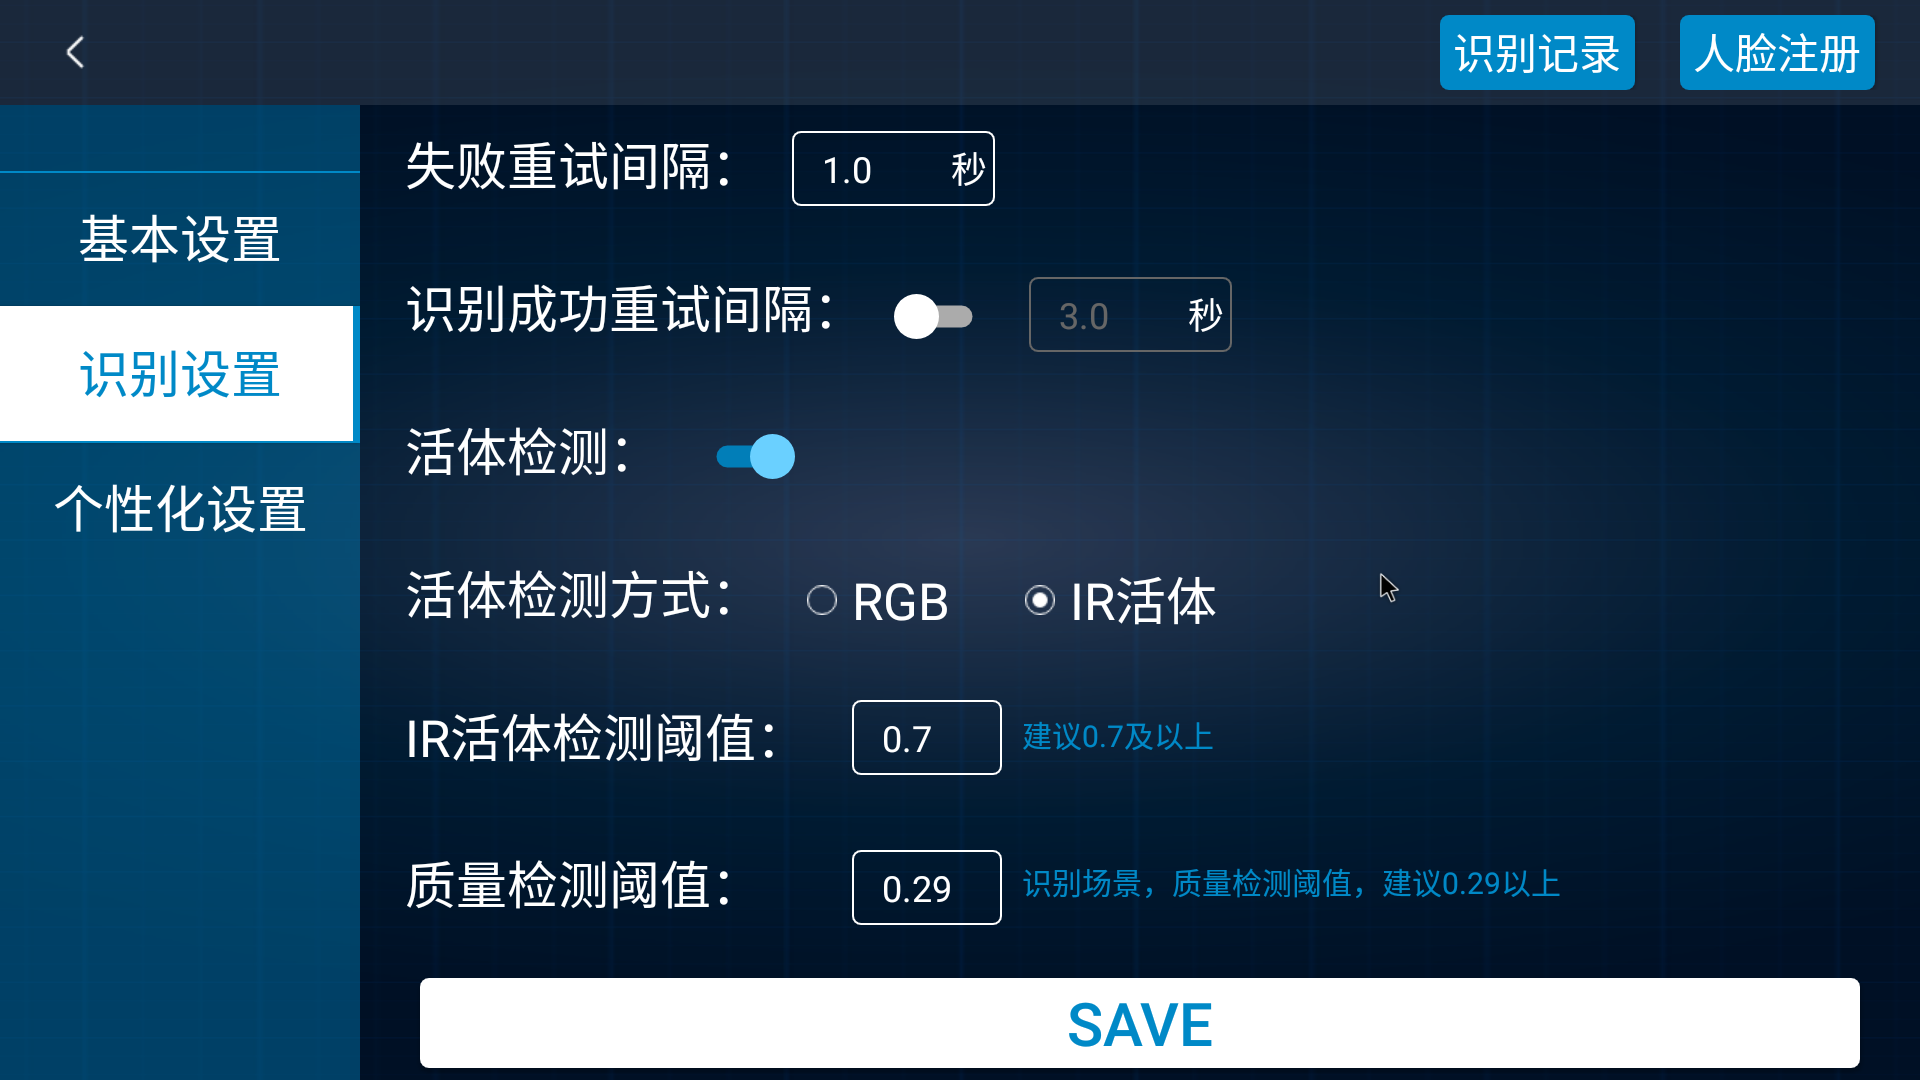
Configure your own recognition parameters according to your needs:
Click the face registration in the upper right corner to register your first face:
After successful registration, return to the preview interface to view the effect:

You can enter the settings to browse the recognition success and failure records:
4.5. Application Authorization
Whether you use Windows or Android for activation, you will enter an interface similar to the following. Please click Collect device information to copy the file generated by the prompt and save it. And send the file to the business and then contact the business to purchase authorization. The business will provide the corresponding device offline activation file, and you can use this file to activate the device.
Important Note:
For customers who need to use the underlying API of the ArcSoft face recognition algorithm. Please ask the business for the activation authorization: APP_ID, SDK_KEY and ACTIVE_KEY information.
The activation file and the device are
one-to-one correspondence. Please be sure to save the activation file after obtaining it.After upgrading the official firmware normally, you can use the corresponding activation file to
reactivate.After activating the device, you must never
eraseor perform other operations to modify thebackuppartition, otherwise you will need to repurchase authorization activation.
4.6. Device Debugging
CAM-C1126S2U/CAM-C1109S2U devices can use TYPE-C OTG cable and serial port for device debugging.
4.6.1. USB Cable Debugging
4.6.1.1. Hardware Wiring
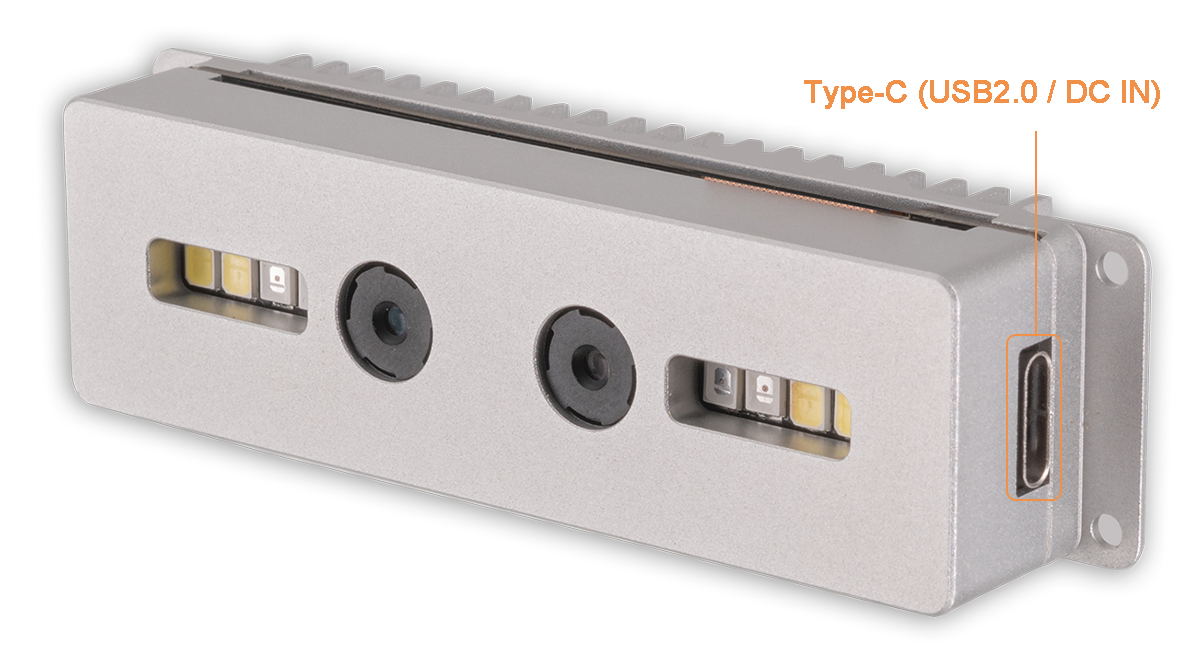
Prepare a TYPE-C cable. Connect one end of the TYPE-C cable to the USB port of the computer and the other end to the USB OTG debugging interface. The wiring is as shown below:
Install ADB based on your system.
4.6.1.2. Windows 下的 ADB 安装:
4.6.1.3. ADB installation under Windows:
Windows version download link: https://dl.google.com/android/repository/platform-tools-latest-windows.zip
Unzip
platform-tools-latest-windows.zipto a custom directoryPress
windows + rto open Run, entersysdm.cpl, and press Enter. Advanced–>Environment Variables–>System Variables–>Double-click Path–>NewExample: Set as shown below:
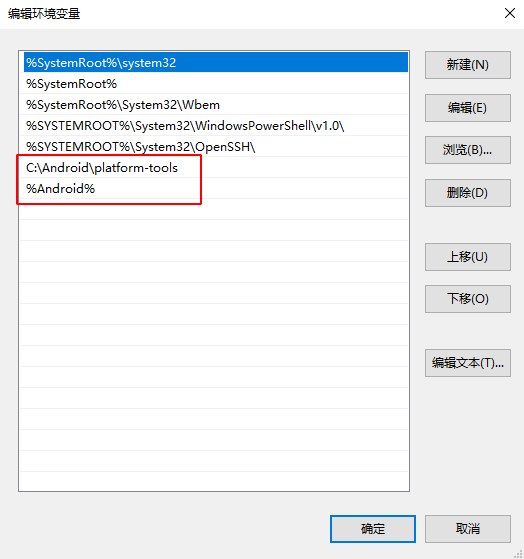
Note: The path needs to be changed to the custom directory you unzipped
以管理员权限打开命令提示符,此时电脑 USB 接口连接了 RV1126 的 USB 调试口。命令提示符终端输入
adb devicesC:\Users\lvsx>adb devices * daemon not running; starting now at tcp:5037 * daemon started successfully List of devices attached d70a14329414b400 device
使用 ADB 进行调试。
adb shell
4.6.1.4. ADB installation under Ubuntu
Install android-tools-adb package with apt-get
sudo apt-get update
sudo apt-get install android-tools-adb
Verify installation:
lvsx@lvsx:~$ adb devices
* daemon not running; starting now at tcp:5037
* daemon started successfully
List of devices attached
d70a14329414b400	device
Use ADB to enter device debugging.
adb shell
Use ADB to copy the linux pc file to the userdata directory of the rv1126 device.
adb push /path/to/your-file /userdata/
Use ADB to copy the rv1126 device file to the local directory of the PC. Replace rv1126-file with the actual file name.
adb pull /path/to/rv1126-file ./
4.6.2. Network Port Debugging
CAM-C1126S2U The device needs to set a static IP address for network port debugging. This debugging method can only be performed after the user manually sets a static IP.
Note: The AI_UVC firmware does not open the service for SSH login terminal by default. Only ADB and serial port debugging can be used. If the SSH login terminal service is required, it needs to be turned on in the buildroot configuration.
4.6.2.1. Network ADB Debugging
Connect the device to the TYPE-C port
Connect the device to the ADB network. Assume that the static IP address of the CAM-C1126S2U device is set to 172.16.110.5. Then execute the following command to connect:
adb connect 192.168.22.33
Use ADB for debugging.
adb shell
4.6.2.2. SSH Debugging
ssh to log in to the development board for debugging
The default account of the firmware before September 2021 is: root, and the default password is: rockchip.
The default account of the firmware after September 2021 is: root, and the default password is: firefly.
ssh root@192.168.22.33
The default account of Debian10 system is: firefly, and the default password is: firefly.
ssh firefly@192.168.22.33
4.6.3. Serial Port Debugging
Prepare a USB to serial port module. It is recommended to use Firefly’s serial port module.
Connect the USB serial port module to the host USB port and the device serial port.
Set the baud rate to
1.5 M.Download, install, and open the serial port debugging tool supported by your system platform according to your system (minicom is recommended for Ubuntu and putty is recommended for Windows). If there is a configuration item for software and hardware flow control in the serial port debugging tool, please turn off this function.
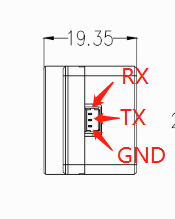
Serial port wiring instructions: As shown in the figure below, from top to bottom, they are
RX, TX, GND.