ROS StartGuide
Introduction
ROS (Robot Operating System) provides libraries and tools to help software developers create robot applications. It provides hardware abstraction, device drivers, libraries, visualizers, message-passing, package management, and more. ROS is licensed under an open source, BSD license.
ROS Wiki
Wikipedia of ROS : http://wiki.ros.org
ROS supporting versions
Currently, ROS distribution only supports installation on Ubuntu linux, but there is meta-ros layer maintained under the OpenEmbedded/Yocto framework, so we can integrate ROS into embedded Linux that is also based on the Openembedded framework.
The OpenEmbedded build framework [1] provides a general cross-compilation environment. This environment allows developers to set up a tool chain for their application and to create a complete Linux distribution for their embedded system. It supports various hardware architectures and embedded boards through board support packages.
The meta-ros layer provides the recipes for ROS hydro, indigo and kinetic. For the indigo distribution, it is currently the best supported distribution in meta-ros. ROC-RK3308-CC are also integrating this ROS distribution, and, it’s root file system is based on the yocto framework.
Reference firmware
Reference firmware: ROC-RK3308-CC_Yocto_ROS
ROS Demo and it’s operation manual can be referred to from “User-instructions”.
Ubuntu install of ROS Indigo
View all ROS distribution release. The latest ROS distribution, which is also the recommended version, is ROS Melodic Morenia. There are more detailed installation instructions in the official site. It should be noted that different Ubuntu versions have different corresponding ROS distribution. For example, ROS Melodic Morenia mainly supports Bionic (Ubuntu 18.04 LTS), while ROS Indigo Igloo supports Trusty (Ubuntu14.04 LTS) for debian packages.
Since ROC-RK3308-CC are integrating the ROS Indigo Igloo distribution, the PC should also Install ROS Indigo Igoloo distribution for test, and the following simple installation instructions are also ** mainly designed for Ubuntu 14.04 (ROS Indigo)**. Installation instructions for other distribution can be found on the Official Website Wiki.
Platform description
ROS Indigo only supports Saucy (13.10) and Trusty (14.04) for debian packages.
Installation step
Configure your Ubuntu repositories
Configure your Ubuntu repositories to allow “restricted,” “universe,” and “multiverse.” You can follow the Ubuntu guide for instructions on doing this.
Setup your sources.list
Setup your computer to accept software from packages.ros.org.
sudo sh -c 'echo "deb http://packages.ros.org/ros/ubuntu $(lsb_release -sc) main" > /etc/apt/sources.list.d/ros-latest.list'
You can also choose by yourself on the basis of UbuntuMirrors.
Set up your keys
sudo apt-key adv --keyserver hkp://ha.pool.sks-keyservers.net:80 --recv-key 421C365BD9FF1F717815A3895523BAEEB01FA116
Installation
1、Make sure your Debian package index is up-to-date:
sudo apt-get update
2、Install:
We recommend Desktop-Full install: ROS, rqt, rviz, robot-generic libraries, 2D/3D simulators and 2D/3D perception.
sudo apt-get install ros-indigo-desktop-full
3、Initialize rosdep:
Before you can use ROS, you will need to initialize rosdep. rosdep enables you to easily install system dependencies for source you want to compile and is required to run some core components in ROS.
sudo rosdep init
rosdep update
4、Environment setup:
It’s convenient if the ROS environment variables are automatically added to your bash session every time a new shell is launched:
echo "source /opt/ros/indigo/setup.bash" >> ~/.bashrc
source ~/.bashrc
5、It is recommended to install rosinstall, a frequently used command-line tool in ROS that is distributed separately:
sudo apt-get install python-rosinstall
6、Test
Install the official Tutorial:
sudo apt-get install ros-indigo-ros-tutorials
run a launch file of ros-tutorials:
roslaunch roscpp_tutorials talker_listener.launch
If everything goes right, you will obtain the following result:
SUMMARY
========

PARAMETERS
 * /rosdistro: indigo
 * /rosversion: 1.11.21

NODES
  /
    listener (roscpp_tutorials/listener)
    talker (roscpp_tutorials/talker)

ROS_MASTER_URI=http://localhost:11311

core service [/rosout] found
process[listener-1]: started with pid [9520]
process[talker-2]: started with pid [9521]
[ INFO] [1545896255.189016471]: hello world 0
[ INFO] [1545896255.289000624]: hello world 1
[ INFO] [1545896255.388990355]: hello world 2
[ INFO] [1545896255.489031727]: hello world 3
[ INFO] [1545896255.489457481]: I heard: [hello world 3]
[ INFO] [1545896255.589028597]: hello world 4
[ INFO] [1545896255.589358894]: I heard: [hello world 4]
User Instructions
Next, we will introduce the operation of ROS by using a simple demo: firefly_controller
This demo shows how to run ROS across multiple machines. It introduces that all nodes must be configured to use the same master, via ROS_MASTER_URI. This demo contents:
Switch the on/off of two LEDs on ROC-RK3308-CC mainboard by using PC keyboard
Connecting to an external temperature & humidity sensor to obtain the current temperature & humidity
The temperature & humidity sensor is SHT30, a sensor produced by Sensirion based on i2c protocol. Its code was mainly based on “ROC-RK3308-CC开发实例总结–SHT30温湿度模块调试”。
ROC-RK3308-CC preparation
Burning firmware
Switch to loader mode according to “burning_firmware”, download the firmware from ROC-RK3308-CC_Yocto_ROS, unzip it and run these command:
sudo upgrade_tool ul MiniLoaderAll.bin && \
sudo upgrade_tool di -p parameter.txt && \
sudo upgrade_tool di -uboot uboot.img && \
sudo upgrade_tool di -trust trust.img && \
sudo upgrade_tool di -boot zboot.img && \
sudo upgrade_tool di -rootfs rootfs.img && sudo upgrade_tool rd
In accordance with the [getting_started] (http://wiki.t-firefly.com/ROC-RK3308-CC/getting_started.html), power on the ROC-RK3308-CC mainboard to start up and connect the serial port. Input the account and password to enter the system terminal after powering on – the account is root and the password is empty.
Note: If you have the SHT30 sensor, it should be connected to before device powering on. It adopts I2C1 protocol for transmission and VCC5, GND, I2C1_SDA and I2C1_SCL should be connected according to “Hardware Documents”.
Initialize configuration
We prepared two scripts in the system for easy environment configuration:
ls /home/root
setup.sh  wifi.sh
After starting up, wifi (WiFi should share the same network segment with PC host so that it is possible to ping each other) should be connected first. Please configure through script wifi.sh like following, where’s ssid is your WiFi account and psk indicates your password.
./wifi.sh $ssid $psk
Next, configure ROS environment as following. Since the PC host acts as the master (the whole ROS operating environment only needs one master), roscore will not be setuped.
source ./setup.sh $master_ip
Of which, master_ip is the ip address of the PC host. We focused on the configuration of ROS_MASTER_URI and ROS_HOSTNAME here and more details can be found in setup.sh script.
Run demo’s node
rosrun firefly_controller firefly_controller
And waits until the PC host is prepared.
PC-host preparation
Note: These instructions are for ROS Groovy and later. For ROS Fuerte and earlier, select rosbuild.
Download Demo package
Download ROS Demo package at firefly_iot_keyboard.tar.bz2
Create ROS work space
If you are installing ROS for the first time, it is possible to create a ROS workspace through catkin:
mkdir -p ~/catkin_ws/src
cd ~/catkin_ws/src
This workspace can be compiled even it is empty (no software package in the src directory, only a CMakeLists.txt link file).
cd ~/catkin_ws/
catkin_make
Compiling
First, unzip the Demo package to the src directory of the workspace:
tar -xjf firefly_iot_keyboard.tar.bz2 -C ~/catkin_ws/src/
Then compile the workspace:
cd ~/catkin_ws/
catkin_make
Run
Open two terminals respectively and configure each one according to the following steps.
Set the current workspace as the top level of ROS work environment:
cd ~/catkin_ws/
source devel/setup.bash
Set ROS_HOSTNAME as the host-ip, if not, the device cannot recognize.
export ROS_HOSTNAME=$master_ip
One of the terminals starts the keyboard control node of demo:
rosrun firefly_iot_keyboard keyboard.py
The other terminal starts demo receiving node:
rosrun firefly_iot_keyboard receiver.py
Final effect
The result is as follows:
PC terminal
Note, if you cannot control, please select the terminal window which running keyboard.py to ensure that your input can be captured.
Terminal of keyboard control:
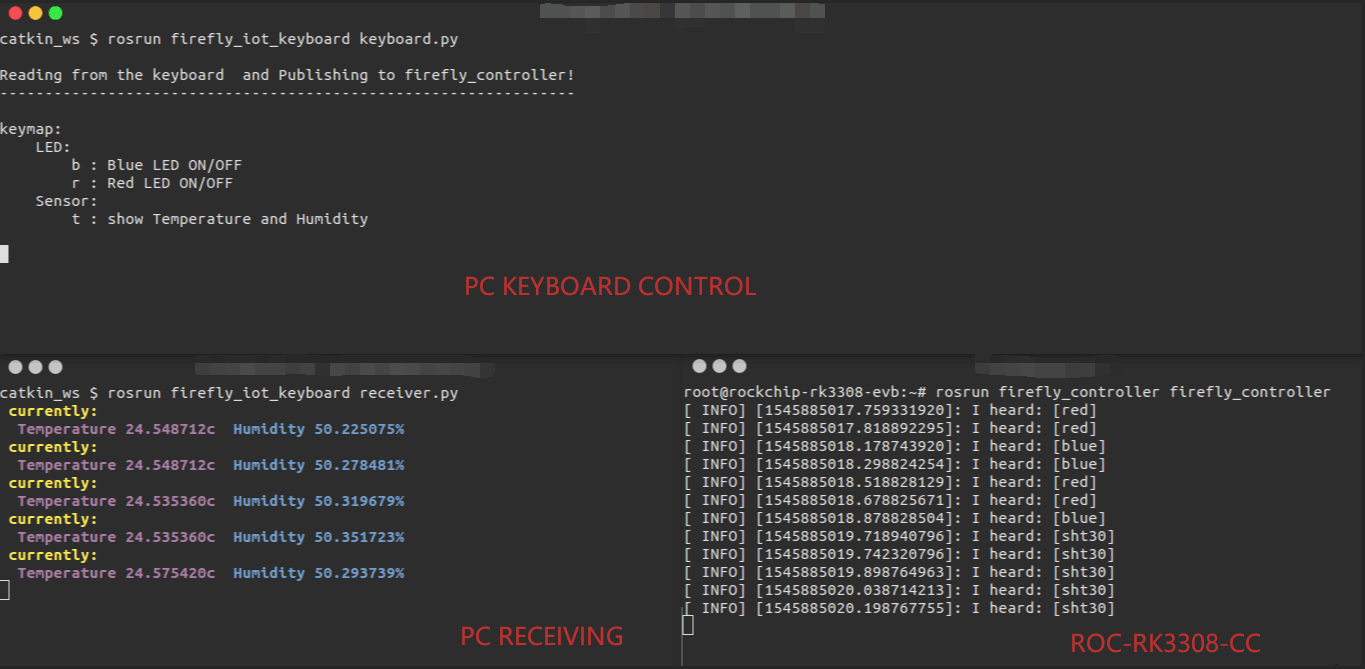
rosrun firefly_iot_keyboard keyboard.py

Reading from the keyboard  and Publishing to firefly_controller!
----------------------------------------------------------------

keymap:
    LED:
        b : Blue LED ON/OFF
        r : Red LED ON/OFF
    Sensor:
        t : show Temperature and Humidity
Press r and b of keyboard can switch to on/off of red and blue LEDs respectively. If the SHT30 sensor is connected, press t can obtain the temperature and humidity reported by the device, and such data will be received by the terminal which is running the other node “receiver.py”.
Terminal of receiving:
rosrun firefly_iot_keyboard receiver.py
 currently:
  Temperature 28.607613c  Humidity 49.396507%
ROC-RK3308-CC result
Serial port print:
root@rockchip-rk3308-evb:~# rosrun firefly_controller firefly_controller
[ INFO] [1545900033.047350122]: I heard: [blue]
[ INFO] [1545900034.086951914]: I heard: [red]
[ INFO] [1545900035.106874956]: I heard: [sht30]
Debugging
Run rosnode list to display information about the ROS nodes that are currently running:
rosnode list
/firefly_base_controller
/firefly_iot_keyboard
/firefly_iot_receiver
/rosout
It shows that three nodes of firefly_controller are running: /firefly_base_controller, /firefly_iot_keyboard and /firefly_iot_receiver
Run rostopic list to return a list of all topics currently subscribed to and published.:
rostopic list
/cmd_vel
/rosout
/rosout_agg
/temphumidity
It shows that firefly_controller has released two Topics: /temphumidity and /cmd_vel
Run rostopic echo to show the data published on a topic:
rostopic echo /temphumidity
humidity: 50.0968933105
temp: 24.1374816895
---
humidity: 51.638053894
temp: 23.3657588959
---
Use rqt_graph tool creates a dynamic graph of what’s going on in the system:
rosrun rqt_graph rqt_graph

rqt_graph is part of the rqt package. Unless you already have it installed, run:
sudo apt-get install ros-indigo-rqt
sudo apt-get install ros-indigo-rqt-common-plugins