Build Android 7.1 Firmware
Preparation
To compile Android, requirement of PC is:
64 bit CPU
16GB physical memory + swap memory
30GB free disk space to build. The source code tree take another 8GB space.
64 bit Ubuntu 12.04 is officially recommended. Yet newer 64 bit Linux OS is also supported, providing the requirements of software and hardware in http://source.android.com/source/building.html are met.To initialize compiling environment, please reference http://source.android.com/source/initializing.html .
Install OpenJDK 8:
   sudo add-apt-repository ppa:openjdk-r/ppa
   sudo apt-get update
   sudo apt-get install openjdk-8-jdk
Ubuntu 12.04 packages install:
sudo apt-get install git gnupg flex bison gperf build-essential \
 zip curl libc6-dev libncurses5-dev:i386 x11proto-core-dev \
 libx11-dev:i386 libreadline6-dev:i386 libgl1-mesa-glx:i386 \
 g++-multilib mingw32 tofrodos gcc-multilib ia32-libs \
 python-markdown libxml2-utils xsltproc zlib1g-dev:i386
Ubuntu 13.10/14.04 packages install:
sudo apt-get install git-core gnupg flex bison gperf libsdl1.2-dev \
 libesd0-dev libwxgtk2.8-dev squashfs-tools build-essential zip curl \
 libncurses5-dev zlib1g-dev pngcrush schedtool libxml2 libxml2-utils  \
 xsltproc lzop libc6-dev schedtool g++-multilib lib32z1-dev lib32ncurses5-dev \
 lib32readline-gplv2-dev gcc-multilib libswitch-perl
Install ARM cross compiling toolchain and related package to compile Linux kernel:
sudo apt-get install gcc-arm-linux-gnueabihf \
 lzop libncurses5-dev \
 libssl1.0.0 libssl-dev
Download Android Industry SDK
The size of industry SDK is huge. Please download follow the cloud storage:
Please check the md5 checksum before proceeding:
$ md5sum /path/to/rk3399-firefly-industry-71-20190926.7z.001

afb279a7d2966908bcf53ce2c2c05edc  rk3399-firefly-industry-71-20190926.7z.001

$md5sum /path/to/rk3399-firefly-industry-71-20190926.7z.002

2bc5a41fd1056f1d1ab1f7e84f666bee  rk3399-firefly-industry-71-20190926.7z.002
If it is correct, uncompress it:
mkdir -p ~/proj/firefly-rk3399-Industry
cd ~/proj/firefly-rk3399-Industry
7z x /path/to/rk3399-firefly-industry-71-20190926.7z.001 -r -o./
git reset --hard
Note: be sure to update the remote warehouse after unpacking. The following method:
#1. Go to the SDK root directory

cd ~/proj/firefly-rk3399-Industry


#2. Download the remote bundle repository

git clone https://gitlab.com/TeeFirefly/rk3399-industry-nougat-bundle.git .bundle

#3. If the download repository fails, you can download [bundle compression] from baidu cloud below and unzip it to the SDK root directory. The unzip instructions are as follows:

7z x rk3399-industry-nougat-bundle.7z  -r -o. && mv rk3399-industry-nougat-bundle/ .bundle/

#4. Update SDK, and the subsequent update does not need to pull the remote repository again, just directly execute the following command

.bundle/update

#5. Follow the prompts to update the content to FETCH_HEAD and synchronize FETCH_HEAD to the firefly branch

git rebase FETCH_HEAD
GoogleDriver[bundle]
Product ROC-RK3399-PC-PLUS complie
Default HDMI
./FFTools/make.sh -d rk3399-roc-pc-plus -j8 -l rk3399_roc_pc_plus-userdebug
./FFTools/mkupdate/mkupdate.sh -l rk3399_roc_pc_plus-userdebug
Manual compilation
ROC-RK3399-PC-PLUS
Before compiling, execute the following command:
export JAVA_HOME=/usr/lib/jvm/java-8-openjdk-amd64
export PATH=$JAVA_HOME/bin:$PATH
export CLASSPATH=.:$JAVA_HOME/lib:$JAVA_HOME/lib/tools.jar
Compile Kernel:
cd ~/proj/firefly-rk3399-industry/kernel/
make ARCH=arm64 firefly_defconfig
make -j8 ARCH=arm64 rk3399-roc-pc-plus.img
Compile Uboot:
cd ~/proj/firefly-rk3399-industry/u-boot/
make rk3399_defconfig
make ARCHV=aarch64 -j8
Compile Android:
cd ~/proj/firefly-rk3399-industry/
source build/envsetup.sh
lunch rk3399_roc_pc_plus-userdebug
make installclean
make -j8
./mkimage.sh
Create update.img
Compiled with Firefly’s script can be packaged into update.img, run: ./FFTools/mkupdate/mkupdate.sh -l rk3399_roc_pc_plus-userdebug update After the package is finished, the update.img will be generated under rockdev/Image-roc_3399_pc_plus/
Create update.img in Windows is simple. Just copy the files to AndroidTool’s rockdev\Image directory as previous step. Then run the batch file mkupdate.bat in rockdev directory, which will create update.img under rockdev\Image.
Create firmware for TF Card startup
After compiling, execute the following command, then package the Firefly official script into a unified SD card firmware, and execute the following command:
./mkimage sdboot
./FFTools/mkupdate/mkupdate.sh -l roc_3399_pc_plus-userdebug
update After the package is finished, the update.img will be generated under rockdev/Image-roc_3399_pc_plus/
(Note: there is no difference in the name of SD card firmware and EMMC firmware when they are generated. The name of firmware with SD on the official website resource is manually modified after it is packaged and generated for users to distinguish)
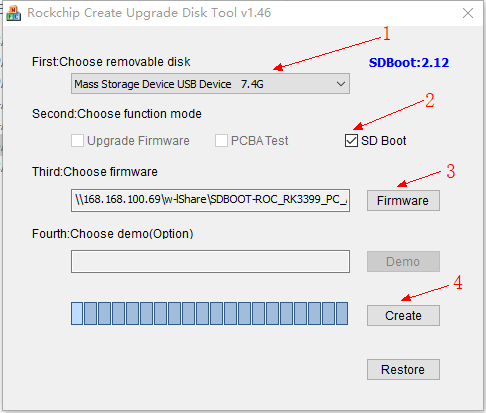
Using Rockchip’s SD_Firmware_Tool tool to create a SD card boot, first select the device, select SD boot in the functional mode, then select the firmware generated by uploading, and finally click Create.The SD_Firmware_Tool interface is shown below.
Flashing partition images
./mkimage.sh at previous step will repack boot.img and system.img, and copy other related image files to the rockdev/Image-roc_3399_pc_plus/ directory. The common image files are listed below:
boot.img : Android’s initramfs, to initialize and mount system partition.
kernel.img : Kernel image.
misc.img : Misc partition image, to switch boot mode and pass parameter in recovery mode.
recovery.img : Recovery mode image.
resource.img : Resource image, containing boot logo and kernel’s device tree info.
system.img : System partition image with ext4 filesystem format.
trust.img :File about sleep
RK3399MiniLoaderAll_V1.05.bin :Loader
uboot.img :uboot
Pleasese flash the image according to Flash image.
If you are using Windows system to flash the images, please copy the image files mentioned above to rockdev\Image directory in AndroidTool (Image flash tool in Windows). Then follow instructions in the flash image guide. This is the easy way, using default configuration, no need to modify image file’s path.
update.img is convenient to distribute to end users to upgrade the system, while partition images are more frequently used during development.