3. 技术案例
3.1. OpenSIP搭建
SIP(Session Initiation Protocol,会话初始协议)的开发目的是用来帮助提供跨越因特网的高级电话业务。因特网电话(IP电话)正在向一种正式的商业电话模式演进,SIP就是用来确保这种演进实现而需要的NGN(下一代网络)系列协议中重要的一员。支持H.264协议。
本次使用的系统为Ubuntu18.04(若使用ubutu20.04或Debian等可能需稍作修改)
3.1.1. 编译opensips
安装所需的环境包
sudo apt-get install flex bison libncurses5-dev

#安装MySQL 5.7 版本数据库
sudo apt-get install mysql-server
sudo apt-get install mysql-client
sudo apt-get install libmysqlclient-dev

git clone https://github.com/OpenSIPS/opensips.git -b2.2 opensips-2.2
编译前配置:
添加 db_mysql 模块功能并保存
修改安装目录 PREFIX=/usr/local/opensips/
# unset C_INCLUDE_PATH 如果编译对象menuconfig不成功,尝试执行此命令
make menuconfig

---------------------------------------------
|                                           |
|    --->  Configure Compile Options        |
|          Compile And Install OpenSIPS     |
|          Cleanup OpenSIPS sources         |
|          Generate OpenSIPS Script         |
|          Exit & Save All Changes          |
---------------------------------------------

选择
Configure Compile Options
    Configure Excluded Modules
        [*] db_mysql #勾选MySQL支持模块
    Configure Install Prefix
        /usr/local/opensips/    #建议修改安装路径,以后容易卸载opensips
编译:
make all -j6
make install
3.1.2. sips服务配置
3.1.2.1. 2.1 修改opensips.cfg
---------------------------------------------
|                                           |
|          Configure Compile Options        |
|          Compile And Install OpenSIPS     |
|          Cleanup OpenSIPS sources         |
|    --->  Generate OpenSIPS Script         |
|          Exit & Save All Changes          |
---------------------------------------------

Generate OpenSIPS Script
    Residential Script
        Configure Residential Script    #1. 先配置script
            #添加:
            [*] ENABLE_TCP
            [*] USE_AUTH
            [*] USE_DBACC
            [*] USE_DBUSRLOC
            [*] USE_DIALOG
        Save Residential Script         #2. 保存配置
        Generate Residential Script     #3. 生成script
替换opensips.cfg: cp opensips-2.2/etc/opensips_residential_2021-5-6_7:21:6.cfg opensips.cfg
修改opensips.cfg中的mpath变量: mpath=”/usr/local/opensips/lib64/opensips/modules/”
修改listen为机器IP: listen=udp:127.0.0.1:5060 # CUSTOMIZE ME listen=tcp:127.0.0.1:5060 # CUSTOMIZE ME
检测配置文件语法是否通过
sbin/opensips -C

May  6 07:30:20 [6441] INFO:core:fix_poll_method: using epoll_lt as the IO watch method (auto detected)
Listening on
             udp: 168.168.102.131 [168.168.102.131]:5060
             tcp: 168.168.102.131 [168.168.102.131]:5060
Aliases:

May  6 07:30:20 [6441] NOTICE:core:main: config file ok, exiting...
3.1.2.2. 2.2 修改 opensipsctlrc
SIP_DOMAIN=168.168.102.131
DBENGINE=MYSQL
#localhost
DBHOST=168.168.102.131
DBNAME=opensips
DBRWUSER=opensips
DBRWPW="opensipsrw"
DBROOTUSER="root"
3.1.2.3. 2.3 创建 opensips数据库
root@firefly:/usr/local/opensips/sbin# ./opensipsdbctl create
MySQL password for root:
INFO: test server charset
INFO: creating database opensips ...
INFO: Using table engine InnoDB.
INFO: Core OpenSIPS tables successfully created.
Install presence related tables? (y/n): y
INFO: creating presence tables into opensips ...
INFO: Presence tables successfully created.
Install tables for imc cpl siptrace domainpolicy carrierroute userblacklist b2b cachedb_sql registrant call_center fraud_detection emergency? (y/n): y
INFO: creating extra tables into opensips ...
INFO: Extra tables successfully created.
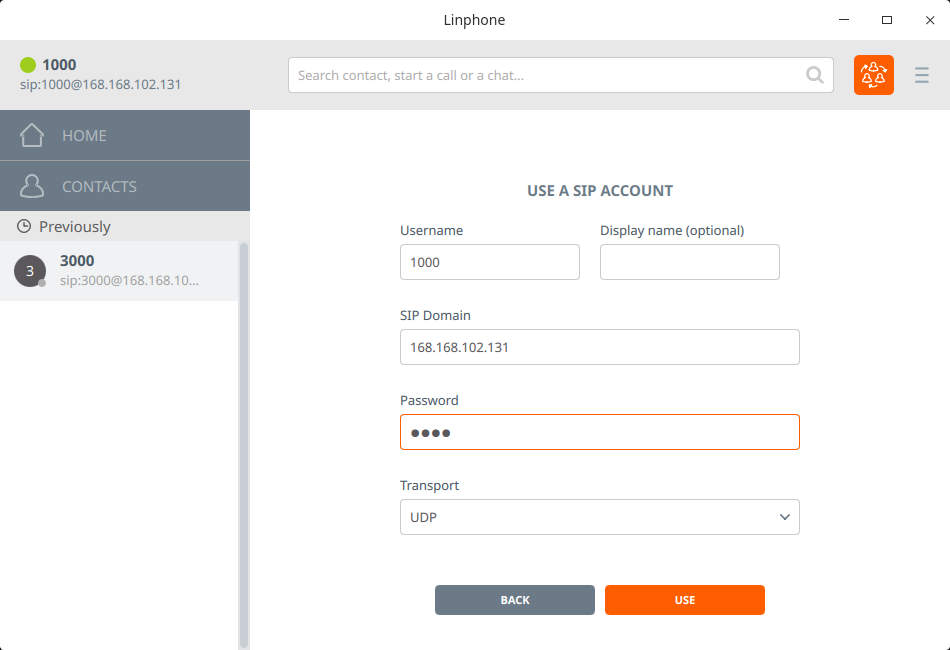
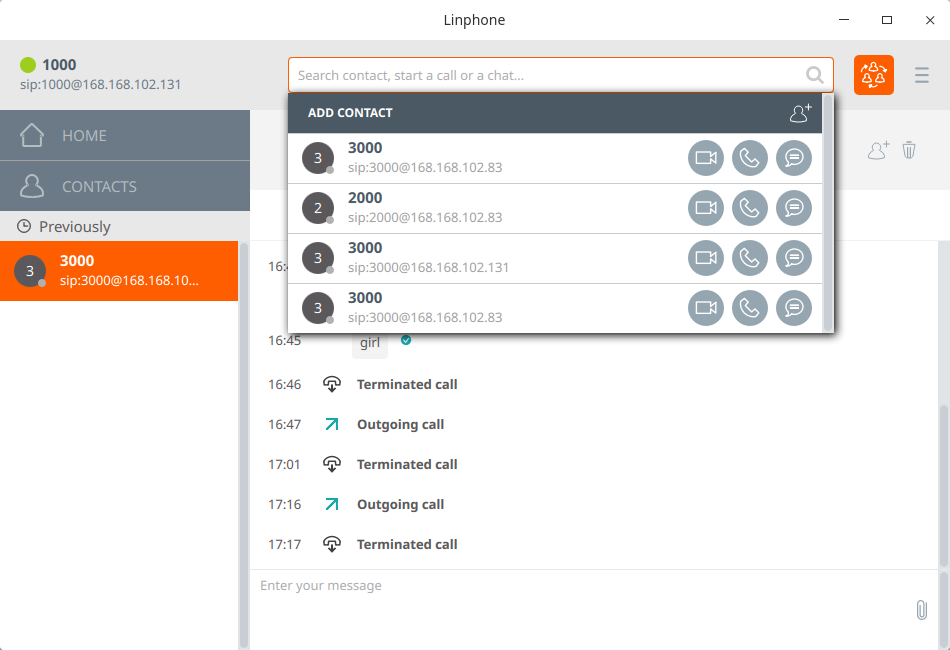
3.1.2.4. 2.4 添加sip用户
./opensipsctl add username password #添加用户
./opensipsctl add 1000 1000     #添加一个账号和密码同为‘1000’的opensips用户
./opensipsctl add 2000 2000     #添加一个账号和密码同为‘2000’的opensips用户
./opensipsctl add 3000 3000     #添加一个账号和密码同为‘3000’的opensips用户
查看MySQL中opensips数据库添加情况
mysql -u opensips

show databases;
use opensips;
select * from subscriber;
具体操作过程:
mysql> show databases;
+--------------------+
| Database           |
+--------------------+
| information_schema |
| mysql              |
| opensips           |
| performance_schema |
| sys                |
+--------------------+
5 rows in set (0.00 sec)

mysql> use opensips;
Reading table information for completion of table and column names
You can turn off this feature to get a quicker startup with -A

Database changed
mysql> use opensips;
Database changed
mysql> select * from subscriber;

| id | username | domain          | password | email_address | ha1                              | ha1b                             | rpid |

|  1 | 1000     | 168.168.102.131 | 1000     |               | 723edede4ecefd0b5762a9d17e32901a | e6c216c8db0d13ce066491f19164a12b | NULL |
|  2 | 2000     | 168.168.102.131 | 2000     |               | 6d3515702693940f19e95e82be498e42 | 10299abcbca6bee63078df877918e557 | NULL |
|  3 | 3000     | 168.168.102.131 | 3000     |               | 1d3a4a80dc09cecea466877fea882811 | 8255c1a861f98b431dc621166130c9d8 | NULL |

3 rows in set (0.01 sec)
3.1.3. 3. 启动sips服务
启动opensips服务: sudo service mysql restart

3.1.5. FAQ
Can’t connect to MySQL server on ‘168.168.100.178’ (111) root@jinchengubuntu-VirtualBox:/usr/local/opensips/sbin# ./opensipsdbctl create MySQL password for root: INFO: test server charset mysql: [Warning] Using a password on the command line interface can be insecure. ERROR 2003 (HY000): Can’t connect to MySQL server on ‘168.168.100.178’ (111) mysql: [Warning] Using a password on the command line interface can be insecure. ERROR 2003 (HY000): Can’t connect to MySQL server on ‘168.168.100.178’ (111) WARNING: Failed to get the available and used character sets
注释
root@jinchengubuntu-VirtualBox:/etc/mysql# grep "bind-address" * -nR
mysql.conf.d/mysqld.cnf:43:bind-address         = 127.0.0.1

sudo service mysql restart
3.2. MIPI 摄像头
带有 MIPI CSI 接口的 RK3399 板子都添加了双 MIPI 摄像头 OV13850 的支持,应用中也添加了摄像头的例子。下面介绍一下相关配置。
3.2.1. 设备树文件配置
以 rk3399-firefly-aiojd4.dts 为例,这些都是摄像头需要打开的配置。由于内核已经添加了双 MIPI 摄像头的支持,所以这里配置了两个摄像头,如果只使用一个摄像只需要打开其中一个摄像头就可以了。
//电源管理
&vcc_mipi {
        status = "okay";
};

&dvdd_1v2 {
        status = "okay";
};

//MIPI 摄像头1
&ov13850 {
        status = "okay";
};
&rkisp1_0 {
        status = "okay";
};

&mipi_dphy_rx0 {
        status = "okay";
};

&isp0_mmu {
        status = "okay";
};
//MIPI 摄像头2
&ov13850_1 {
        status = "okay";
};
&rkisp1_1 {
        status = "okay";
};
&mipi_dphy_tx1rx1 {
        status = "okay";
};

&isp1_mmu {
        status = "okay";
};
注意: 如果使用的是 core-3399 核心板加上 DIY 底板,可能需要修改相应的 GPIO 属性。
3.2.2. 调试
在运行脚本之前先确认一下 OV13850 设备是否注册成功,下面是成功的内核日志:
root@firefly:~# dmesg | grep ov13850
//MIPI 摄像头1
[    1.276762] ov13850 1-0036: GPIO lookup for consumer reset
[    1.276771] ov13850 1-0036: using device tree for GPIO lookup
[    1.276803] of_get_named_gpiod_flags: parsed 'reset-gpios' property of node '/i2c@ff110000/ov13850@36[0]' - status (0)
[    1.276855] ov13850 1-0036: Looking up avdd-supply from device tree
[    1.277034] ov13850 1-0036: Looking up dovdd-supply from device tree
[    1.277170] ov13850 1-0036: Looking up dvdd-supply from device tree
[    1.277535] ov13850 1-0036: GPIO lookup for consumer pwdn
[    1.277544] ov13850 1-0036: using device tree for GPIO lookup
[    1.277575] of_get_named_gpiod_flags: parsed 'pwdn-gpios' property of node '/i2c@ff110000/ov13850@36[0]' - status (0)
[    1.281862] ov13850 1-0036: Detected OV00d850 sensor, REVISION 0xb2
//MIPI 摄像头2
[    1.284442] ov13850 1-0046: GPIO lookup for consumer pwdn
[    1.284461] ov13850 1-0046: using device tree for GPIO lookup
[    1.284523] of_get_named_gpiod_flags: parsed 'pwdn-gpios' property of node '/i2c@ff110000/ov13850@46[0]' - status (0)
[    1.288235] ov13850 1-0046: Detected OV00d850 sensor, REVISION 0xb2
在 /dev 下应该生成相关设备文件:
root@firefly:~# ls /dev/video
//MIPI 摄像头1
video0  video1  video2  video3
//MIPI 摄像头2
video4  video5  video6  video7
注意: 同理,如果只使用一个摄像头,只需要注册一个摄像头设备就可以了。
3.2.3. 测试预览摄像头
3.2.3.1. v4l2
使用v4l2方式预览摄像头:
apt-get install -y git libopencv-dev cmake libdrm-dev g++ librga-dev

git clone https://github.com/T-Firefly/rkisp-v4l2.git

cd rkisp-v4l2/rkisp_demo/
cmake ./
make

sudo -u firefly DISPLAY=:0 ./rkisp_demo -c 300 -d /dev/video0 -w 640 -h 480
or
sudo -u firefly DISPLAY=:0 ./rkisp_demo -c 300 -d /dev/video5 -w 640 -h 480
3.2.3.2. gstreamer
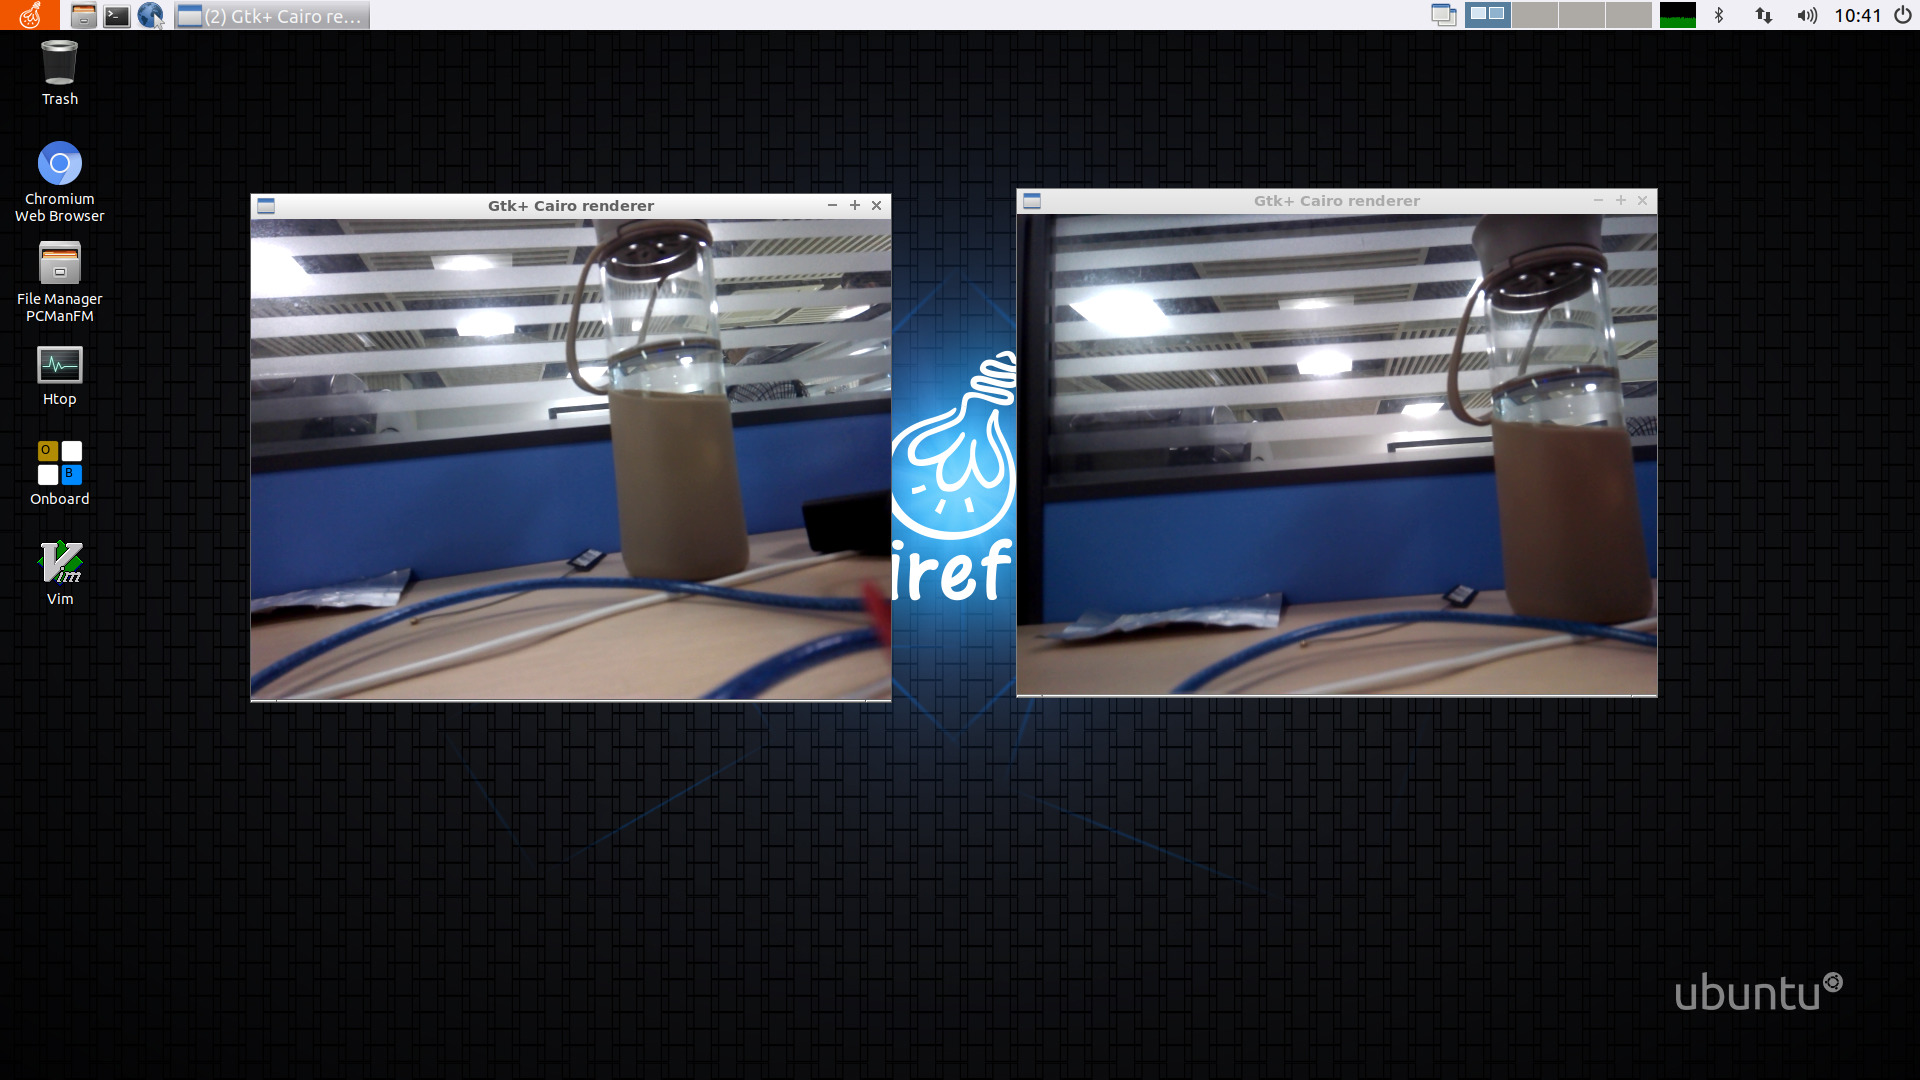
使用gstreamer方式预览摄像头:
gst-launch-1.0 v4l2src device=/dev/video0 ! video/x-raw,format=NV12,width=640,height=480, framerate=30/1 ! videoconvert ! kmssink &
运行脚本即可,结果如图所示:
3.2.4. 开发MIPI 摄像头
3.2.4.1. FFMPEG读取MIPI摄像头
使用v4l2loopback和FFMPEG多路投影
apt-get install -y git libopencv-dev cmake libdrm-dev g++ librga-dev python-dev

git clone https://github.com/umlaeute/v4l2loopback.git

cd v4l2loopback/

#参考 《安装linux-headers和linux-image》
make install
...

//使用v4l2loopback创建 video10、video11和video12设备
sudo insmod v4l2loopback.ko videonr=10,11,12

#打开读取video0设备,并把图像信息写入到video10中
sudo -u firefly DISPLAY=:0  ./rkisp_demo -c 300  -d /dev/video0 -w 640  -h 480 -D /dev/video10

// 使用ffmpeg拷贝功能将video10中的内容,拷贝到video11和video12设备中
ffmpeg -loglevel quiet -f v4l2 -video_size 640x480 -r 10 -i /dev/video10 -preset fast -codec copy -f v4l2 /dev/video11 -preset fast -codec copy -f v4l2 /dev/video12

// 另起一个终端,使用ffplay工具任意预览video11或video12
ffplay -i /dev/video11
3.2.4.2. OpenCV读取MIPI摄像头
MIPI摄像头是不支持OpenCV中 capture.open(index) 方式读取的,在此提供2中读取摄像头的方法:
这种方式推荐OpenCV的C++版本使用,详细使用参考前面的v4l2预览一节。v4l2_simple_demo是rkisp_demo.cpp的精简版本,详细可参考rkisp_demo.cpp。
C++
推荐OpenCV的C++版本使用,详细使用参考前面的v4l2预览一节。v4l2_simple_demo是rkisp_demo.cpp的精简版本,详细可参考rkisp_demo.cpp。
参考:
https://github.com/T-Firefly/rkisp-v4l2.git

git clone https://github.com/T-Firefly/rkisp-v4l2.git
cd rkisp-v4l2/mipi_video_demo/v4l2_simple_demo
make
# open /dev/video0
sudo -u firefly DISPLAY=:0 ./opencv
Python
使用 OpenCV-Python 方式读取 MIPI 摄像头需要添加Gstreamer支持,并需要重现编译安装OpenCV。参考《OpenCV 编译和安装》
git clone https://gitlab.com/firefly-linux/test_code/rkisp-v4l2.git
cd mipi_video_demo/OpenCV_Python
# Please read rkisp-v4l2/mipi_video_demo/OpenCV_Python/README.md carefully.
python3 opencv_gst_test.py
3.3. OpenCV 编译和安装
不少客户遇到OpenCV的问题多集中在如何获取mipi摄像头的数据。因为OpenCV使用的V4l2协议和Rockchip编写的mipi摄像头驱动协议不同,所以不能直接使用OpenCV的摄像头API。本节讲述如何编译Opencv并添加GStreamer API支持。
3.3.1. 要求
OS: Ubuntu18.04 / Debian 10
OpenCV version: 3.4.15
Board: RK3399
3.3.2. 编译和安装
搭建python3.7虚拟环境
# 依次安装gcc和cmake等编译环境
# 安装python3.7-tk 和 python3.7-dev
# 安装virtualenv虚拟环境
sudo apt install gcc cmake git build-essential \
python3-tk python3.7-dev \
virtualenv
创建python3.7虚拟环境
virtualenv -p /usr/bin/python3.7m /home/firefly/venv
# 使用虚拟环境,如果想退出可以在终端输入 deactivate
source /home/firefly/venv/bin/activate
安装Opencv所需的环境包
# 安装编译环境、gtk包和相关编解码库
sudo apt install cmake build-essential libgtk2.0-dev pkg-config libavcodec-dev libavformat-dev libswscale-dev libtbb2 libtbb-dev libjpeg-dev libpng-dev libtiff-dev libdc1394-22-dev libjasper-dev

# 注意!如果安装了rknn_toolkit(or lite)则不需要再安装Python-numpy,否则会导致rknn_toolkit(or lite)无法使用
sudo apt install python-numpy
下载Opencv
# 创建文件夹
mkdir opencv
cd opencv

# 下载 opencv-3.4.15.zip
wget https://github.com/opencv/opencv/archive/refs/tags/3.4.15.zip
unzip opencv-3.4.15.zip
配置
mkdir build
cd build

# 让 OpenCV 和 Python3 之间建立联系
cmake -D CMAKE_BUILD_TYPE=RELEASE \
-D 	PYTHON_DEFAULT_EXECUTABLE=$(python -c "import sys; print(sys.executable)")\
-D PYTHON3_EXECUTABLE=$(python -c "import sys; print(sys.executable)")  \
-D PYTHON3_NUMPY_INCLUDE_DIRS=$(python -c "import numpy; print (numpy.get_include())")  \
-D PYTHON3_PACKAGES_PATH=$(python -c "from distutils.sysconfig import get_python_lib; print(get_python_lib())")  \
../opencv-3.4.15
如需支持Gstreamer API,则进行以下配置操作否则跳过
sudo apt install libgstreamer1.0-dev libgstreamer-plugins-base1.0-dev
cmake -D WITH_GSTREAMER=ON ../opencv-3.4.15
编译安装
# 如果板子内存不超过2G,建议不超过-j4
make -j6
# 安装的过程需要sudo权限
sudo make install
3.3.3. 测试
测试
source /home/firefly/venv/bin/activate
git clone https://gitlab.com/firefly-linux/test_code/rkisp-v4l2.git
cd mipi_video_demo/OpenCV_Python
python3 opencv_gst_test.py
opencv_gst_test.py 代码
import numpy as np
import cv2 as cv
import os
import time

cap = cv.VideoCapture('v4l2src device=/dev/video1 ! video/x-raw, format=NV12, width=640, height=480, framerate=30/1 ! videoconvert ! appsink', cv.CAP_GSTREAMER)

if not cap.isOpened():
    print("Cannot capture from camera. Exiting.")
    os._exit()
last_time = time.time()

while(True):

    ret, frame = cap.read()
    this_time = time.time()
    print (str((this_time-last_time)*1000)+'ms')
    last_time = this_time;
    cv.imshow('frame', frame)

    if cv.waitKey(1) & 0xFF == ord('q'):
        break

cap.release()
cv.destroyAllWindows()
3.4. USB 以太网
USB 以太网,主要实现的是将设备的 OTG 接口做外设模式,模拟成一个网络接口,然后主机通过 USB 连接设备并通过设备访问互联网。以下是基于 Firefly-RK3399 板卡进行的具体操作。
操作环境:
Ubuntu 系统的 PC 机
Firefly-RK3399 板卡
3.4.1. 内核设置
在内核目录下,打开内核配置选项菜单:
make firefly_linux_defconfig
make menuconfig
进入内核配置菜单后依次选择:Device Drivers -> USB Support -> USB Gadget Support。
将 USB Gadget Driver 设置成编译成模块,然后可以在下边找到 Ethernet Gadget (with CDC Ethernet support) 选项,同样选择编译成模块。同时要选择上 RNDIS support。
<M>   USB Gadget Drivers
<M>     USB functions configurable through configfs
<M>     Ethernet Gadget (with CDC Ethernet support)
[*]       RNDIS support (NEW)
接着在 kernel 目录下编译内核:
make rk3399-firefly.img -j12
编译完成后将内核烧录到设备中,烧录过程请用户参考相应板卡维基的升级固件页面。然后将内核目录下生成的下列模块复制到设备中:
drivers/usb/gadget/function/u_ether.ko
drivers/usb/gadget/function/usb_f_ecm_subset.ko
drivers/usb/gadget/function/usb_f_ecm.ko
drivers/usb/gadget/function/usb_f_rndis.ko
drivers/usb/gadget/function/usb_f_eem.ko
drivers/usb/gadget/legacy/g_ether.ko
drivers/usb/gadget/libcomposite.ko
然后在设备上,依次加载上述模块:
insmod libcomposite.ko
insmod u_ether.ko
insmod usb_f_ecm_subset.ko
insmod usb_f_rndis.ko
insmod usb_f_ecm.ko
insmod usb_f_eem.ko
insmod g_ether.ko
注意: 要先加载 libcomposite.ko 和 u_ether.ko,后面的模块才可以加载进去。
3.4.2. IP 地址设置
用数据线连接 PC 机和设备的 OTG 接口,在 PC 机中执行 lsusb 命令可以查看到 USB 以太网设备,即说明连接成功。
firefly@Desktop:~$ lsusb
Bus 002 Device 003: ID 09da:5814 A4Tech Co., Ltd.
Bus 002 Device 002: ID 8087:0024 Intel Corp. Integrated Rate Matching Hub
Bus 002 Device 001: ID 1d6b:0002 Linux Foundation 2.0 root hub
Bus 001 Device 005: ID 04f2:b2ea Chicony Electronics Co., Ltd Integrated Camera [ThinkPad]
Bus 001 Device 004: ID 0a5c:21e6 Broadcom Corp. BCM20702 Bluetooth 4.0 [ThinkPad]
Bus 001 Device 003: ID 147e:1002 Upek Biometric Touchchip/Touchstrip Fingerprint Sensor
Bus 001 Device 002: ID 8087:0024 Intel Corp. Integrated Rate Matching Hub
Bus 001 Device 001: ID 1d6b:0002 Linux Foundation 2.0 root hub
Bus 004 Device 001: ID 1d6b:0003 Linux Foundation 3.0 root hub
Bus 003 Device 003: ID 0525:a4a2 Netchip Technology, Inc. Linux-USB Ethernet/RNDIS Gadget
Bus 003 Device 001: ID 1d6b:0002 Linux Foundation 2.0 root hub
输出信息中 ID 0525:a4a2 Netchip Technology, Inc. Linux-USB Ethernet/RNDIS Gadget 即为 USB 网卡设备。
设备插入网线,使设备可以连接外网。
在设备中 IP 的设置:
输入执行 ifconfig -a 命令,可以查看到以下信息:
root@firefly:~# ifconfig -a

# eth0 是有线网卡
eth0: flags=4163<UP,BROADCAST,RUNNING,MULTICAST>  mtu 1500
        inet 168.168.100.48  netmask 255.255.0.0  broadcast 168.168.255.255
        inet6 fe80::1351:ae2f:442e:e436  prefixlen 64  scopeid 0x20<link>
        ether 8a:4f:c3:77:94:ac  txqueuelen 1000  (Ethernet)
        RX packets 9759  bytes 897943 (897.9 KB)
        RX errors 0  dropped 0  overruns 0  frame 0
        TX packets 236  bytes 35172 (35.1 KB)
        TX errors 0  dropped 0 overruns 0  carrier 0  collisions 0
        device interrupt 42  base 0x8000

        ...

# usb0 是虚拟的 usb 网卡
usb0: flags=4098<BROADCAST,MULTICAST>  mtu 1500
        ether 4a:81:b1:34:d2:ad  txqueuelen 1000  (Ethernet)
        RX packets 0  bytes 0 (0.0 B)
        RX errors 0  dropped 0  overruns 0  frame 0
        TX packets 0  bytes 0 (0.0 B)
        TX errors 0  dropped 0 overruns 0  carrier 0  collisions 0
然后给 usb0 网卡自定义一个适当的 IP:
注意要设置 usb0 的 IP 和有线网卡 eth0 的 IP 不在同一网段!!
ifconfig usb0 192.168.1.101
在 PC 机中 IP 的设置:
# 先查看 USB 虚拟网卡
firefly@Desktop:~$ ifconfig
enp0s20u2i1: flags=4163<UP,BROADCAST,RUNNING,MULTICAST>  mtu 1500
        inet 192.168.2.90  netmask 255.255.255.0  broadcast 192.168.2.255
        inet6 fe80::871c:b87e:1327:7fd4  prefixlen 64  scopeid 0x20<link>
        ether 46:fe:6e:97:ee:a6  txqueuelen 1000  (以太网)
        RX packets 0  bytes 0 (0.0 B)
        RX errors 0  dropped 0  overruns 0  frame 0
        TX packets 1  bytes 54 (54.0 B)
        TX errors 0  dropped 0 overruns 0  carrier 0  collisions 0
...

# 设置 USB 网卡的 IP 地址和设备的 usb0 的 IP 地址在同一网段
firefly@Desktop:~$ sudo ifconfig enp0s20u2i1 192.168.1.100

#设置默认网关:要设置为设备 usb0 的 ip 地址,因为后面要通过 usb0 来进行流量的转发
firefly@Desktop:~$ sudo route add default gw 192.168.1.101
设置完设备和 PC 机的 IP 后,互相是可以 ping 通的,PC 机也可以用 ssh 命令登录到设备。
3.4.3. 网络共享实现 PC 机上网
在设备上:首先打开 IPv4 的转发功能:
echo 1 > /proc/sys/net/ipv4/ip_forward
如果希望每次重启设备后都自动打开转发功能,请直接修改 /etc/sysctl.conf 文件的 net.ipv4.ip_forward 值为1。修改文件参数后要执行 sysctl -p 命令重新载入 /etc/sysctl.conf 文件,使 IPv4 转发功能生效。
添加规则进行流量转发:
iptables -t nat -A POSTROUTING -s 192.168.1.0/24 -o eth0 -j SNAT --to-source 168.168.100.48
现在 PC 主机就可以访问网络了。如果 PC 机可以 ping 通设备的 usb0 和 eth0,但是无法上外网,则需要修改 PC 机的 DNS,在 /etc/resolv.conf 中做以下添加:
nameserver 8.8.8.8
nameserver 8.8.4.4
配置过程中要注意以下几点:
对应好上述步骤中自己设备上的各个 IP 地址,注意设备上的 USB 虚拟网卡 IP 和有线网络 IP 不在同一网段;
PC 机虚拟 USB 网卡的网关要设置为设备虚拟 USB 网卡的 IP 地址;
设备上的虚拟网卡 IP 地址、IP 转发功能、流量转发规则等设置会在设备重启后恢复,用户可以自行查找资料如何开机自动设置这些配置。
3.5. 网络启动
网络启动,是用 TFTP 在服务器下载内核、dtb 文件到目标机的内存中,同时可以用 NFS 挂载网络根文件系统到目标机上,实现目标机的无盘启动。以下基于 Firefly-RK3399 板卡作出一个示例,提供用户参考。
准备工作:
Firefly-RK3399 板卡
路由器、网线
安装有 NFS 和 TFTP 的服务器
一份制作好的根文件系统
注:示例中使用的是 Ubuntu 系统的 PC 机作为服务器,通过路由器和网线实现与设备的连接。用户可以根据自己的实际情况作调整,但如果是 PC 机直连设备,请使用交叉网线。请确保服务器和目标机在同一局域网内。
3.5.1. 服务器部署
1、在服务器上部署 TFTP 服务:
安装 TFTP 服务:
sudo apt-get install tftpd-hpa
创建 /tftpboot 目录并赋予权限:
mkdir /tftpboot
sudo chmod 777 /tftpboot
然后修改 TFTP 服务器的配置文件 /etc/default/tftpd-hpa,修改内容为:
# /etc/default/tftpd-hpa

TFTP_USERNAME="tftp"
TFTP_DIRECTORY="/tftpboot"   # 这个根据用户实际的 tftp 目录设置
TFTP_ADDRESS="0.0.0.0:69"
TFTP_OPTIONS="-c -s -l"
退出修改后重启 TFTP 服务器:
sudo service tftpd-hpa restart
在 /tftpboot 目录中创建一个文件,测试 TFTP 服务是否可用:
firefly@Desktop:~$ cd /tftpboot/
firefly@Desktop:/tftpboot$ touch test
firefly@Desktop:/tftpboot$ cd /tmp
firefly@Desktop:/tmp$ tftp 127.0.0.1
tftp> get test
tftp> q
查看 /tmp 目录中的文件,如果看到了 test 文件表示 TFTP 服务器是可用的。
2、在服务器上部署 NFS 服务:
安装 NFS 服务器:
sudo apt-get install nfs-kernel-server
创建共享目录:
sudo mkdir /nfs
sudo chmod 777 /nfs
cd /nfs
sudo mkdir rootfs
sudo chmod 777 rootfs
然后将定制好的根文件系统复制到 /nfs/rootfs 目录中。
接着配置 NFS,在 /etc/exports 中添加共享目录位置:
/nfs/rootfs *(rw,sync,no_root_squash,no_subtree_check)
共享的目录根据用户实际情况设置,其中的 “*” 代表的是所有用户可访问。
重启 NFS 服务器:
sudo /etc/init.d/nfs-kernel-server restart
本地挂载共享目录,测试 NFS 服务器是否可用:
sudo mount -t nfs 127.0.0.1:/nfs/rootfs/ /mnt
在 /mnt 目录下查看到了与 /nfs/rootfs 一致的内容,则说明 NFS 服务器部署成功。然后可以解除挂载:
sudo umount /mnt
3.5.2. 内核的配置
如果要做到挂载网络根文件系统,需要在内核中做相关配置,并在 dts 中修改相关挂载根文件系统的配置。
首先进行内核配置,在内核目录中执行 make menuconfig,选择相关配置:
[*] Networking support  --->
         Networking options  --->
                [*]   IP: kernel level autoconfiguration
                [*]     IP: DHCP support
                [*]     IP: BOOTP support
                [*]     IP: RARP support

File systems  --->
        [*] Network File Systems  --->
                [*]   Root file system on NFS
修改 rk3399-firefly.dts 配置,在 dts 文件中修改 chosen 节点下的 bootargs 参数,选择使用 NFS 挂载远程根文件系统,内容如下。
chosen {
    bootargs = "earlycon=uart8250,mmio32,0xff1a0000 swiotlb=1 console=ttyFIQ0 root=/dev/nfs rootfstype=ext4 rootwait";
};

#主要是修改 root 的值,root=/dev/nfs 表示通过 NFS 挂载网络根文件系统
编译内核:
make ARCH=arm64 rk3399-firefly.img -j12
编译完成后,将编译好的内核文件 boot.img 和 rk3399-firefly.dtb 文件复制到 /tftpboot 目录中:
cp boot.img /tftpboot
cp arch/arm64/boot/dts/rockchip/rk3399-firefly.dtb /tftpboot
详细说明可以参考内核目录中的 kernel/Documentation/filesystems/nfs/nfsroot.txt
3.5.3. U-Boot 设置
请先确保目标机网线已插入,接入到服务器的局域网内。
目标机启动进入 U-Boot 命令行模式,设置以下参数:
=> setenv ipaddr 192.168.31.101     # 设置目标机 IP 地址
=> setenv serverip 192.168.31.106   # 设置 serverip 为服务器 IP 地址

# 设置从 TFTP 下载内核和 dtb 文件到相应地址,用户请根据自己实际的目标机修改相应地址
=> setenv bootcmd tftpboot 0x0027f800 boot.img \; tftpboot 0x08300000 rk3399-firefly.dtb \; bootm 0x0027f800 - 0x08300000

# 设置挂载网络根文件系统,IP 参数依次为:目标机 IP:服务器 IP:网关:网络掩码:设备名:off,可以更简单的设置 ip=dhcp,通过 DHXP 自动分配 IP
=> setenv bootargs root=/dev/nfs rw nfsroot=192.168.31.106:/nfs/rootfs,v3 ip=192.168.31.101:192.168.31.106:192.168.31.1:255.255.255.0::eth0:off

# 如果不想每次开机都设置一遍,可以保存上面配置的变量
=> saveenv
Saving Environment to MMC...
Writing to MMC(0)... done

# 启动目标机
=> boot
ethernet@fe300000 Waiting for PHY auto negotiation to complete. done
Speed: 100, full duplex
Using ethernet@fe300000 device
TFTP from server 192.168.31.106; our IP address is 192.168.31.101
Filename 'boot.img'.
Load address: 0x27f800
Loading: #################################################################
         #################################################################
         #################################################################
         #################################################################
         #################################################################
         ##################################################
         475.6 KiB/s
done
Bytes transferred = 20072448 (1324800 hex)
Speed: 100, full duplex
Using ethernet@fe300000 device
TFTP from server 192.168.31.106; our IP address is 192.168.31.101
Filename 'rk3399-firefly.dtb'.
Load address: 0x8300000
Loading: #######
         645.5 KiB/s
done
Bytes transferred = 97212 (17bbc hex)
## Booting Android Image at 0x0027f800 ...
Kernel load addr 0x00280000 size 19377 KiB
## Flattened Device Tree blob at 08300000
   Booting using the fdt blob at 0x8300000
   XIP Kernel Image ... OK
   Loading Device Tree to 0000000073edc000, end 0000000073ef6bbb ... OK
Adding bank: 0x00200000 - 0x08400000 (size: 0x08200000)
Adding bank: 0x0a200000 - 0x80000000 (size: 0x75e00000)
Total: 912260.463 ms

Starting kernel ...

...
在开机内核日志中可见:
[ 12.146297] VFS: Mounted root (nfs filesystem) on device 0:16.
说明已经挂载上了网络根文件系统。
注意事项
确保 TFTP 服务器、NFS 服务器可用;
确保目标机先插入网线后在开机,且和服务器在同一局域网内,如果是直连目标机和服务器,请使用交叉网线;
内核配置中,
Root file system on NFS依赖于IP: kernel level autoconfiguration选项,请先选择IP: kernel level autoconfiguration,之后才可以找到Root file system on NFS选项;在 U-Boot 命令行中,请确认
boot.img烧录地址和 dtb 文件烧录地址。(提示:boot.img的文件结构中,开头有2k的头文件,然后才是 kernel。所以在 TFTP 下载内核到目标机时,要下载到对应 kernel 地址减去 0x0800 的地址上);在设置挂载远程根文件系统时,
nfsroot=192.168.31.106:/nfs/rootfs,v3中的v3代表 NFS 版本信息,请添加上以避免出现挂载不成功的问题。
3.6. 外部存储设备 rootfs 挂载
根文件系统除了可以使用在内部的 eMMC 中的,还可以使用外部存储设备的根文件系统,如 SD 卡,U 盘等。以下是以 SD 卡为例,在 Firefly-RK3399 设备上实现挂载外部存储设备的根文件系统。
3.6.1. 在 SD 卡上建立分区
在 PC 机上插入 SD 卡,用 gdisk 工具分出一个装载根文件系统的分区:
# 用户请用 `fdisk -l` 查询 SD 卡设备名是什么,在用 gdisk 命令进入对应的设备
sudo gdisk /dev/sdb

GPT fdisk (gdisk) version 1.0.3

Partition table scan:
  MBR: protective
  BSD: not present
  APM: not present
  GPT: present

Found valid GPT with protective MBR; using GPT.

Command (? for help):

-------------------------------------------------------------------

# 输入 ? 查看帮助信息
# 按 p 显示 SD 卡当前已有分区,由于使用的 SD 卡暂未创建分区,所以没有查询到分区信息

Command (? for help): p
Disk /dev/sdb: 15278080 sectors, 7.3 GiB
Model: CARD-READER
Sector size (logical/physical): 512/512 bytes
Disk identifier (GUID): 5801AE61-92ED-42FB-A144-E522E8E15827
Partition table holds up to 128 entries
Main partition table begins at sector 2 and ends at sector 33
First usable sector is 34, last usable sector is 15278046
Partitions will be aligned on 2048-sector boundaries
Total free space is 15278013 sectors (7.3 GiB)

Number  Start (sector)    End (sector)  Size       Code  Name

-------------------------------------------------------------------

# 创建新的分区,请用户根据自身实际情况创建合适的分区大小给根文件系统

Command (? for help): n     # 输入 n 创建新分区
Partition number (1-128, default 1): 1      # 输入1创建第一个分区
First sector (34-15278046, default = 2048) or {+-}size{KMGTP}:   # 直接按回车,使用默认值
Last sector (2048-15278046, default = 15278046) or {+-}size{KMGTP}: +3G     # 创建分区大小为3G
Current type is 'Linux filesystem'
Hex code or GUID (L to show codes, Enter = 8300):       # 按回车使用默认值
Changed type of partition to 'Linux filesystem'

-------------------------------------------------------------------

# 创建完成后,输入 i,可以查看分区的 unique GUID

Command (? for help): i
Using 1
Partition GUID code: 0FC63DAF-8483-4772-8E79-3D69D8477DE4 (Linux filesystem)
Partition unique GUID: 6278AF5D-BC6B-4213-BBF6-47D333B5CB53   # 使用的是该分区的 unique GUID,记下前12位即可
First sector: 2048 (at 1024.0 KiB)
Last sector: 6293503 (at 3.0 GiB)
Partition size: 6291456 sectors (3.0 GiB)
Attribute flags: 0000000000000000
Partition name: 'Linux filesystem'

-------------------------------------------------------------------

# 输入 wq 保存修改并退出

Command (? for help): wq

Final checks complete. About to write GPT data. THIS WILL OVERWRITE EXISTING
PARTITIONS!!

Do you want to proceed? (Y/N): y
OK; writing new GUID partition table (GPT) to /dev/sdb.
Warning: The kernel is still using the old partition table.
The new table will be used at the next reboot or after you
run partprobe(8) or kpartx(8)
The operation has completed successfully.
把新创建的分区进行格式化。
# 注意 sdb1 表示 SD 卡对应分区设备名,请用户根据实际情况填入
sudo mkfs.ext4 /dev/sdb1
格式化完成后,使用 dd 命令,将制作好的根文件系统烧写到 SD 卡刚新建的分区中。(根文件系统的定制可以参考:《Ubuntu 根文件系统定制》)
# 用户请根据实际情况填写根文件系统镜像的路径和 SD 卡对应分区设备名
dd conv=fsync,notrunc if=/rootfs_path/rootfs.img of=/dev/sdb1
3.6.2. 挂载 SD 卡根文件系统
首先要修改设备树文件,打开对应的 dts 文件,在根节点下重写 chosen 节点下的 bootargs 参数的 root 值为写入了根文件系统的 SD 卡分区的 unique GUID:
# 将 root 的值改为获取到的 unique GUID 值的前 12 位
chosen {
    bootargs = "earlycon=uart8250,mmio32,0xff1a0000 swiotlb=1 console=ttyFIQ0 rw root=PARTUUID=6278AF5D-BC6B  rootfstype=ext4 rootwait";
};
修改完成后编译并烧录至设备中。
SD 卡的根文件系统烧录完成后,插入设备的 TF 卡槽中,开机即可进入到 SD 的根文件系统中。
注意事项:
在操作前请注意备份 U 盘或者 SD 卡内的重要文件,避免丢失;
操作时请确认自己的 SD 卡对应的设备名;
dts 文件中
root参数的值使用的是 unique GUID,记下前12位即可。用户也可以根据gdisk的帮助信息自行修改这个值。
3.7. 在线更新内核和 U-Boot
本小节介绍了在线更新的一个简单的流程。将内核、U-Boot 或者其他需要更新的文件打包成 deb 安装包,然后导入到本地包仓库,实现在设备上下载并自动更新。仅供用户参考。
3.7.1. 准备 deb 安装包
操作中需要升级内核和 U-Boot,事先已经准备好了修改好的相关文件:uboot.img 、trust.img 、boot.img 。
deb 是 Debian Linux 的软件包格式,打包最关键的是在 DEBIAN 目录下创建一个 control 文件。首先创建 deb 工作目录,然后在 deb 目录中创建相应的目录和文件:
mkdir deb
cd deb
mkdir firefly-firmware    # 创建 firefly-firmware 目录
cd firefly-firmware
mkdir DEBIAN    # 创建 DEBIAN 目录,这个目录是必须要有的。
mkdir -p usr/share/{kernel,uboot}
mv ~/boot.img ~/deb/firefly-firmware/usr/share/kernel  # 将相应文件放到相应的目录
mv ~/uboot.img ~/deb/firefly-firmware/usr/share/uboot
mv ~/trust.img ~/deb/firefly-firmware/usr/share/uboot
DEBIAN 目录下存放的文件是 deb 包安装的控制文件以及相应的脚本文件。
在 DEBIAN 目录下创建控制文件 control 和脚本文件 postinst。
control 文件内容如下,用于记录软件标识,版本号,平台,依赖信息等数据。
Package: firefly-firmware # 文件目录名
Version: 1.0    # 版本号
Architecture: arm64 # 架构
Maintainer: neg   # 维护人员,自定义即可
Installed-Size: 1
Section: test
Priority: optional
Descriptionon: This is a deb test
postinst 文件内容如下,就是将需要更新的内核和 U-Boot 文件用 dd 命令写进对应分区的脚本:
echo "-----------uboot updating------------"
dd conv=fsync,notrunc if=/usr/share/uboot/uboot.img of=/dev/disk/by-partlabel/uboot

echo "-----------trust updating------------"
dd conv=fsync,notrunc if=/usr/share/uboot/trust.img of=/dev/disk/by-partlabel/trust

echo "-----------kernel updating------------"
dd conv=fsync,notrunc if=/usr/share/kernel/boot.img of=/dev/disk/by-partlabel/boot
说明:postinst 脚本,是在解包数据后运行的脚本,对应的还有:
preinst:在解包数据前运行的脚本;
prerm:卸载时,在删除文件之前运行的脚本;
postrm:在删除文件之后运行的脚本;
其他相关知识点用户可以自行了解。这里只用到了 preinst 脚本。
以下是创建好的目录树:
deb
└── firefly-firmware
    ├── DEBIAN
    │   ├── control
    │   └── postinst
    └── usr
        └── share
            ├── kernel
            │   └── boot.img
            └── uboot
                ├── trust.img
                └── uboot.img
进入 deb 目录,用 dpkg 命令生成 deb 包:
dpkg -b firefly-firmware firefly-firmware_1.0_arm64.deb
生成 deb 包时,一般按照这种规范进行命名:package_version-reversion_arch.deb 。
3.7.2. 创建本地仓库
首先安装需要的包:
sudo apt-get install reprepro gnupg
然后用 GnuPG 工具生成一个 GPG 密匙,执行命令后请根据提示操作:
gpg --gen-key
执行 sudo gpg --list-keys 可以查看刚刚生成的密匙信息:
sudo gpg --list-keys

gpg: WARNING: unsafe ownership on homedir '/home/firefly/.gnupg'
gpg: 正在检查信任度数据库
gpg: marginals needed: 3  completes needed: 1  trust model: pgp
gpg: 深度:0 有效性:  4 已签名:  0 信任度:0-,0q,0n,0m,0f,4u
gpg: 下次信任度数据库检查将于 2021-05-29 进行
/home/firefly/.gnupg/pubring.kbx
--------------------------------
pub   rsa3072 2019-05-31 [SC] [有效至:2021-05-30]
      BCB65788541D632C057E696B8CBC526C05417B76
uid           [ 绝对 ] firefly <firefly@t-chip.com>
sub   rsa3072 2019-05-31 [E] [有效至:2021-05-30]
接下来创建包仓库,首先创建目录:
cd /var/www
mkdir apt   # 包仓库目录
mkdir -p ./apt/incoming
mkdir -p ./apt/conf
mkdir -p ./apt/key
把前面生成的密匙导出到仓库文件夹,请用户对应好自己创建的用户名和邮箱地址。
gpg --armor --export firefly firefly@t-chip.com > /var/www/apt/key/deb.gpg.key
在 conf 目录下创建 distributions 文件,其内容如下:
Origin: Neg   # 你的名字
Label: Mian     # 库的名字
Suite: stable   # (stable 或 unstable)
Codename: bionic    # 发布代码名,可自定义
Version: 1.0    # 发布版本
Architectures: arm64    # 架构
Components: main    # 组件名,如main,universe等
Description: Deb source test        # 相关描述
SignWith: BCB65788541D632C057E696B8CBC526C05417B76  # 上面步骤中生成的 GPG 密匙
建立仓库树:
reprepro --ask-passphrase -Vb /var/www/apt export
将第 2 步做好的 deb 包加入到仓库中:
reprepro --ask-passphrase -Vb /var/www/apt includedeb bionic ~/deb/firefly-firmware_1.0_arm64.deb
可以查看库中添加的文件:
root@Desktop:~# reprepro -b /var/www/apt/ list bionic
bionic|main|arm64: firefly-firmware 1.0
你的包已经加入了仓库,如果要移除它的话采用如下命令:
reprepro --ask-passphrase -Vb /var/www/apt remove bionic firefly-firmware
安装 nginx 服务器:
sudo apt-get install nginx
修改nginx的配置文件 /etc/nginx/sites-available/default 为:
server {
    listen 80 default_server;
    listen [::]:80 default_server;

    root /var/www/apt;      //本地包仓库的路径

    access_log /var/log/nginx/repo.access.log;
    error_log   /var/log/nginx/repo.error.log;

    location ~ /(db|conf) {
        deny all;
        return 404;
    }
}
重启 nginx 服务器:
sudo service nginx restart
3.7.3. 客户端更新安装
在客户端设备中,首先要添加本地包仓库的源,在目录 /etc/apt/sources.list.d 下添加一个新的配置文件 bionic.list,内容如下:
deb http://192.168.31.106 bionic main
IP 地址是服务器地址, bionic 是仓库发布代码名, main 是组件名。
从服务器中获取并添加 GPG 密匙:
wget -O - http://192.168.31.106/key/deb.gpg.key | apt-key add -
更新后即可安装自定义软件源里的 firefly-firmware_1.0_arm64 包:
root@firefly:/home/firefly# apt-get update
Hit:1 http://192.168.31.106 bionic InRelease
Hit:2 http://wiki.t-firefly.com/firefly-rk3399-repo bionic InRelease
Hit:3 http://ports.ubuntu.com/ubuntu-ports bionic InRelease
Hit:4 http://archive.canonical.com/ubuntu bionic InRelease
Hit:5 http://ports.ubuntu.com/ubuntu-ports bionic-updates InRelease
Hit:6 http://ports.ubuntu.com/ubuntu-ports bionic-backports InRelease
Hit:7 http://ports.ubuntu.com/ubuntu-ports bionic-security InRelease
Reading package lists... Done

root@firefly:/home/firefly# apt-get install firefly-firmware
Reading package lists... Done
Building dependency tree
Reading state information... Done
The following package was automatically installed and is no longer required:
  libllvm6.0
Use 'apt autoremove' to remove it.
The following NEW packages will be installed:
  firefly-firmware
0 upgraded, 1 newly installed, 0 to remove and 3 not upgraded.
Need to get 0 B/6982 kB of archives.
After this operation, 1024 B of additional disk space will be used.
Selecting previously unselected package firefly-firmware.
(Reading database ... 117088 files and directories currently installed.)
Preparing to unpack .../firefly-firmware_1.0_arm64.deb ...
Unpacking firefly-firmware (1.0) ...
Setting up firefly-firmware (1.0) ...
-----------uboot updating------------
8192+0 records in
8192+0 records out
4194304 bytes (4.2 MB, 4.0 MiB) copied, 0.437281 s, 9.6 MB/s
-----------trust updating------------
8192+0 records in
8192+0 records out
4194304 bytes (4.2 MB, 4.0 MiB) copied, 0.565762 s, 7.4 MB/s
-----------kernel updating------------
39752+0 records in
39752+0 records out
20353024 bytes (20 MB, 19 MiB) copied, 0.1702 s, 120 MB/s
可以看到安装过程中执行了 deb 包中的 poinst 脚本。安装完成后,重启设备,更新完成。
在 /usr/share 目录中还可以看到 kernel 和 uboot 目录,分别存放了 boot.img,uboot.img 和 trust.img 。
注意事项
在制作 deb 包中,与
DEBIAN同级的目录视为根目录,即放在与DEBIAN同目录下的文件,在客户端安装 deb 包后,可以在客户端的根目录下找到deb 包中的文件和脚本,用户要根据自己的实际情况做调整
每次在仓库中修改了配置文件后,都要重新导入仓库目录树
nginx 服务器配置中,
root参数配置的是仓库的地址,请用户根据自己的实际情况修改客户端添加的新下载源的文件时,注意核对正确的服务器地址,包仓库代码名和组件名。注意客户端要连通服务器
客户端要用
apt-key add命令添加 GPG 密匙之后,才可以获取本地的仓库的信息