
ROCKCHIP
Large Language Model
1.RKLLM Introduction
The RKLLM SDK helps users quickly deploy large language models onto GS1-N2. SDK Download
1.1 RKLLM-Toolkit Functions Introduction
The RKLLM-Toolkit is a development suite designed for users to perform quantization and conversion of large language models on their computers. Through the Python interface provided by this tool, users can conveniently achieve the following functions:
Model Conversion: Supports converting large language models in Hugging Face format to RKLLM models. The converted RKLLM models can be loaded and used on the Rockchip NPU platform.
Quantization: Supports quantizing floating-point models to fixed-point models. Currently supported quantization types include w4a16 and w8a8.
1.2 RKLLM Runtime Functions Introduction
The RKLLM Runtime is primarily responsible for loading RKLLM models converted using the RKLLM-Toolkit and performing inference on the Rockchip NPU by invoking the NPU driver on the GS1-N2 board. During the inference of RKLLM models, users can customize the inference parameters, define various text generation methods, and continuously receive inference results through predefined callback functions.
2.RKLLM-Toolkit Installation
The RKLLM-Toolkit is currently only available for Linux PC, with Ubuntu 20.04(x64) recommended. Since multiple versions of Python environments might be present on the system, it is advisable to use miniforge3 to manage Python environments.
# Check if miniforge3 and conda are installed, and if they are, you can skip this section.
conda -V
# Download the miniforge3 installer package.
wget -c https://mirrors.bfsu.edu.cn/github-release/conda-forge/miniforge/LatestRelease/Miniforge3-Linux-x86_64.sh
# Install miniforge3
chmod 777 Miniforge3-Linux-x86_64.sh
bash Miniforge3-Linux-x86_64.sh
# Activate the Conda base environment. The installation directory for miniforge3 will be the default location for Conda.
source ~/miniforge3/bin/activate
# Create a Conda environment named RKLLM-Toolkit with Python 3.8 (recommended version).
conda create -n RKLLM-Toolkit python=3.8
# Enter RKLLM-Toolkit Conda environment
conda activate RKLLM-Toolkit
# Install RKLLM-Toolkit,such as rkllm_toolkit-1.1.4-cp38-cp38-linux_x86_64.whl
pip3 install rkllm-toolkit/rkllm_toolkit-1.1.4-cp38-cp38-linux_x86_64.whl
If the following command executes without errors, the installation was successful:
python
from rkllm.api import RKLLM
3.Large Language Model Deployment Example
The large language models supported by RKLLM are as follows:
| Model | Huggingface Link |
|---|---|
| DeepSeek-R1-Distill | LINK |
| LLAMA | LINK |
| TinyLLAMA | LINK |
| Qwen | LINK |
| Phi | LINK |
| ChatGLM3-6B | LINK |
| Gemma | LINK |
| InternLM2 | LINK |
| MiniCPM | LINK |
| TeleChat | LINK |
| Qwen2-VL | LINK |
| MiniCPM-V | LINK |
3.1 Large Language Model Conversion And Execution Demo
Below is an example demonstrating how to convert, quantize, export a large language model, and finally deploy and run it on the board, using the DeepSeek-R1-Distill-Qwen-1.5B_Demo provided by the RKLLM SDK.
3.1.1 Convert The Model On The PC
Using DeepSeek-R1-Distill-Qwen-1.5B as an example, click the table link and find the corresponding repository to clone the complete repository.
With RKLLM-Toolkit properly installed, activate the Conda base environment and execute generate_data_quant.py. This will generation results as the quantization calibration data.
# Note that you need to set the path to the repository that you cloned.
cd export
python3 generate_data_quant.py -m ~/DeepSeek-R1-Distill-Qwen-1.5B
Modify export_rkllm.py according to the actual situation. Execute export_rkllm.py.You can get the rkllm model.
modelpath = '/rkllm/rkllm_model/DeepSeek-R1-Distill-Qwen-1.5B'
# For RK3576, Quantization type is W4A16,and it is a dual-core NPU.Then no change is required for RK3588.
target_platform = "RK3576"
quantized_dtype = "W4A16"
num_npu_core = 2
(RKLLM-Toolkit-1.1.4) root@ea5d57ca8e66:/rkllm/rknn-llm/examples/DeepSeek-R1-Distill-Qwen-1.5B_Demo/export# python3 export_rkllm.py
INFO: rkllm-toolkit version: 1.1.4
WARNING: Cuda device not available! switch to cpu device!
The argument `trust_remote_code` is to be used with Auto classes. It has no effect here and is ignored.
Downloading data files: 100%|███████████████████████████████████████████████████████████████████████████████████████████████████████████████████████████████████████████████████████| 1/1 [00:00<00:00, 15307.68it/s]
Extracting data files: 100%|█████████████████████████████████████████████████████████████████████████████████████████████████████████████████████████████████████████████████████████| 1/1 [00:00<00:00, 2377.72it/s]
Generating train split: 21 examples [00:00, 3327.05 examples/s]
Optimizing model: 100%|██████████████████████████████████████████████████████████████████████████████████████████████████████████████████████████████████████████████████████████████| 28/28 [21:16<00:00, 45.59s/it]
Building model: 100%|██████████████████████████████████████████████████████████████████████████████████████████████████████████████████████████████████████████████████████████████| 399/399 [00:07<00:00, 52.78it/s]
WARNING: The bos token has two ids: 151646 and 151643, please ensure that the bos token ids in config.json and tokenizer_config.json are consistent!
INFO: The token_id of bos is set to 151646
INFO: The token_id of eos is set to 151643
INFO: The token_id of pad is set to 151643
Converting model: 100%|███████████████████████████████████████████████████████████████████████████████████████████████████████████████████████████████████████████████████████| 339/339 [00:00<00:00, 2494507.12it/s]
INFO: Exporting the model, please wait ....
[=================================================>] 597/597 (100%)
INFO: Model has been saved to ./DeepSeek-R1-Distill-Qwen-1.5B_W8A8_RK3588.rkllm!
3.1.2 Deploy And Run The RKLLM Model On GS1-N2.
3.1.2.1 Kernel Requirements
Before performing model inference with RKLLM Runtime, you must first verify that the NPU kernel on the board is version v0.9.8 or higher.
root@firefly:/# cat /sys/kernel/debug/rknpu/version
RKNPU driver: v0.9.8
If the NPU kernel version is lower than v0.9.8, please go to the official firmware address to download the latest firmware
3.1.2.2 Compilation Requirements for RKLLM Runtime
When using RKLLM Runtime, pay attention to the version of the GCC cross-compilation toolchain. It is recommended to use cross-compilation toolchain gcc-arm-10.2-2020.11-x86_64-aarch64-none-linux-gnu
cd deploy
# Modify build-linux.sh
GCC_COMPILER_PATH=~/gcc-arm-10.2-2020.11-x86_64-aarch64-none-linux-gnu/bin/aarch64-none-linux-gnu
# Add executable permissions
chmod +x ./build-linux.sh
# Compilation
./build-linux.sh
3.1.2.3 Running Inference On GS1-N2
After compiling, generate the executable program install/demo_Linux_aarch64/llm_demo. Transfer the compiled llm_demo executable and the library file rkllm-runtime/runtime/Linux/librkllm_api/aarch64/librkllmrt.so and fixed frequency script rknn-llm/scripts/fix_freq_rk3588.sh to the board using scp command.
firefly@firefly:~$ ./fix_freq_rk3588.sh
firefly@firefly:~$ export LD_LIBRARY_PATH=./lib
firefly@firefly:~$ taskset f0 ./llm_demo ./DeepSeek-R1-Distill-Qwen-1.5B_W8A8_RK3588.rkllm 2048 4096
rkllm init start
I rkllm: rkllm-runtime version: 1.1.4, rknpu driver version: 0.9.8, platform: RK3588

rkllm init success

**********************可输入以下问题对应序号获取回答/或自定义输入********************

[0] 现有一笼子,里面有鸡和兔子若干只,数一数,共有头14个,腿38条,求鸡和兔子各有多少只?
[1] 有28位小朋友排成一行,从左边开始数第10位是学豆,从右边开始数他是第几位?

*************************************************************************

user: who are you?
robot: <think>

</think>

Greetings! I'm DeepSeek-R1, an artificial intelligence assistant created by DeepSeek. I'm at your service and would be delighted to assist you with any inquiries or tasks you may have.

user:
4.Others
For more demo and api usage, refer to RKLLM SDK routines and documentation
5.FAQs
Q1: Failed to convert model?
A1: Check the available RAM on your PC.Models with larger parameter sizes require more memory for conversion or execution. You might consider increasing the swapfile size or using a PC with more memory.
Artificial Intelligence Algorithm Deployment
GS1-N2 supports the deployment of a range of mainstream artificial intelligence algorithms, including but not limited to the following categories of algorithms:
| sample | category |
|---|---|
| LPRNet | License Plate Recognition |
| PPOCR | OCR |
| RetinaFace | Face detection |
| clip | MultiModal Object Detection |
| deeplabv3 | Semantic segmentation |
| lite_transformer | Lite NLP |
| mobilenet | Image classification |
| ppseg | Instance segmentation |
| ppyoloe | Object Detection |
| resnet | Image classification |
| whisper | Speech Recognition |
| YAMNet | Audio classification |
| yolo_world | Object Detection |
| yolov10 | Object Detection |
| yolov5 | Object Detection |
| yolov5_seg | Instance segmentation |
| yolov6 | Object Detection |
| yolov7 | Object Detection |
| yolov8 | Object Detection |
| yolov8_obb | Rotating Frame Object Detection |
| yolov8_pose | Keypoint detection |
| yolov8_seg | Instance segmentation |
| yolox | Object Detection |
In addition to the above artificial intelligence algorithms,see rknn_model_zoo for more examples.GS1-N2 also supports large language models. For information on deploying large language models, please refer to the Large Language Model section.
1.1 NPU Usage
GS1-N2 comes with a built-in NPU module,offering processing performance of up to 6 TOPS.To use this NPU,you need to download the RKNN SDK.The RKNN SDK provides C++/Python programming interfaces, which help users deploy RKNN models exported by RKNN-Toolkit2,accelerating the deployment of AI applications. The overall development steps for RKNN are divided into three main parts: model conversion, model evaluation, board-side deployment and execution.
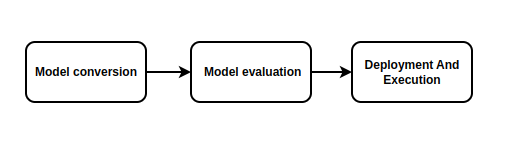
Model Conversion:Supports converting models from
Caffe、TensorFlow、TensorFlow Lite、ONNX、DarkNet、PyTorchetc.,to RKNN models.It also supports importing and exporting RKNN models, which can be used on the Rockchip NPU platform.Model Evaluation:The model evaluation phase helps users quantify and analyze model performance, including key metrics such as accuracy, on-board inference performance, and memory usage.
Board-Side Deployment and Execution:Involves loading the RKNN model onto the RKNPU platform, and performing model preprocessing, inference, post-processing, and release.
1.2 RKNN-Toolkit2
RKNN-Toolkit2 RKNN-Toolkit2 is a development suite provided for model conversion, inference, and performance evaluation on PC and Rockchip NPU platforms. Users can conveniently perform various operations using the Python interface provided by this tool.Note:The RKNN-Toolkit2 development suite runs on the PC x86_64 platform and should not be installed on the GS1-N2 board.
1.2.1 RKNN-Toolkit2 Installation
The RKNN SDK offers two installation methods for RKNN-Toolkit2: via Docker and via pip. Users can choose either method for installation. Here is an example using pip on PC Ubuntu20.04(x64).Since there may be multiple versions of Python environments on the system, it is recommended to use miniforge3 to manage the Python environment.
# Check if miniforge3 and conda are installed. If already installed, this step can be skipped.
conda -V
# Download the miniforge3 installation package
wget -c https://mirrors.bfsu.edu.cn/github-release/conda-forge/miniforge/LatestRelease/Miniforge3-Linux-x86_64.sh
# Install miniforge3
chmod 777 Miniforge3-Linux-x86_64.sh
bash Miniforge3-Linux-x86_64.sh
# Enter the Conda base environment; miniforge3 is the installation directory
source ~/miniforge3/bin/activate
# Create a Conda environment named RKNN-Toolkit2 with Python 3.8 (recommended version)
conda create -n RKNN-Toolkit2 python=3.8
# Enter the RKNN-Toolkit2 Conda environment
conda activate RKNN-Toolkit2
# Install dependency libraries
pip3 install -r rknn-toolkit2/packages/requirements_cp38-2.0.0b0.txt
# Install RKNN-Toolkit2, for example:
pip3 install rknn-toolkit2/packages/rknn_toolkit2-2.0.0b0+9bab5682-cp38-cp38-linux_x86_64.whl
If no errors are reported when executing the following command, the installation is successful.
python
from rknn.api import RKNN
If installation fails or if other installation methods are needed, please refer to the RKNN SDK documentation.
1.2.2 Model Conversion Demo
In the rknn-toolkit2/examples directory, there are various function demos. Here, we will run a model conversion demo as an example. This demo shows the process of converting a yolov5 onnx model to an RKNN model on a PC, then exporting and inferring on a simulator. For the specific implementation of model conversion, refer to the demo’s source code and the RKNN SDK documentation.
root@9893c1c48f42:/rknn-toolkit2/examples/onnx/yolov5# python3 test.py
I rknn-toolkit2 version: 2.0.0b0+9bab5682
--> Config model
done
--> Loading model
I It is recommended onnx opset 19, but your onnx model opset is 12!
I Model converted from pytorch, 'opset_version' should be set 19 in torch.onnx.export for successful convert!
I Loading : 100%|██████████████████████████████████████████████| 125/125 [00:00<00:00, 22152.70it/s]
done
--> Building model
I GraphPreparing : 100%|███████████████████████████████████████| 149/149 [00:00<00:00, 10094.68it/s]
I Quantizating : 100%|███████████████████████████████████████████| 149/149 [00:00<00:00, 428.06it/s]
W build: The default input dtype of 'images' is changed from 'float32' to 'int8' in rknn model for performance!
                       Please take care of this change when deploy rknn model with Runtime API!
W build: The default output dtype of 'output' is changed from 'float32' to 'int8' in rknn model for performance!
                      Please take care of this change when deploy rknn model with Runtime API!
W build: The default output dtype of '283' is changed from 'float32' to 'int8' in rknn model for performance!
                      Please take care of this change when deploy rknn model with Runtime API!
W build: The default output dtype of '285' is changed from 'float32' to 'int8' in rknn model for performance!
                      Please take care of this change when deploy rknn model with Runtime API!
I rknn building ...
I rknn buiding done.
done
--> Export rknn model
done
--> Init runtime environment
I Target is None, use simulator!
done
--> Running model
I GraphPreparing : 100%|███████████████████████████████████████| 153/153 [00:00<00:00, 10289.55it/s]
I SessionPreparing : 100%|██████████████████████████████████████| 153/153 [00:00<00:00, 1926.55it/s]
done
   class        score      xmin, ymin, xmax, ymax
--------------------------------------------------
   person       0.884     [ 208,  244,  286,  506]
   person       0.868     [ 478,  236,  559,  528]
   person       0.825     [ 110,  238,  230,  533]
   person       0.334     [  79,  353,  122,  517]
    bus         0.705     [  92,  128,  554,  467]
Save results to result.jpg!
If the rknn-toolkit2 is missing a model demo you need, you can refer to the rknn_model_zoo repository for Python examples.
1.3 RKNPU2 Usage
RKNPU2 provides C/C++ programming interfaces for model inference on the board-side Rockchip NPU platform.
1.3.1 Environment Installation
If the RKNPU2 Runtime library file librknnrt.so is missing or needs updating on the board, for Linux systems, you can push rknpu2/runtime/Linux/librknn_api/aarch64/librknnrt.so to the /usr/lib directory using scp.
1.3.2 Board-Side Inference
The RKNN SDK directory rknpu2/examples provides many model inference demos. Users can refer to these examples to develop and deploy their own AI applications.The rknn_model_zoo repository also provides C/C++ examples.
1.4 RKNN-Toolkit Lite2 Introduction
RKNN-Toolkit Lite2 provides a Python interface for board-side model inference, making it convenient for users to develop AI applications using Python. Note: RKNN-Toolkit Lite2 is installed and run on the board-side, and it is used only for inference; it does not support model conversion.
1.4.1 RKNN-Toolkit Lite2 Installation
# Install python3/pip3
sudo apt-get update
sudo apt-get install -y python3 python3-dev python3-pip gcc python3-opencv python3-numpy
# Install RKNN-Toolkit Lite2; find the installation package in rknn-toolkit-lite2/packages and install the corresponding version according to the system python version
pip3 install rknn_toolkit_lite2-2.0.0b0-cp310-cp310-linux_aarch64.whl
1.4.2 RKNN-Toolkit Lite2 Usage
In the RKNN SDK/rknn-toolkit-lite2/examples directory, there are applications developed based on RKNN-Toolkit Lite2. Although the number of provided examples is limited, in practice, the interfaces of RKNN-Toolkit Lite2 and RKNN-Toolkit2 are quite similar. Users can refer to the RKNN-Toolkit2 examples for porting to RKNN-Toolkit Lite2.
1.5 Detailed Development Documentation
For detailed usage of NPU and Toolkit, please refer to the doc documentation under RKNN SDK.
1.6 FAQs
Q1:Why is there a decrease in inference accuracy of the rknn model compared to the original model?
A1:Please refer to the accuracy troubleshooting section in the document《Rockchip_RKNPU_User_Guide_RKNN_SDK*》 to step-by-step identify the cause.
Q2:It prompts that the ‘expand’ is not supported
A2:Try to update RKNN-Toolkit2/RKNPU2 to the latest version or modify the model and use ‘Repeat’ instead of ‘Expand’.
For more conversion issues or error causes, please refer to the Trouble Shooting section in the document《Rockchip_RKNPU_User_Guide_RKNN_SDK*》