2. RKNN Toolkit
Rockchip provides RKNN-Toolkit Development Suite for model transformation, reasoning and performance evaluation.
Users can easily complete the following functions through the provided Python interface:
1)Model transformation: Support Caffe, Tensorflow, TensorFlow Lite, ONNX, Darknet model, support RKNN model import and export, follow-up can be loaded on the hardware platform.
2)Model reasoning: It can simulate the running model on PC and obtain the reasoning results. It can also run the model on RK3399Pro Linux and get the reasoning results.
3)Performance evaluation: It can simulate the running of the model on PC and obtain the time-consuming information of each layer. It can also run the model on the specified hardware platform RK3399Pro Linux through online debugging, and obtain the total running time of the model on hardware and the time-consuming information of each layer.
RKNN Tookit only supports Linux system and can be used on 3399pro development board or PC.
2.1. Program installation
2.1.1. Install in PC
The RKNN Toolkit can be downloaded from this link: https://github.com/rockchip-linux/rknn-toolkit Please see the instructions in the doc/ directory for the installation method.
2.1.2. Mounting on the board
Because the board is limited by storage space and CPU performance, and the installation process of RKNN Toolkit is very difficult, it is recommended to install RKNN Toolkit Lite on the board, which is only responsible for the inference part.
2.2. API call process
2.2.1. Model trasformation
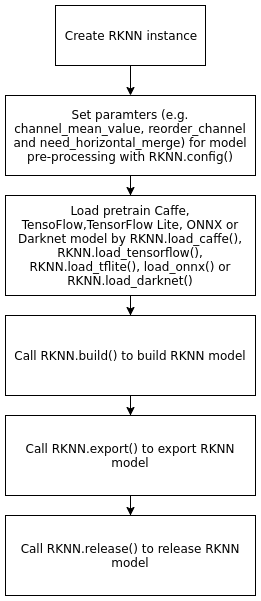
Examples of model transformation are given below, referring in detail to examples in RKNN Tookit.
from rknn.api import RKNN

INPUT_SIZE = 64

if __name__ == '__main__':
    # Create RKNN execution objects
    rknn = RKNN()
    # Configure model input for NPU preprocessing of data input
    # channel_mean_value='0 0 0 255',In model reasoning, RGB data will be transformed as follows
    # (R - 0)/255, (G - 0)/255, (B - 0)/255。When reasoning, RKNN model will automatically do mean and normalization processing
    # reorder_channel=’0 1 2’ Used to specify whether to adjust the image channel order, set to 0 1 2, that is, do not adjust according to the order of the input image channel.
    # reorder_channel=’2 1 0’ Represents switching channels 0 and 2, and if the input is RGB, it will be adjusted to BGR. If it is BGR, it will be adjusted to RGB.
    #The order of image channels is not adjusted
    rknn.config(channel_mean_value='0 0 0 255', reorder_channel='0 1 2')

    # Loading TensorFlow Model
    # tf_pb='digital_gesture.pb' Specify the TensorFlow model to be converted
    # Inputs specify input nodes in the model
    # Outputs specify the output node in the model
    # Input_size_list specifies the size of model input
    print('--> Loading model')
    rknn.load_tensorflow(tf_pb='digital_gesture.pb',
                         inputs=['input_x'],
                         outputs=['probability'],
                         input_size_list=[[INPUT_SIZE, INPUT_SIZE, 3]])
    print('done')

    # Creating Analytical Pb Model
    # do_quantization=False Specify not to quantify
    # Quantization reduces the size of the model and improves the speed of computation, but it loses accuracy.
    print('--> Building model')
    rknn.build(do_quantization=False)
    print('done')

    # Export and save RkNN model file
    rknn.export_rknn('./digital_gesture.rknn')

    # Release RKNN Context
    rknn.release()
2.2.2. Model reasoning
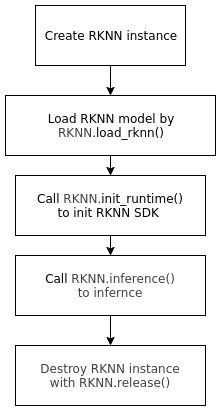
Examples of using model reasoning are as follows. Refer to example in RKNN Tookit for details.
import numpy as np
from PIL import Image
from rknn.api import RKNN
# Analytical model output to obtain the most probabilistic gestures and corresponding probabilities
def get_predict(probability):
    data = probability[0][0]
    data = data.tolist()
    max_prob = max(data)

    return data.index(max_prob), max_prob
def load_model():
    # Create RKNN objects
    rknn = RKNN()
    # Loading RKNN model
    print('-->loading model')
    rknn.load_rknn('./digital_gesture.rknn')
    print('loading model done')
    # Initialize RKNN Running Environment
    print('--> Init runtime environment')
    ret = rknn.init_runtime(target='rk3399pro')
    if ret != 0:
       print('Init runtime environment failed')
       exit(ret)
    print('done')
    return rknn
def predict(rknn):
    im = Image.open("../picture/6_7.jpg")   # Loading image
    im = im.resize((64, 64),Image.ANTIALIAS)  # Image zooming to 64x64
    mat = np.asarray(im.convert('RGB'))    # Converting to RGB format
    outputs = rknn.inference(inputs=[mat])   # Running reasoning to get reasoning results
    pred, prob = get_predict(outputs)     # Converting Reasoning Results into Visual Information
    print(prob)
    print(pred)

if __name__=="__main__":
    rknn = load_model()
    predict(rknn)

    rknn.release()
2.3. API
For a detailed API, please refer to the Usage Guide document in RKNN-Toolkit:《RKNN-Toolkit User Guide_V*.pdf》。