Amazon Alexa
参考固件
Amazon授权
使用 Alexa Voice Service,首先你需要注册一个Amazon账号,向 Amazon 注册你的产品,并对你的 alexa client 进行授权。
第一步,按照官方指导,仔细的按照步骤,注册你的产品,并创建安全配置文件。
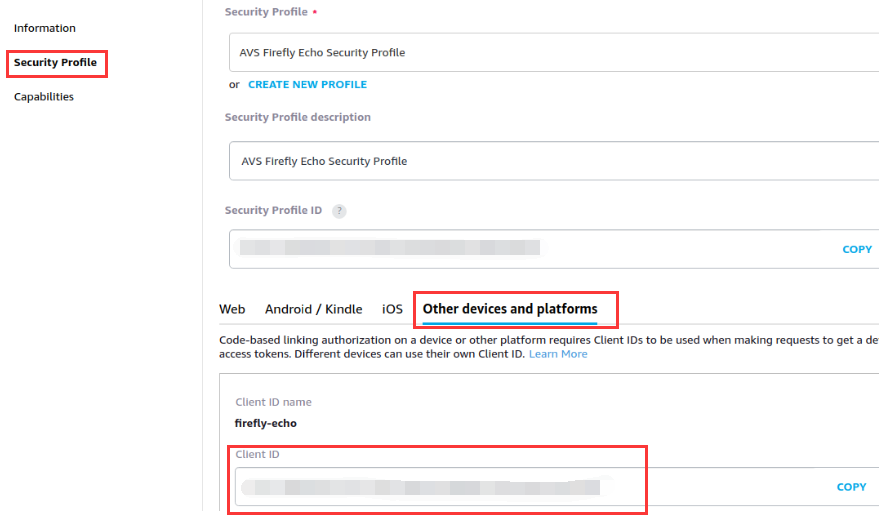
第二步,得到你的 Client ID 和 Product ID
获取 Product ID:

获取 Client ID:
使用流程
注意:Alexa Voice Service 不支持中文。
● 上电开机,如果没有配置网络,先进行配网。
● 将上面获得的Client ID 和 Product ID填入 /oem/AlexaClientSDKConfig.json的deviceInfo属性:
"deviceInfo":{
    // Unique device serial number. e.g. 123456
    "deviceSerialNumber":"123456",
    // The Client ID of the Product from developer.amazon.com
    "clientId":"YOUR_CLIENT_ID",
    // Product ID from developer.amazon.com
    "productId":"YOUR_PRODUCT_ID"
},
● 执行下面命令启动 Alexa
SampleApp /oem/AlexaClientSDKConfig.json /oem/resources/
● 第一次启动需要进行认证授权,按提示打开对应网页,输入验证码进行认证即可
##################################
#       NOT YET AUTHORIZED       #
##################################

################################################################################################
#       To authorize, browse to: 'https://amazon.com/us/code' and enter the code: AT4HLU       #
################################################################################################

#################################################
#       Checking for authorization (1)...       #
#################################################
● 认证过程中,稍等几分钟后,就可以与 Alexa 进行对话,可通过呼叫“alexa”唤醒,不过大部分交互体验都要通过命令行引导。
+----------------------------------------------------------------------------+
|                                  Options:                                  |
| Wake word:                                                                 |
|       Simply say Alexa and begin your query.                               |
| Tap to talk:                                                               |
|       Press 't' and Enter followed by your query (no need for the 'Alexa').|
| Hold to talk:                                                              |
|       Press 'h' followed by Enter to simulate holding a button.            |
|       Then say your query (no need for the 'Alexa').                       |
|       Press 'h' followed by Enter to simulate releasing a button.          |
| Stop an interaction:                                                       |
|       Press 's' and Enter to stop an ongoing interaction.                  |
| Privacy mode (microphone off):                                             |
|       Press 'm' and Enter to turn on and off the microphone.               |
| Echo Spatial Perception (ESP): This is for testing purpose only!           |
|       Press 'e' followed by Enter at any time to adjust ESP settings.      |
| Playback Controls:                                                         |
|       Press '1' for a 'PLAY' button press.                                 |
|       Press '2' for a 'PAUSE' button press.                                |
|       Press '3' for a 'NEXT' button press.                                 |
|       Press '4' for a 'PREVIOUS' button press.                             |
| Settings:                                                                  |
|       Press 'c' followed by Enter at any time to see the settings screen.  |
| Speaker Control:                                                           |
|       Press 'p' followed by Enter at any time to adjust speaker settings.  |
| Firmware Version:                                                          |
|       Press 'f' followed by Enter at any time to report a different        |
|       firmware version.                                                    |
| Info:                                                                      |
|       Press 'i' followed by Enter at any time to see the help screen.      |
| Reset device:                                                              |
|       Press 'k' followed by Enter at any time to reset your device. This   |
|       will erase any data stored in the device and you will have to        |
|       re-register your device.                                             |
|       This option will also exit the application.                          |
| Reauthorize device:                                                        |
|       Press 'z' followed by Enter at any time to re-authorize your device. |
|       This will erase any data stored in the device and initiate           |
|       re-authorization.                                                    |
| Quit:                                                                      |
|       Press 'q' followed by Enter at any time to quit the application.     |
+----------------------------------------------------------------------------+
资源
Alexa 源码目录:
SDK/external/alexaClientSDK/
Buildroot 的 Alexa package 目录:
SDK/buildroot/package/rockchip/alexaClientSDK/
Alexa 没有自启动入口,需要进入系统后自己手动启动Alexa,方法如上一节。如果需要自启动,则可以参考DuerOS。
编译方法
● 编译之前,亦可将上面获得的Client ID 和 Product ID填入SDK/device/rockchip/rk3308/alexa/AlexaClientSDKConfig.json的deviceInfo属性,这样固件就默认的带有了Client ID 和 Product ID信息。
"deviceInfo":{
    // Unique device serial number. e.g. 123456
    "deviceSerialNumber":"123456",
    // The Client ID of the Product from developer.amazon.com
    "clientId":"YOUR_CLIENT_ID",
    // Product ID from developer.amazon.com
    "productId":"YOUR_PRODUCT_ID"
},
● 甚至可以从已经认证过的设备中,拷贝/oem/application-necessities/cblAuthDelegate.db到SDK中device/rockchip/rk3308/alexa/application-necessities/cblAuthDelegate.db,这样Alexa就会跳过认证,直接开始对话。
● 编辑 device/rockchip/rk3308/BoardConfig.mk 文件,将 OEM_PATH=oem 修改为 OEM_PATH=alexa,保存退出
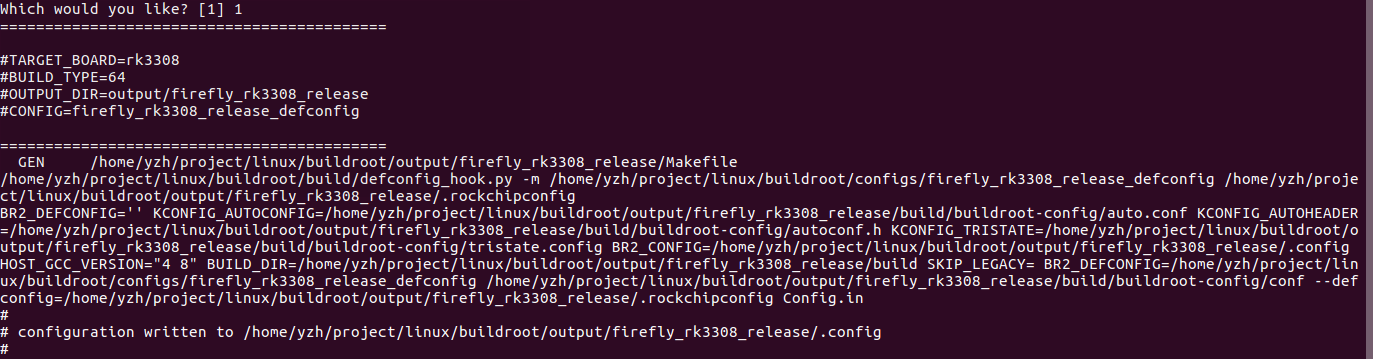
● 配置 firefly_rk3308_release
source buildroot/build/envsetup.sh
选择[1],按回车,配置成功后如下
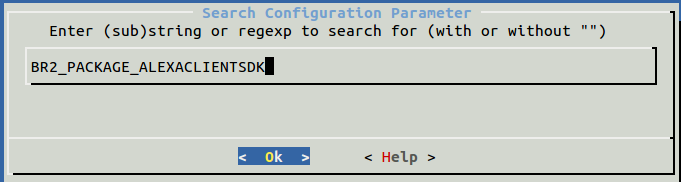
● Buildroot配置:BR2_PACKAGE_ALEXACLIENTSDK
make menuconfig
进入图形选择界面,输入 /,跳出搜索界面如下,输入BR2_PACKAGE_ALEXACLIENTSDK,按回车进行搜索

选择[1],然后按空格选择上 alexa client sdk
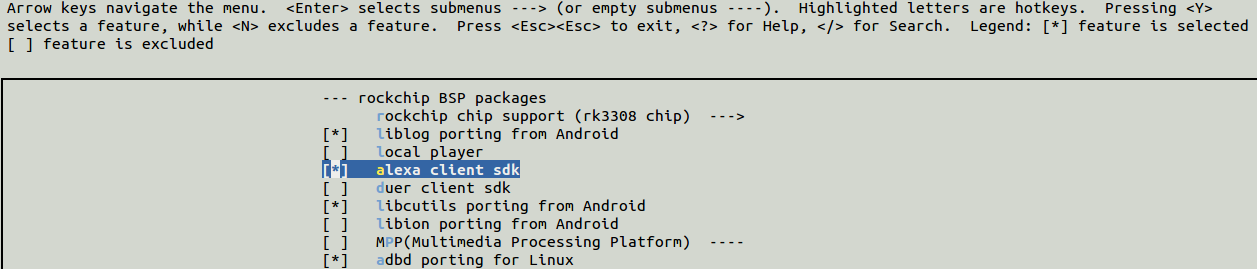
前面有 [ * ] 号,表示已经选上,然后< Save >保存,并< Exit >退出图形界面,输入配置保存命令:
make savedefconfig
保存配置,不保存的话,会在一键编译脚本中被重置
● 在编译前,如果当前仓库不是第一次编译,需要执行:
make gst1-plugins-good-reconfigure && make gst1-plugins-good-rebuild
● 最后全部编译
./build.sh