
Serial Debug
If you’re doing serious U-Boot or kernel development, a USB serial adapter (short for the USB serial TTL bridge adapter) is very useful to check the system startup log, especially in case of no graphics desktop shows up.
Configuration Serial Debugging
Since the UART2 used for serial port debugging is multiplexed with the serial port used by Bluetooth, the officially released firmware cannot be debugged using the serial port. If you use the serial port debugging, Bluetooth will not work properly. You need to use the serial port debugging, please modify it as follows:
Linux Configuration Serial Debugging
Android7.1 modification method
Before configuring the serial port debugging, you first need to Compile Linux Firmware, and then modify the following.
Open the configuration file kernel/arch/arm64/boot/dts/rockchip/rk3328-roc-pc.dts
Related configuration nodes for serial port debugging:
fiq-debugger {
	status = "disabled";
};
...
&uart2 {
	dma-names = "tx", "rx";
	status = "okay";
};
Change into:
fiq-debugger {
	status = "okay";
};
...
&uart2 {
	dma-names = "tx", "rx";
	status = "disabled";
};
Compile the kernel and then upgrade the firmware.
Android10.0 modification method
Uboot modification:
diff --git a/u-boot/configs/rk3328_defconfig b/u-boot/configs/rk3328_defconfig
index 9e9b7544c1..ae66c2b36d 100644
--- a/u-boot/configs/rk3328_defconfig
+++ b/u-boot/configs/rk3328_defconfig
@@ -19,7 +19,6 @@ CONFIG_FIT=y
 CONFIG_FIT_VERBOSE=y
 CONFIG_SPL_LOAD_FIT=y
 CONFIG_BOOTDELAY=0
-CONFIG_DISABLE_CONSOLE=y
 CONFIG_SYS_CONSOLE_INFO_QUIET=y
 # CONFIG_DISPLAY_CPUINFO is not set
 CONFIG_ANDROID_BOOTLOADER=y
 cp rkbin/bin/rk33/rk3328_ddr_333MHz_v1.16_uart2_debug.bin rkbin/bin/rk33/rk3328_ddr_333MHz_v1.16.bin
 cd u-boot
 ./make.sh rk3328
Kernel modification:
diff --git a/kernel/arch/arm64/boot/dts/rockchip/roc-rk3328-pc.dtsi b/kernel/arch/arm64/boot/dts/rockchip/roc-rk3328-pc.dtsi
index af29607..d5b9a86 100644
--- a/kernel/arch/arm64/boot/dts/rockchip/roc-rk3328-pc.dtsi
+++ b/kernel/arch/arm64/boot/dts/rockchip/roc-rk3328-pc.dtsi
@@ -176,7 +176,7 @@

 #define UART2_BLUETOOTH 0
 #define UART2_DEBUG 1
-#define UART2_FUNCTION UART2_BLUETOOTH
+#define UART2_FUNCTION UART2_DEBUG
 cd kernel
 make ARCH=arm64 BOOT_IMG=../rockdev/Image-roc_rk3328_pc_32/boot.img roc-rk3328-pc.img -j24
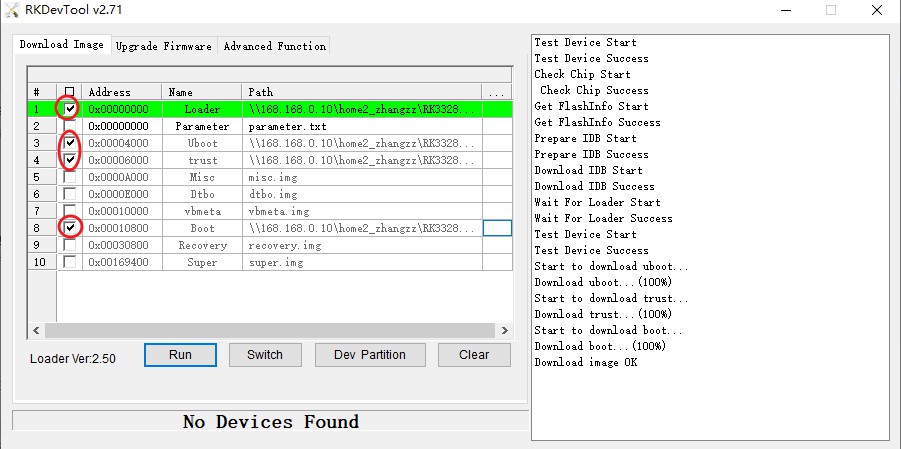
Finally, update rk3328_loader_v1.16.250.bin , uboot.img , trust.img from uboot directory and boot.img from kernel directory .
In addition, when debugging serial port output is configured, there will be a lot of Bluetooth printing
[  178.375793] init: Service 'vendor.bluetooth-1-0' (pid 5490) received signal 11
[  178.375865] init: Sending signal 9 to service 'vendor.bluetooth-1-0' (pid 5490) process group...
[  178.376177] libprocessgroup: Successfully killed process cgroup uid 1002 pid 5490 in 0ms
[  178.376448] init: updatable process 'vendor.bluetooth-1-0' exited 4 times in 4 minutes
[  178.376699] init: Init cannot set 'ro.init.updatable_crashing_process_name' to 'vendor.bluetooth-1-0': Read-only property was already set
[  178.376839] init: Init cannot set 'ro.init.updatable_crashing' to '1': Read-only property was already set
[  178.377832] binder: release 5490:5490 transaction 55248 in, still active
[  178.377853] binder: send failed reply for transaction 55248 to 5573:5612
[  178.950182] audit: audit_lost=511 audit_rate_limit=5 audit_backlog_limit=64
[  178.950212] audit: rate limit exceeded
[  180.540002] binder: undelivered death notification, 00000000d4b533c0
[  181.805281] audit: audit_lost=515 audit_rate_limit=5 audit_backlog_limit=64
[  181.805305] audit: rate limit exceeded
If you think the printing is too complicated, you can directly turn off the Bluetooth function, and then compile the Android upper layer Android Upper layer modification:
--- a/device/rockchip/common/BoardConfig.mk
+++ b/device/rockchip/common/BoardConfig.mk
@@ -402,8 +402,8 @@ BOARD_TEMPERATURE_SENSOR_SUPPORT ?= false
BOARD_USB_HOST_SUPPORT ?= false
BOARD_USB_ACCESSORY_SUPPORT ?= true
BOARD_CAMERA_SUPPORT ?= false
-BOARD_BLUETOOTH_SUPPORT ?= true
-BOARD_BLUETOOTH_LE_SUPPORT ?= true
+BOARD_BLUETOOTH_SUPPORT ?= false
+BOARD_BLUETOOTH_LE_SUPPORT ?= false
./FFTools/make.sh -a -j8
Finally update super.img
Android Configuration Serial Debugging
Before configuration the serial port debugging, you first need to Compile Android Firmware, and then modify the following.
Open the configuration file kernel/arch/arm64/boot/dts/rk3328-roc-pc-port.dtsi;
Related configuration nodes for serial port debugging:
fiq-debugger {
	status = "disabled";
};
...
&uart_dbg {
	status = "okay";
	dma-names = "tx","rx";
};
Change into:
fiq-debugger {
	status = "okay";
};
&uart_dbg {
	status =  "disabled";
	dma-names = "tx","rx";
}
Compile the kernel and then upgrade the firmware.
Choosing a USB Serial Adapter
ROC-RK3328-PC defaults to use 1,500,000 baud rate for its UART debug port, with TTL voltage.
Some adapters cannot support such high baud rate. So before purchase, make sure it meets the requirements and has the proper driver for your OS.
You can refer to the USB Serial Adapter with CP2104 chip in the Firefly Online Shop.
Connecting to the Debug Port
Three wires are required to connect the TX/RX/GND pins together:
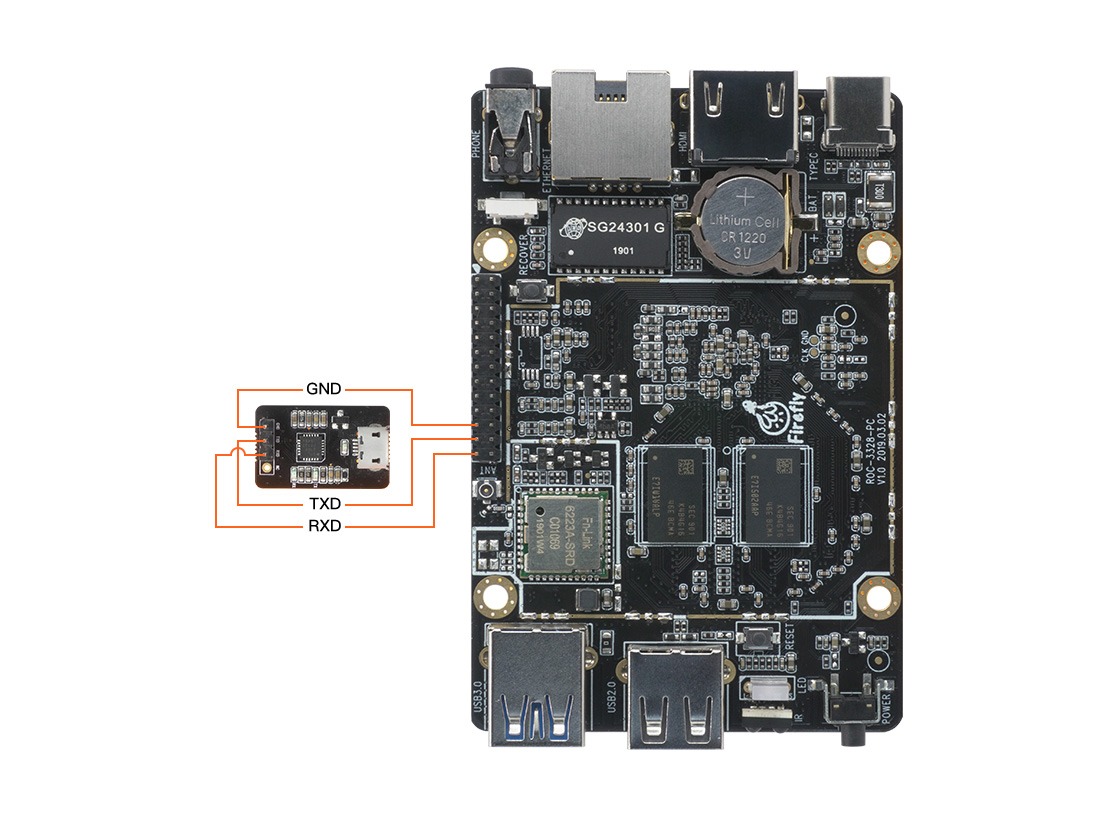
With some adapters, you may try to connect TX pin of the adapter to RX pin of the board, and RX pin of adapter to TX pin of the board, if you do not get the serial console working.
Serial Parameters
ROC-RK3328-PC uses the following serial parameters:
Baud rate: 1,500,000
Data bit: 8
Stop bit: 1
Parity check: none
Flow control: none
Next, depending on the OS you are using, we’ll guide you through the detailed steps.
Serial Debugging in Windows
Install Driver
Use the recommended driver from your USB serial adapter vendor. If not available, you can check the chipset and try the following drivers:
Tips: If PL2303 does not work under Win8, you can try to downgrade the driver to version 3.3.5.122 or before.
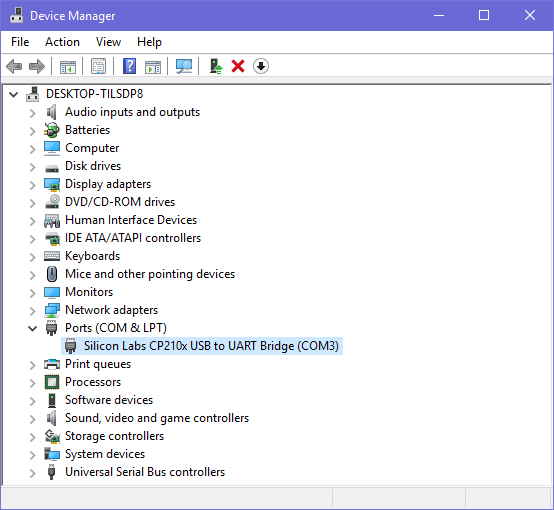
After installing the driver, connect the adapter to the USB port. The OS will prompt that a new hardware is detected. When it finishes, you can find the new COM port in the device manager.
Putty
There are many serial console utilities in Windows, such as putty and SecureCRT. Putty, a popular opensource software, is taken as an example here.
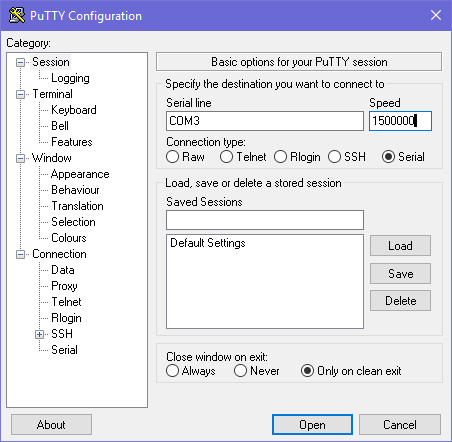
Download putty.zip, extract it and run PUTTY.exe.
Select “Connection type” to “Serial”.
Modify “Serial line” to the COM port found in the device manager.
Set “Speed” to 1500000.
Click “Open” button.
Serial Debugging in Linux
If the chipset of the USB serial adapter is supported by Linux kernel, the driver will be loaded automatically.
Connect the serial adapter, and check the corresponding serial device file by checking:
$ ls -l /dev/ttyUSB*
crw-rw---- 1 root uucp 188, 0 Apr 10 16:44 /dev/ttyUSB0
Add your Linux user to the uucp group, in order to have permission to access this device (or you may use sudo everytime):
sudo gpasswd -a $(whoami) uucp
The group change will take effect after logout/login Linux, or use the newgrp command to enter a shell with the new group:
newgrp uucp
Then proceed the following steps depending on your favor of picocom or minicom.
picocom
picocom is light weight, easy to use.
Install it with:
sudo apt-get install picocom
Start picocom:
$ picocom -b 1500000 /dev/ttyUSB0
picocom v3.1

port is        : /dev/ttyUSB0
flowcontrol    : none
baudrate is    : 1500000
parity is      : none
databits are   : 8
stopbits are   : 1
escape is      : C-a
local echo is  : no
noinit is      : no
noreset is     : no
hangup is      : no
nolock is      : no
send_cmd is    : sz -vv
receive_cmd is : rz -vv -E
imap is        :
omap is        :
emap is        : crcrlf,delbs,
logfile is     : none
initstring     : none
exit_after is  : not set
exit is        : no

Type [C-q] [C-h] to see available commands
Terminal ready
The messages above show that Ctrl-a is the escape key. Pressing Ctrl-a Ctrl-q will quit picocom and return to the shell.
minicom
Install minicom with:
sudo apt-get install minicom
Start minicom:
$ minicom
Welcome to minicom 2.7

OPTIONS: I18n
Compiled on Jan  1 2014, 17:13:19.
Port /dev/ttyUSB0, 15:57:00

Press CTRL-A Z for help on special keys
Based on the above tips, press Ctrl-a then z (not Ctrl-z) to bring up the Help menu.
+-------------------------------------------------------------------+
|                      Minicom Command Summary                      |
|                                                                   |
|              Commands can be called by CTRL-A <key>               |
|                                                                   |
|               Main Functions                  Other Functions     |
|                                                                   |
| Dialing directory..D  run script (Go)....G | Clear Screen.......C |
| Send files.........S  Receive files......R | cOnfigure Minicom..O |
| comm Parameters....P  Add linefeed.......A | Suspend minicom....J |
| Capture on/off.....L  Hangup.............H | eXit and reset.....X |
| send break.........F  initialize Modem...M | Quit with no reset.Q |
| Terminal settings..T  run Kermit.........K | Cursor key mode....I |
| lineWrap on/off....W  local Echo on/off..E | Help screen........Z |
| Paste file.........Y  Timestamp toggle...N | scroll Back........B |
| Add Carriage Ret...U                                              |
|                                                                   |
|             Select function or press Enter for none.              |
+-------------------------------------------------------------------+
Press O as prompted to enter setup screen:
           +-----[configuration]------+
           | Filenames and paths      |
           | File transfer protocols  |
           | Serial port setup        |
           | Modem and dialing        |
           | Screen and keyboard      |
           | Save setup as dfl        |
           | Save setup as..          |
           | Exit                     |
           +--------------------------+
Choose “Serial port setup”, then press the upper-case letter in front of the option to set to values as illustrated below:
   +-----------------------------------------------------------------------+
   | A -    Serial Device      : /dev/ttyUSB0                              |
   | B - Lockfile Location     : /var/lock                                 |
   | C -   Callin Program      :                                           |
   | D -  Callout Program      :                                           |
   | E -    Bps/Par/Bits       : 1500000 8N1                               |
   | F - Hardware Flow Control : No                                        |
   | G - Software Flow Control : No                                        |
   |                                                                       |
   |    Change which setting?                                              |
   +-----------------------------------------------------------------------+
Note:
Hardware Flow ControlandSoftware Flow Controlshould be set toNo.After finishing the setting, go back to the previous menu by pressing
ESC, and selectSave setup as dflto save as the default configuration.